Installing the Agent in a Third-Party Public Network Cluster
Scenarios
Install the agent on a third-party cluster that can access the public network. After the configuration is complete, HSS automatically installs the agent on existing cluster nodes, installs the agent on new nodes when the cluster is scaled out, and uninstalls the agent from removed nodes when the cluster is scaled in.
Notes and Constraints
- Supported cluster orchestration platforms: Kubernetes 1.19 or later
- Supported node OS: Linux
- Node specifications: at least 2 vCPUs, 4 GiB memory, 40 GiB system disk, and 100 GiB data disk
- The agent is incompatible with clusters of Galera 3.34, MySQL 5.6.51, or earlier versions.
Installation Process
Determine the agent installation process based on the connectivity between the cluster and the HSS server.
- Cluster can be connected to the HSS server
Figure 1 Installation process when the cluster can be connected to the HSS server

You need to perform the following operations to install the agent:
- Cluster cannot be connected to the HSS server
Figure 2 Installation process when the cluster cannot be connected to the HSS server

You need to perform the following operations to install the agent:
Step 1: Prepare the kubeconfig File
The kubeconfig file specifies the cluster permissions assigned to HSS. The kubeconfig file configured using method 1 contains the cluster administrator permissions, whereas the file generated using method 2 contains only the permissions required by HSS. If you want to minimize HSS permissions, prepare the file using method 2.
- Method 1: configuring the default kubeconfig file
- Perform the following operations to create a dedicated namespace for HSS:
- Log in to a cluster node.
- Create the hss.yaml file and copy the following content to the file:
1{"metadata":{"name":"hss"},"apiVersion":"v1","kind":"Namespace"}
- Run the following command to create a namespace:
kubectl apply -f hss.yaml
- Find and download the config file in the $HOME/.kube/config directory.
- Change the file name from config to config.yaml.
- Perform the following operations to create a dedicated namespace for HSS:
- Method 2: generating a kubeconfig file dedicated to HSS
- Create a dedicated namespace and an account for HSS.
- Log in to a cluster node.
- Create the hss-account.yaml file and copy the following content to the file:
1{"metadata":{"name":"hss"},"apiVersion":"v1","kind":"Namespace"}{"metadata":{"name":"hss-user","namespace":"hss"},"apiVersion":"v1","kind":"ServiceAccount"}{"metadata":{"name":"hss-user-token","namespace":"hss","annotations":{"kubernetes.io/service-account.name":"hss-user"}},"apiVersion":"v1","kind":"Secret","type":"kubernetes.io/service-account-token"}
- Run the following command to create a namespace and an account:
kubectl apply -f hss-account.yaml
- Generate the kubeconfig file.
- Create the gen_kubeconfig.sh file and copy the following content to the file:
 1
 2
 3
 4
 5
 6
 7
 8
 9
10
#!/bin/bash

KUBE_APISERVER=`kubectl config view  --output=jsonpath='{.clusters[].cluster.server}' | head -n1 `
CLUSTER_NAME=`kubectl config view -o jsonpath='{.clusters[0].name}'`
kubectl get secret hss-user-token -n hss -o yaml |grep ca.crt: | awk '{print $2}' |base64 -d >hss_ca_crt

kubectl config set-cluster ${CLUSTER_NAME} --server=${KUBE_APISERVER}  --certificate-authority=hss_ca_crt  --embed-certs=true --kubeconfig=hss_kubeconfig.yaml
kubectl config set-credentials hss-user --token=$(kubectl describe secret hss-user-token -n hss | awk '/token:/{print $2}') --kubeconfig=hss_kubeconfig.yaml
kubectl config set-context hss-user@kubernetes --cluster=${CLUSTER_NAME} --user=hss-user --kubeconfig=hss_kubeconfig.yaml
kubectl config use-context hss-user@kubernetes --kubeconfig=hss_kubeconfig.yaml
- Run the following command to generate the kubeconfig file named hss_kubeconfig.yaml:
bash gen_kubeconfig.sh
- Create the gen_kubeconfig.sh file and copy the following content to the file:
- Create a dedicated namespace and an account for HSS.
Step 2: Verify the Connection Between the Cluster and the HSS Server
- Log in to the HSS console.
- Click
 in the upper left corner and select a region or project.
 - In the navigation pane, choose .
- On the Cluster tab page, click Install Container Agent. The Container Asset Access and Installation page is displayed.
- Select Non-CCE cluster (Internet access) and click Configure Now.
- On a node of the cluster to be connected, copy and run the following ping command to test the connectivity between the cluster and the HSS server.
Figure 3 Copying the ping command
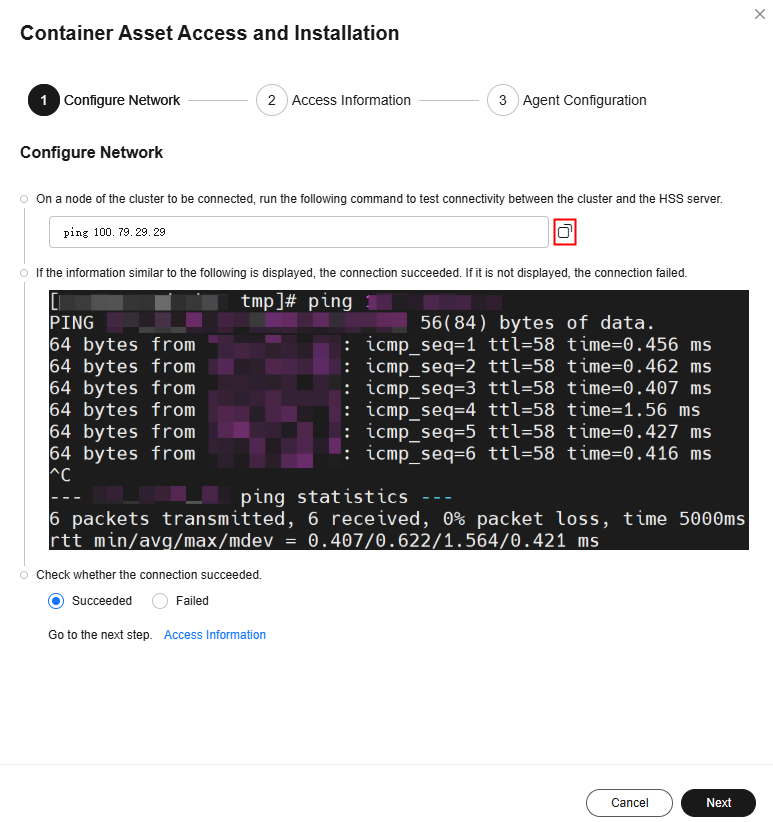
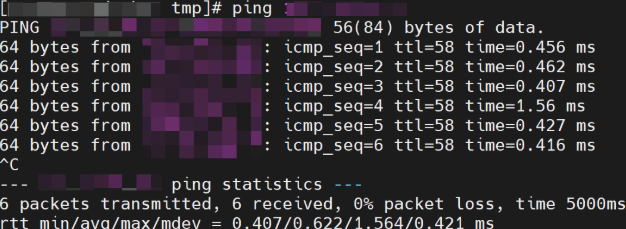
- If the information similar to Figure 4 is displayed, the connection succeeded. If it is not displayed, the connection failed.
- If the network connection is successful, click Next and go to Step 3: Configure Cluster Information and Install the Agent (Network Connected By Default).
- If the network connection fails, go to Step 4: Create a Connection Between the Cluster and the HSS Server.
Step 3: Configure Cluster Information and Install the Agent (Network Connected By Default)
- Configure cluster access information and click Generate Command. For more information, see Table 1.
Figure 5 Configuring cluster access information
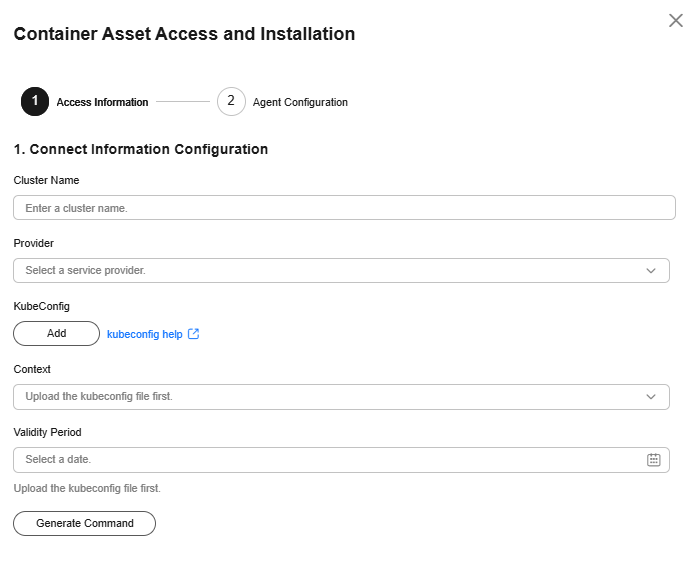
Table 1 Access parameters Parameter
Description
Cluster Name
Name of the cluster to be connected.
Provider
Service provider of the cluster. Currently, the clusters of the following service providers are supported:
- Alibaba Cloud
- Tencent Cloud
- AWS
- Azure
- User-built
- On-premises IDC
KubeConfig
Add and upload the kubeconfig.yaml or config.yaml file configured as required in Step 1: Prepare the kubeconfig File.
Context
After the kubeconfig file is uploaded, HSS automatically parses the context.
Validity Period
After the kubeconfig file is uploaded, HSS automatically parses the validity period. You can also specify a time before the final validity period. After the specified validity period expires, you need to connect to the asset again.
- Perform the following operations to install the cluster connection component (ANP-agent) and establish a connection between HSS and the cluster:
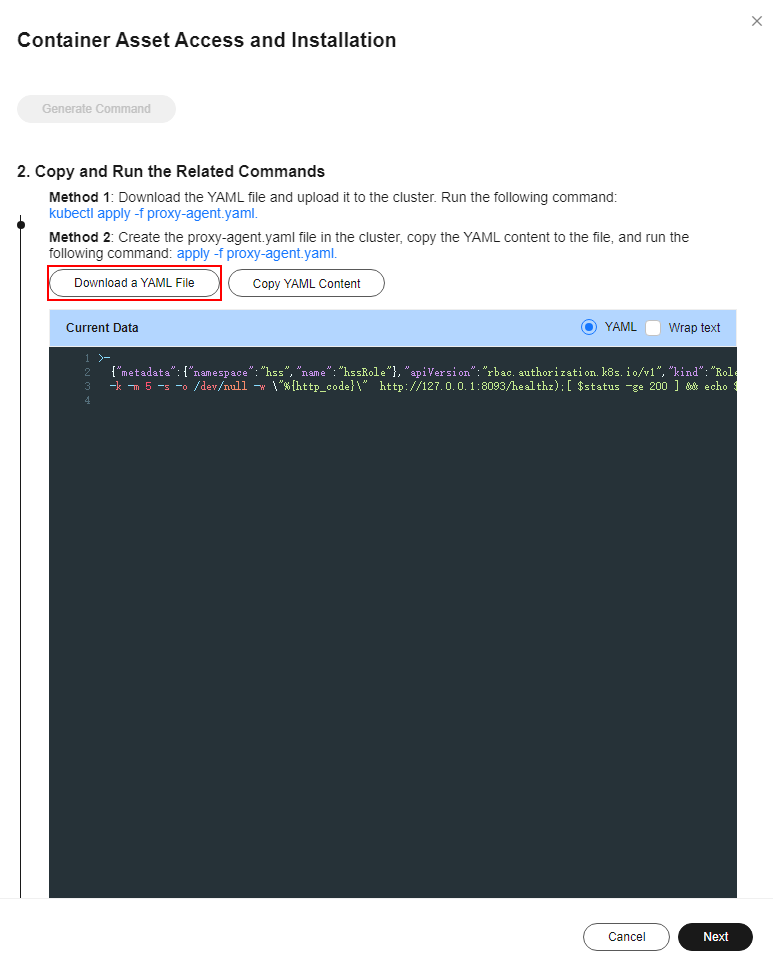
- In the Container Asset Access and Installation dialog box, click Download a YAML File.
Figure 6 Downloading the YAML file
- Run the following command to install the cluster connection component (ANP-Agent):
kubectl apply -f proxy-agent.yaml
- Run the following command to check whether the cluster connection component (ANP-agent) is successfully installed:
kubectl get pods -n hss | grep proxy-agent
If the command output shown in Figure 7 is displayed, the cluster connection component (ANP-agent) is successfully installed.
- Run the following command to check whether the cluster is connected to HSS:
for a in $(kubectl get pods -n hss| grep proxy-agent | cut -d ' ' -f1); do kubectl -n hss logs $a | grep 'Start serving';done
If the command output shown in Figure 8 is displayed, the cluster is connected to HSS.
- In the Container Asset Access and Installation dialog box, click Download a YAML File.
- In the Container Asset Access and Installation dialog box, click Next.
- Configure agent parameters. For more information, see Table 2.
Table 2 Agent parameters Parameter
Description
Configuration Rules
Select an agent configuration rule.
- Default Rule: Select this if the sock address of container runtime is a common address. The agent will be installed on nodes having no taints.
- Custom: Select this rule if the sock address of your container runtime is not a common address or needs to be modified, or if you only want to install the agent on specific nodes.
NOTE:- If the sock address of your container runtime is incorrect, some HSS functions may be unavailable after the cluster is connected to HSS.
- You are advised to select all runtime types.
(Optional) Advanced Configuration
This parameter can be set if Custom is selected for Configuration Rules.
Click
 to expand advanced configurations. The Enabling auto upgrade agent option is selected by default.
- Enabling auto upgrade
Configure whether to enable automatic agent upgrade. If it is enabled, HSS automatically upgrades the agent to the latest version between 00:00 to 06:00 every day to provide you with better services.
- Node Selector Configuration
Set the Key and Value of tags of the nodes where the agent is to be installed and click Add. If no tags are specified, the agent will be installed on all the nodes having no taints.
- Tolerance Configuration
If you added a node whose tag contains a taint in Node Selector Configuration, set the Key, Value, and Effect of the taint, and click Add to allow agent installation on the node.
- After the configuration is complete, click OK to install the HSS agent.
- In the cluster list, check the cluster status. If the cluster status is Running, the cluster is successfully connected to HSS.
Step 4: Create a Connection Between the Cluster and the HSS Server
- Create a VPC.
- Go to the page for Creating a VPC.
- On the Create VPC page, set parameters for the VPC and subnets as prompted.
- You are advised to set some parameters by referring to Table 3 and retain the default values for other parameters. For details about how to create a VPC, see Creating a VPC and Subnet.
Table 3 Parameters for creating a VPC Parameter
Description
Example Value
Region
Select a region near you to ensure the lowest latency possible.
CN-Hong Kong
Name
VPC name. The requirements are as follows:
- It can contain 1 to 64 characters.
- Can contain letters, numbers, underscores (_), hyphens (-), and periods (.).
HSS-outside-anp-VPC
Enterprise Project
Enterprise project to which the VPC belongs.
An enterprise project facilitates project-level management and grouping of cloud resources and users. The name of the default project is default.
For details about creating and managing enterprise projects, see the Enterprise Management User Guide.
default
Subnet Name
Subnet name. The requirements are as follows:
- It can contain 1 to 64 characters.
- Can contain letters, numbers, underscores (_), hyphens (-), and periods (.).
HSS-outside-subnet
- Click Create Now. You can view the VPC after it is created.
- Create a security group.
- In the navigation pane on the left, choose .
- Click Create Security Group in the upper right corner.
- Configure security group parameters as prompted.
- You are advised to configure some parameters by referring to Table 4 and configure other parameters based on site requirements. For details about how to create a security group, see Creating a Security Group.
Table 4 Parameters for creating a security group Parameter
Description
Example Value
Region
Select a region near you to ensure the lowest latency possible.
CN-Hong Kong
Name
Specify the name of the security group. The requirements are as follows:- It can contain 1 to 64 characters.
- Can contain letters, numbers, underscores (_), hyphens (-), and periods (.).
HSS-outside-anp-secGroups
Enterprise Project
When creating a security group, you can add the security group to an enterprise project that has been enabled.
An enterprise project facilitates project-level management and grouping of cloud resources and users. The name of the default project is default.
For details about creating and managing enterprise projects, see the Enterprise Management User Guide.
default
Preset Rule
Inbound and outbound rules are preset in security group rules. You can select a rule as needed to quickly create a security group.
All ports open
- Click Create Now. You can view the security group after it is created.
- Creating an ECS.
- Click
 in the upper left corner and Compute > Elastic Cloud Server.
 - In the upper right corner, click Buy ECS.
- Configure ECS parameters as prompted.
You are advised to configure some parameters by referring to Table 5 and configure other parameters based on site requirements.
Table 5 Parameters for purchasing an ECS Parameter
Description
Example Value
Billing Mode
ECS billing mode.
- Yearly/Monthly: Prepaid mode. Yearly/monthly ECSs are billed by the purchased duration specified in the order.
- Pay-per-use: Postpaid billing mode. You pay as you go and just pay for what you use. Pay-per-use ECSs are billed by the second and settled by the hour.
- Spot price: Spot pricing is a postpaid billing mode. You pay as you go and just pay for what you use. In Spot pricing billing mode, your purchased ECS is billed at a lower price than that of a pay-per-use ECS with the same specifications. In Spot pricing billing mode, you can select Spot or Spot block for the Spot Type. Spot ECSs and Spot block ECSs are billed by the second and settled by the hour.
Pay-per-use
Region
Select a region near you to ensure the lowest latency possible.
CN-Hong Kong
CPU Architecture
Select a CPU architecture. The value can be x86.
x86
Instance
General computing, 2 vCPUs, 4 GiB
Image
An image is an ECS template that contains an OS. It may also contain proprietary software and application software. You can use images to create ECSs.
Public image, EulerOS 2.5 64bit (40 GiB)
System Disk
Stores the OS of an ECS, and is automatically created and initialized upon ECS creation.
Ultra-high I/O
Network
The VPC service allows you to create logically isolated, configurable, and manageable virtual networks for VPCs. You can configure security groups, Virtual Private Networks (VPNs), CIDR blocks, and bandwidths in your VPC. ECSs in different VPCs cannot communicate with each other by default.
HSS-outside-anp-VPC
(VPC created in 1)
Security Group
Select an available security group from the drop-down list. You can select multiple security groups for an ECS (no more than five security groups are recommended). The access rules of all the selected security groups apply to the ECS.
HSS-outside-anp-secGroups
(Security group created in 2)
EIP
An EIP is a static public IP address bound to a cloud server in a VPC. Using the EIP, the cloud server provides services externally.
Buy now, static BGP
ECS Name
This parameter will be set to the initial server name (hostname) in the ECS OS.
The name can contain only letters, numbers, underscores (_), hyphens (-), and periods (.).
HSS-outside-anp-ECS
Enterprise Project
When purchasing an ECS, you can add it to an enabled enterprise project.
An enterprise project facilitates project-level management and grouping of cloud resources and users. The name of the default project is default.
For details about creating and managing enterprise projects, see the Enterprise Management User Guide.
default
Login Mode
Method for logging in to an ECS.
Password
- Click Create. In the displayed dialog box, click Agree and Create. After the payment is complete, the ECS will be automatically created and started by default.
- Click
- Set up Nginx.
- Log in to the server created in 3.
- Go to the temp directory.
- cd /temp
- Run the following command to create the install_nginx.sh file:
- vi install_nginx.sh
- Press i to enter the editing mode and copy the following content to the install_nginx.sh file:
#!/bin/bash

yum -y install pcre-devel zlib-devel popt-devel openssl-devel openssl
wget http://www.nginx.org/download/nginx-1.21.0.tar.gz
tar zxf nginx-1.21.0.tar.gz -C /usr/src/
cd /usr/src/nginx-1.21.0/
useradd -M -s /sbin/nologin nginx
./configure \
--prefix=/usr/local/nginx \
--user=nginx \
--group=nginx \
--with-file-aio \
--with-http_stub_status_module \
--with-http_gzip_static_module \
--with-http_flv_module \
--with-http_ssl_module \
--with-stream \
--with-pcre && make && make install
ln -s /usr/local/nginx/sbin/nginx /usr/local/sbin/
nginx
- Configure the ELB.
- Go to the page for Buying ELB page.
- Set ELB parameters as prompted.
- You are advised to configure some parameters by referring to Table 6 and configure other parameters based on site requirements. For details about how to buy a load balancer, see Creating a Dedicated Load Balancer.
Table 6 Parameters for buying an ELB Parameter
Description
Example Value
Type
Type of the shared load balancer. The type cannot be changed after the load balancer is created.
Dedicated load balancers work well for heavy-traffic and high-concurrency workloads, such as large websites, cloud native applications, IoV, and multi-AZ disaster recovery applications.
Dedicated
Billing Mode
Billing mode of a dedicated load balancer.
- Yearly/Monthly: prepaid billing mode. You pay in advance for a subscription term, and in exchange, you get a discounted rate.
- Pay-per-use: postpaid billing mode. You pay as you go and just pay for what you use. The load balancer usage is calculated by the second but billed every hour.
Pay-per-use
Region
Select a region near you to ensure the lowest latency possible.
CN-Hong Kong
Name
Load balancer name. The name can contain:
- It can contain 1 to 64 characters.
- Letters, numbers, underscores (_), hyphens (-), and periods (.).
HSS-outside-anp-ELB
Enterprise Project
When creating a load balancer, you can add it to an enabled enterprise project.
An enterprise project facilitates project-level management and grouping of cloud resources and users. The name of the default project is default.
For details about creating and managing enterprise projects, see the Enterprise Management User Guide.
default
Specification Type
Select Elastic or Fixed if pay-per-use is chosen as the billing mode.
Specifications:- Elastic specifications work well for fluctuating traffic, and you will be charged for how many LCUs you use.
- Fixed specifications are suitable for stable traffic, and you will be charged for the specifications you select.
- Fixed
- Network load balancing
- Small
Network Configuration
- Network Type: You can select one or more network types.
- Private IPv4 network: The load balancer routes IPv4 requests from the clients to backend servers in a VPC. If you want the load balancer to route IPv4 requests from the Internet, bind an EIP to the load balancer.
- IPv6 network: An IPv6 address will be assigned to the load balancer to route requests from IPv6 clients.
- VPC: VPC where the dedicated load balancer works. You cannot change the VPC after the load balancer is created. Plan the VPC as required.
Select an existing VPC, or click View VPCs to create a desired one.
- Frontend Subnet: Subnet where the dedicated load balancer is located. The system allocates an IP address from this subnet to the load balancer for external services.
After a load balancer is created, you can unbind the IP address from it and assign an IP address from a new frontend subnet to the load balancer.
- Backend Subnet: The load balancer uses IP addresses in the backend subnet to establish connections with backend servers.
EIP
EIP that will be bound to the load balancer for receiving and forwarding IPv4 requests over the Internet.
- Buy now
- Dynamic BGP
- Bandwidth
- After setting the parameters, click Next.
- On the ELB page, view the created ELB and record the public IPv4 address.
- In the row of a load balancer, click Add now in the listener (frontend protocol/port) column.
- Set the listener parameters as prompted.
- You are advised to configure some parameters by referring to Table 7 and configure other parameters based on site requirements. For details, see Adding a TCP Listener.
Table 7 Parameters for adding a listener Parameter
Description
Example Value
Configure Listener
Name
Listener name.
HSS-outside-anp-Listener
Frontend Protocol
Protocol used by the client and listener to distribute traffic.
TCP
Frontend Port
Port used by the client and listener to distribute traffic.
8091
Access control
Supports access control based on the whitelist and blacklist.
All IP addresses
Configure Routing Policy
Backend Server Group
A group of backend servers with the same features.
- Create new
- Use existing
Create new
Name
Name of the backend server group.
HSS-outside-anp-server-group
Backend Protocol
Specifies the protocol that backend servers in the backend server group use to receive requests from the listeners. The protocol varies depending on the forwarding mode.
TCP
Load Balancing Algorithm
Algorithm used by the load balancer.
- Weighted round robin: Requests are routed to different servers based on their weights. Backend servers with higher weights receive proportionately more requests, whereas equal-weighted servers receive the same number of requests.
- Weighted least connections: In addition to the number of connections, each server is assigned a weight based on its capacity. Requests are routed to the server with the lowest connections-to-weight ratio.
- Source IP hash: Allows requests from different clients to be routed based on source IP addresses and ensures that requests from the same client are forwarded to the same server.
Weighted round robin
Add Backend Server
Backend Servers
When you use ELB to route requests, ensure that at least one backend server is running properly and can receive requests routed by the load balancer.
Click Add Backend Server.
HSS-outside-anp-ECS
Set the service port to 8091.
(Server created in 3)
- On the Confirm page, check parameter settings.
- Click Submit complete the configuration.
- Modify a security group.
- Click
 in the upper left corner of the management console and choose Network > Virtual Private Cloud.
 - In the navigation tree on the left, choose Security Groups.
- Locate the security group created in 2 and click Manage Rules.
- Delete the IPv6 full passing rule, as shown in Figure 9.
- Modify the IPv4 full bypass rule, as shown in Figure 10.
- Change the value of Protocol & Port from Protocols > All to Protocols / TCP (Custom ports) and set the port number to 8091.
- Click OK.
- Click
- Return to the HSS console. Test the network connectivity between the cluster and the HSS server again by referring to Step 2: Verify the Connection Between the Cluster and the HSS Server.
After the network connection is successful, go to Step 5: Configure Cluster Information and Install the Agent (by Manually Configuring the Connection).
Step 5: Configure Cluster Information and Install the Agent (by Manually Configuring the Connection)
- Click Next, configure cluster access information, and click Generate Command. For more information, see Table 8.
Figure 11 Configuring cluster access information
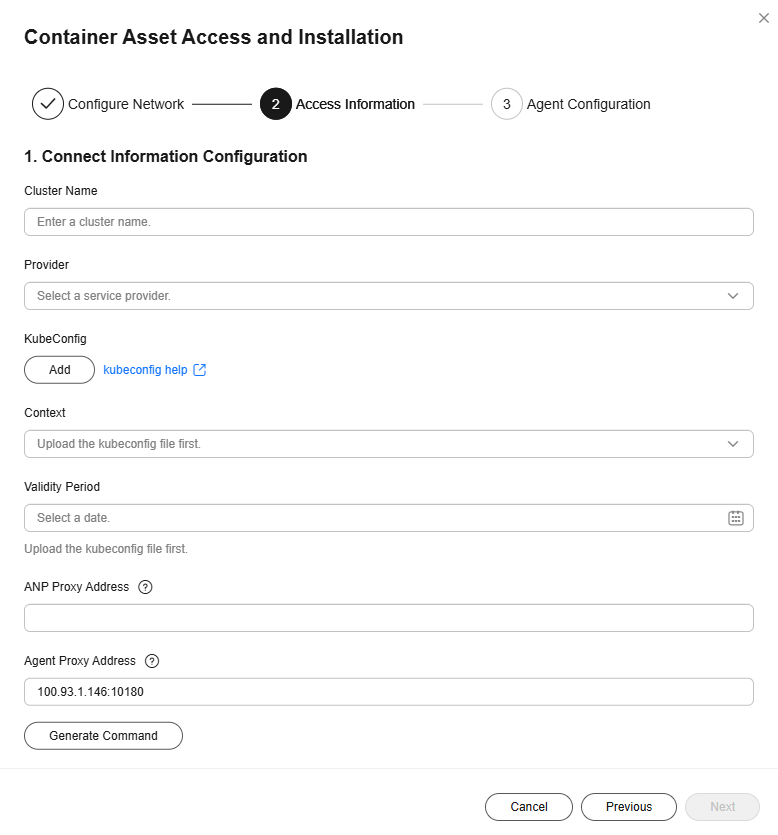
Table 8 Access parameters Parameter
Description
Cluster Name
Name of the cluster to be connected.
Provider
Service provider of the cluster. Currently, the clusters of the following service providers are supported:
- Alibaba Cloud
- Tencent Cloud
- AWS
- Azure
- User-built
- On-premises IDC
KubeConfig
Add and upload the kubeconfig.yaml or config.yaml file configured as required in Step 1: Prepare the kubeconfig File.
Context
After the kubeconfig file is uploaded, HSS automatically parses the context.
Validity Period
After the kubeconfig file is uploaded, HSS automatically parses the validity period. You can also specify a time before the final validity period. After the specified validity period expires, you need to connect to the asset again.
ANP Proxy Address
The ELB EIP recorded in Step 4: Create a Connection Between the Cluster and the HSS Server.
Agent Proxy Address
Retain the default value.
- Perform the following operations to install the cluster connection component (ANP-agent) and establish a connection between HSS and the cluster:
- In the Container Asset Access and Installation dialog box, click Download a YAML File.
Figure 12 Downloading the YAML file
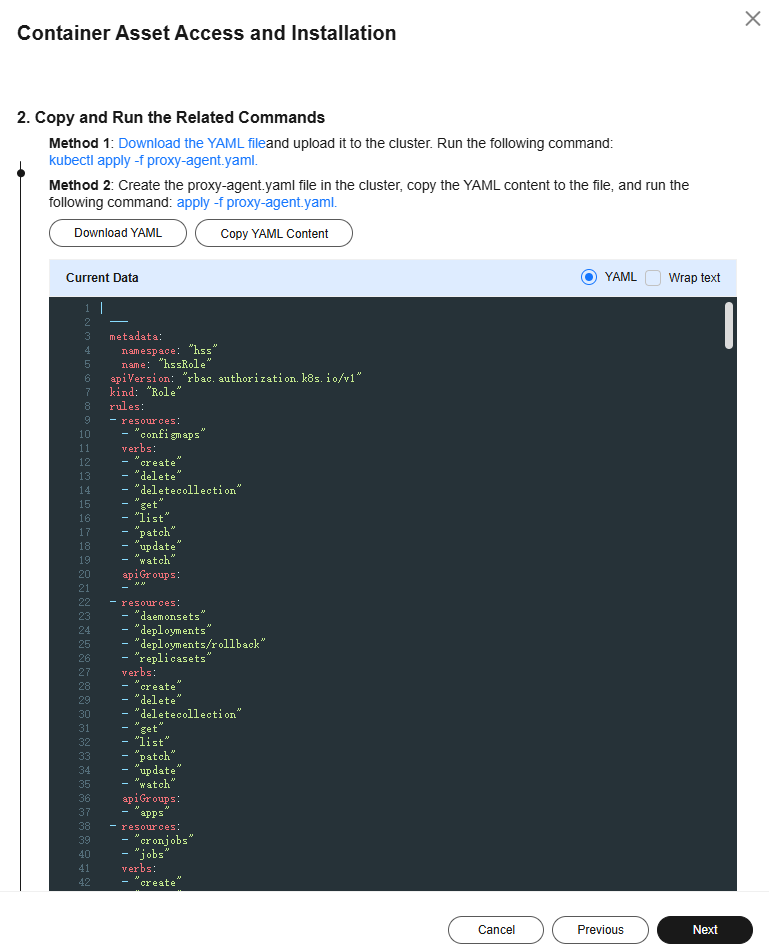
- Run the following command to install the cluster connection component (ANP-Agent):
kubectl apply -f proxy-agent.yaml
- Run the following command to check whether the cluster connection component (ANP-agent) is successfully installed:
kubectl get pods -n hss | grep proxy-agent
If the command output shown in Figure 13 is displayed, the cluster connection component (ANP-agent) is successfully installed.
- Run the following command to check whether the cluster is connected to HSS:
for a in $(kubectl get pods -n hss| grep proxy-agent | cut -d ' ' -f1); do kubectl -n hss logs $a | grep 'Start serving';done
If the command output shown in Figure 14 is displayed, the cluster is connected to HSS.
- In the Container Asset Access and Installation dialog box, click Download a YAML File.
- In the Container Asset Access and Installation dialog box, click Next.
- Configure agent parameters. For more information, see Table 9.
Table 9 Agent parameters Parameter
Description
Configuration Rules
Select an agent configuration rule.
- Default Rule: Select this if the sock address of container runtime is a common address. The agent will be installed on nodes having no taints.
- Custom: Select this rule if the sock address of your container runtime is not a common address or needs to be modified, or if you only want to install the agent on specific nodes.
NOTE:- If the sock address of your container runtime is incorrect, some HSS functions may be unavailable after the cluster is connected to HSS.
- You are advised to select all runtime types.
(Optional) Advanced Configuration
This parameter can be set if Custom is selected for Configuration Rules.
Click
 to expand advanced configurations. The Enabling auto upgrade agent option is selected by default.
- Enabling auto upgrade
Configure whether to enable automatic agent upgrade. If it is enabled, HSS automatically upgrades the agent to the latest version between 00:00 to 06:00 every day to provide you with better services.
- Node Selector Configuration
Set the Key and Value of tags of the nodes where the agent is to be installed and click Add. If no tags are specified, the agent will be installed on all the nodes having no taints.
- Tolerance Configuration
If you added a node whose tag contains a taint in Node Selector Configuration, set the Key, Value, and Effect of the taint, and click Add to allow agent installation on the node.
- After the configuration is complete, click OK to install the HSS agent.
- In the cluster list, check the cluster status. If the cluster status is Running, the cluster is successfully connected to HSS.
Follow-up Operations
After the agent is installed in a cluster, enable protection.
Feedback
Was this page helpful?
Provide feedbackThank you very much for your feedback. We will continue working to improve the documentation.See the reply and handling status in My Cloud VOC.
For any further questions, feel free to contact us through the chatbot.
Chatbot

