
Defining a Build Task on GUI
CodeArts Build provides a graphical user interface (GUI) where you can configure build tools and parameters.
Constraints
If a build task pulls code from your local repository, you can add the following IP addresses to your repository server's whitelist for security purposes. This restricts access so that only CodeArts Build can reach your repository.
- AP-Singapore: 114.119.185.21
- AF-Cairo: 101.46.68.29
- LA-Santiago: 119.8.154.190
- AF-Johannesburg: 182.160.17.185
- ME-Riyadh: 101.46.48.183
- LA-Mexico City2: 122.8.183.54 and 110.238.80.148
- Brazil: 119.8.85.121
- TR-Istanbul: 101.44.33.34, 101.44.34.216, and 101.44.36.238
Preparations
- To use CodeArts Repo as the code source, ensure that you have the required operation permissions on CodeArts Repo. For details, see Managing Member Permissions.
- Create a CodeArts project by referring to CodeArts User Guide > "Preparations" > "Creating a CodeArts Project".
If you already have a project available, skip this step.
- Create a repository by referring to CodeArts Repo User Guide > "Creating a CodeArts Repo Repository".
If you already have a CodeArts Repo repository or are using a third-party repository, skip this step.
Creating a Build Task with GUI
- Access the CodeArts Build homepage from the project page.
- Click a group name.
- Click Create Task. On the displayed Basic Information page, configure the essential attributes for your build task. For details, see Table 1. Click Next. The page for selecting a build template is displayed.
Table 1 Basic information Parameter
Description
Name
Assign a custom name to the build task.
- Letters, digits, underscores (_), and hyphens (-) allowed.
- 1 to 115 characters.
Project
Select the project to which the build task belongs.
- When you access CodeArts Build through the project page, this parameter is autofilled so you can leave it as default.
- When accessing the service through the service homepage, select the project created in Preparations.
Code Source
Select the source from which CodeArts Build retrieves the code to compile.- Repo: Code is pulled from the current project's CodeArts Repo repository for your build.
- Other Repo: Code is pulled from CodeArts Repo repositories of other projects. Select an existing project. Then, select a code repository and its default branch.
- Pipeline: If Pipeline is selected as a code source, the build task can only be triggered by a corresponding pipeline and cannot run on its own.
The following code repositories are provided by third-party sources and not by CodeArts.- GitHub: Code is pulled from GitHub for your build.
- Git: Code is pulled from other services for your build.
Service Endpoint
Optional. This parameter is required when Code Source is set to a third-party code repository. If you are using a third-party code repository for the first time, you will need to create a service endpoint. For details, see Creating a Service Endpoint.
Repository
Select the exact repository from which CodeArts Build retrieves the code to compile.
Default Branch
Select a default branch.
Description
Optional. Enter additional information to describe the build task. Max. 512 characters.
Timeout
Set a time cap for your build task. Your build will auto-terminate if it hits that ceiling.
You can set this value up to 480 minutes.
- CodeArts Build has more than 30 built-in build templates. You can select a template that suits your requirements and click OK to create the build task. For details about templates, see Table 2.
- You can also select Blank Template and add desired build actions when configuring a build task.
- If the preset templates do not meet your needs, you can also create a custom one.
Table 2 System templates Template
Description
Language
Stages Included
Maven
Build a Java project with Apache Maven.
Java
Configure the build environment, download code, build with Maven, and upload the software package to a release repo.
Quick App
Build a quick app with npm.
JavaScript
Configure the build environment, download code, build an Android quick app, and upload the software package to a release repo.
Django
Build a Django project.
Python
Configure the build environment, download code, build with Setuptools, and upload the software package to a release repo.
Ionic Android App
Develop an Android app with Ionic, an HTML5 mobile app development framework.
Java
Configure the build environment, download code, build an Android app with Ionic, and upload the software package to a release repo.
Ant
Apache Ant is a tool used to compile and deploy Java projects.
Java
Configure the build environment, download code, build with Ant, and upload the software package to a release repo.
CMake
Build a cross-platform project with CMake.
C/C++
Configure the build environment, download code, build with CMake, and upload the software package to a release repo.
Grails
Build a Web application with Grails, a Web application development framework.
Groovy
Configure the build environment, download code, build with Grails, and upload the software package to a release repo.
Grunt
Build and run a JavaScript project with Grunt.
JavaScript
Configure the build environment, download code, build with Grunt, and upload the software package to a release repo.
gulp
Use gulp to build an automated workflow in frontend development.
JavaScript
Configure the build environment, download code, build with gulp, and upload the software package to a release repo.
Go
Build a Go project.
Go
Configure the build environment, download code, build with Go, and upload the software package to a release repo.
mono-linux
Compile a project with MSBuild and .NET on Mono Linux (x86 and Arm).
JavaScript
Configure the build environment, download code, build on Mono Linux, and upload the software package to a release repo.
Maven-Container
Use Apache Maven to build a Java project, create an image from Dockerfile, and push the image to SWR.
Java
Configure the build environment, download code, Build with Maven, create an image, and push the image to SWR.
ServiceStage-Maven-Image Build
Use Apache Maven to build a Java project, create an image from Dockerfile, and push the image to SWR.
Java
Configure the build environment, download code, Build with Maven, create an image, push the image to SWR, run shell commands, and upload the software package to a release repo.
ServiceStage-npm-WAR
Build a WAR package with npm and upload the package to a release repo.
JavaScript
Configure the build environment, download code, Build with npm, run shell commands, Build with Ant, and upload the software package to a release repo.
Release Private Maven Package
When your Maven-enabled Java project depends on any private package, you must first upload those dependencies to a self-hosted Maven repo in CodeArts Release.
Java
Configure the build environment, download code, and Build with Maven.
PHP
Use the PHP runtime and Composer to declare, install, and package the PHP libraries your project requires.
PHP
Configure the build environment, download code, build in PHP, and upload the software package to a release repo.
Bazel
Build a project with Bazel.
Java
Configure the build environment, download code, build with Bazel, and upload the software package to a release repo.
Shell
Run shell commands.
N/A
Configure the build environment, download code, and run shell commands.
sbt
Build a Scala or Java project with sbt.
Scala
Configure the build environment, download code, build with sbt, and upload the software package to a release repo.
npm
Build Vue and Webpack projects with npm.
JavaScript
Configure the build environment, download code, build with npm, and upload the software package to a release repo.
Android APK
The Android build system compiles application resources and source code, and then packages them into APKs that can be deployed, signed, and distributed.
Java
Configure the build environment, download code, build with Android, and upload the software package to a release repo.
Gradle
Build a Java, Groovy, or Scala project with Gradle.
Java
Configure the build environment, download code, build with Gradle, and upload the software package to a release repo.
Serverless-npm
Build Vue and Webpack projects with npm.
JavaScript
Configure the build environment, download code, build with npm, and upload the software package to a release repo.
DevStar-Maven-Container Build
Use Apache Maven to build a Java project, create an image from Dockerfile, and push the image to SWR.
Java
Configure the build environment, download code, Build with Maven, create an image, and push the image to SWR.
DevStar-npm-Container Build
Use npm to build a JavaScript project, create an image from Dockerfile, and push the image to SWR.
JavaScript
Configure the build environment, download code, Build with npm, create an image, and push the image to SWR.
DevStar-Python-Container Build
Build a Python project, create an image from Dockerfile, and push the image to SWR.
Python
Configure the build environment, download code, Build with Setuptools, create an image, and push the image to SWR.
Yarn
Build a JavaScript project with Yarn.
JavaScript
Configure the build environment, download code, build with Yarn, and upload the software package to a release repo.
Build Image
Create an image from Dockerfile, and push the image to SWR.
Java
Configure the build environment, download code, create an image, and push the image to SWR.
PyInstaller
Use PyInstaller to compress Python files into an executable program.
Python
Configure the build environment, download code, build with PyInstaller, and upload the software package to a release repo.
Setuptools
Build a Python project with Setuptools.
Python
Configure the build environment, download code, build with Setuptools, and upload the software package to a release repo.
Build with Ark Compiler
Build an application with Ark Compiler on Ubuntu.
Java
Configure the build environment, download code, build with Ark Compiler, and upload the software package to a release repo.
GNU-Arm
Design, develop, and use an Arm simulator with the GNU Arm toolchain.
C
Configure the build environment, download code, build with GNU Arm, and upload the software package to a release repo.
- On the displayed Build Actions page, click Save. The build task is created. The new task appears in the build task list.
You can continue to configure this build task by referring to Configuring a Build Task.
Turning a Task Into a Template
- You can save the current build task as a template for later build task creation. The procedure is as follows:
- On the Build History page, click
 in the upper right corner and select Make Template from the drop-down list.
 - Enter the template name and description, and click Save.
- Click the username, and select from the drop-down list.
- In the navigation pane, choose . The saved template is displayed in the list.
- On the Build History page, click
The following table lists what you can do straight from the build templates.
Note that template edits and deletions are locked down to the template creator and the tenant account.
| Operation | Description |
|---|---|
| Search for a template | Enter a keyword in the search box to find a template. |
| Favorite a template | Locate the desired template and click |
| Delete a template | Locate the desired template, click |


Creating a Service Endpoint
When selecting any third-party repository as the code source on the Basic Information page, you must configure a service endpoint.
Service endpoints act as extensions that enable CodeArts to connect to third-party services.
By default, CodeArts Build pulls code from CodeArts Repo for your build. With service endpoints, CodeArts Build can access source code hosted in third-party repositories.

- Because third-party repositories depend on their own network conditions and service availability, builds may experience instability or other problems when pulling code from them.
- To achieve secure, stable, and efficient download and build, you are advised to use CodeArts Repo's code import feature to migrate your code into CodeArts Repo.
GitHub
By configuring authentication through either OAuth or an access token, you can limit CodeArts Build's access to a GitHub repository (while still ensuring that the service can retrieve the code required to run your build).
You can also delete connections or withdraw authorization at any time to prevent password leakage.
- Click Create next to Service Endpoint.
- In the displayed dialog box, configure the following parameters.
Parameter
Description
Service Endpoint Name
Assign a custom name to the service endpoint. Enter a maximum of 256 characters, including letters, digits, hyphens (-), underscores (_), periods (.), and spaces.
Authentication Mode
- OAuth: You must log in to GitHub for manual authorization.
- Access token: You must enter a GitHub access token, which can be obtained by following these steps:
- Log in to GitHub and open the configuration page.
- Click Developer settings.
- Choose .
- Verify the login account.
- Enter the token description, select the scopes that define the token's access to a private repository, and click Generate token.
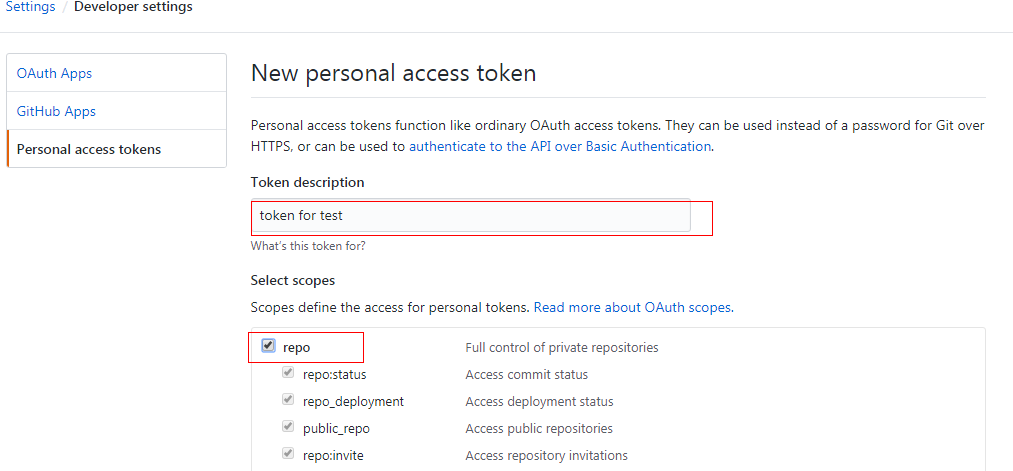
- Copy the generated token.
 NOTE:
NOTE:- Save the token right when it appears, as it disappears after you refresh the page. To regain access, you will need to generate a new token.
- Enter a valid token description so that it can be easily identified. If the token is deleted by mistake, the build will fail.
- To prevent information leakage, delete the token when it is no longer used.
- After the authorization is successful, return to the Create Build Task page.
Git
- Click Create next to Service Endpoint.
- In the displayed dialog box, configure the following parameters.
Parameter
Description
Service Endpoint Name
Assign a custom name to the service endpoint. Enter a maximum of 256 characters, including letters, digits, hyphens (-), underscores (_), periods (.), and spaces.
Git Repository URL
Enter the HTTPS address for logging in to the target Git repository.
Username
Optional. Enter the username for logging in to the target Git repository. Max. 300 characters.
Password or Access Token
Optional. Enter the password for logging in to the target Git repository. Max. 300 characters.
- Click OK.
Feedback
Was this page helpful?
Provide feedbackThank you very much for your feedback. We will continue working to improve the documentation.See the reply and handling status in My Cloud VOC.
For any further questions, feel free to contact us through the chatbot.
Chatbot


