
Interconnecting with SMTP to Send Emails
Simple Mail Transfer Protocol (SMTP) is a protocol that provides reliable and effective email transmission. In Huawei Cloud Astro Zero, applications connect to the SMTP to implement the email sending function.
Creating an SMTP Connector
- Log in to the application designer by referring to Logging In to the Application Designer.
- In the navigation pane, choose Integrations.
- Click Connector Instance under Connector.
- In the navigation pane, choose Message > Email by SMTP.
- On the right of the page, click + to set SMTP email service interconnection parameters. Figure 1 Creating an SMTP email service connector

Table 1 Parameters for creating an SMTP email service connector Parameter
Description
Name
Name of the connector to be created. The naming requirements are as follows:
- The value cannot exceed 64 characters, including the prefix namespace.
To prevent duplicate data names among different tenants, each tenant must define a unique namespace when first creating an application. A tenant can create only one namespace. After being created, the namespace cannot be modified.
- Start with a letter and can contain only letters, digits, and underscores (_). Do not end with an underscore (_).
SMTP Host:port
Address and port number of the SMTP server when SMTP is enabled for the mailbox.
User Name
The username of the mailbox. If the username has not been changed, the default value is the email address.
Example: example@163.com.
Password
A random character string generated when SMTP is enabled for the mailbox.
Sender Email Address
Email address of the sender.
Sender Display Name
Sender name.
Description
Enter the description of the connector.
Value: 1–255 characters.
Package Current Configuration
If this parameter is selected, the connector will be packed together with applications. For example, if an application package is released to the runtime environment, the current configuration is synchronized to the runtime environment by default. If this option is not selected, the connector will not be packaged and released to the runtime environment. In this case, you need to create the corresponding connector by referring to Managing Connectors in Applications.
This parameter is selected by default. You are advised not to select this option in information-sensitive scenarios.
- The value cannot exceed 64 characters, including the prefix namespace.
- (Optional) Test whether emails can be sent.
- On the connector details page, click the send button.
- Enter the recipient, subject, and email content, and click the send button. Figure 2 Sending an email

If the recipient receives an email, the test is successful, as shown in Figure 3.

Calling the Connector in the Script
In the script, call the created connector to connect to SMTP.
- Create an empty script by referring to Creating a Blank Script.
- In the script editor, enter the following code:
// Import a connector
import * as connector from 'connector';

//Create an SMTP email connector. The first parameter is fixed to emailsmtp, and the second parameter is the connector name
let client = connector.newClient("emailsmtp","namespace__smtp01");

//Construct the request header, including the recipient address, email subject, and email body. (The subject and body cannot be empty at the same time.)
//Send by content.
let req ={"address":"test@example.com","subject":"SMTP Function verification-Event","body":"Send emails using SMTP"};

//Send the email based on the template. If the template parameter is available, the subject and body configurations are invalid. The email is sent based on the content in the email template
//let req={"address":"test@example.com","template":"smtptt1"}

//Send an email. The first parameter does not need to be set, and the second parameter is the message body
let resp = client.invoke("",req);
In connector.newClient, Namespace__smtp01 is the connector name, address is the recipient, subject is the subject, and body is the email content.
- Click
 in the upper part of the script editor to save the script.
 - Click
 to execute the script.
 - The input parameters have been set in 2. You do not need to set them here. Click
 in the upper right corner of the test window.
 - Check whether the recipient receives the email.
If the email is received, the connector is successfully called, as shown in Figure 4.
- Click
 in the upper part of the script editor to activate the script.

Calling a Connector in a Flow
In the flow, call the created connector to connect to SMTP.
- Create a flow by referring to Creating a Blank Flow.
- On the left of the flow design page, choose Connector > Message and drag the EmailBySMTP diagram element to the canvas. Figure 5 Dragging the EmailBySMTP diagram element to the canvas

- Click
 and set basic information. Figure 6 Configuring basic information
Table 2 Basic information parameters of the EmailBySMTP diagram element Parameter
Description
Label
Label of the diagram element, which is displayed on pages.
Name
Name of diagram element, which uniquely identifies the diagram element in the system. The naming requirements are as follows:
- Enter up to 80 characters.
- Start with a letter and can contain only letters, digits, and underscores (_). It cannot end with an underscore (_).
Description
Description of the diagram element.
Connector
Select the target connector from the drop-down list, that is, the connector created in Creating an SMTP Connector.
- Click
 and set parameters for calling SMTP. Figure 7 Configuring the SMTP connector
Table 3 Parameters of the EmailBySMTP diagram element connector Parameter
Description
Action
Set this parameter to SendEmailBySMTP, which is the email sending API preset in the system.
Input Parameters
Set the input parameters of the API.
- If Target is set to address, configure the email receiving address in Source, which can be defined as an input variable email add1.
- If Target is set to subject, configure the email subject in Source, which can be defined as an input variable email sub1.
- If Target is set to body, configure the email content in Source, which can be defined as an input variable email body1.
When using a template to send an email, you only need to enter the template name. You do not need to enter the subject and content.
Output Parameters
Output parameters of the API. In this example, you do not need to set the output parameters.
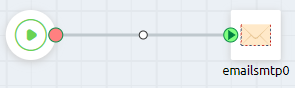
- Connect the start and SMTP diagram elements. Figure 8 Connecting diagram elements
- Click
 to save the flow.
 - Click
 to activate the flow.
 - Set input parameters and click the run button. An example of parameter settings is as follows:
{
    "address": "test@example.com",
    "subject": "SMTP connector",
    "body": "Call the SMTP connector in the flow"
}
In the example, address indicates the recipient, subject indicates the email subject, and body indicates the email content. The address field is mandatory. The email subject and email content cannot be empty at the same time.
If the following information is displayed, the email is sent successfully.
Figure 9 Email sent
- Click
 in the upper part of the flow designer page to activate the flow.
Feedback
Was this page helpful?
Provide feedbackThank you very much for your feedback. We will continue working to improve the documentation.See the reply and handling status in My Cloud VOC.
For any further questions, feel free to contact us through the chatbot.
Chatbot


