
Using Bridges to Bind Data to Advanced Page Widgets
During application development, APIs need to be called in advanced page components to complete the entire business scenario (for example, obtaining the user ID, order ID, and offering information in the shopping cart). To facilitate API calling, Astro Zero provides bridges. Bridges encapsulate some logic of the platform, such as CSRF token verification, data sharing, and periodic data calling.
There are 18 bridges preset on the platform, including common bridges (API data, flow data, script data, and object data). When developing custom widgets, you can introduce them based on the API. There are also 14 system bridges for widgets, such as for maps and scatter charts. If the preset bridges cannot meet the development requirements, you can customize a bridge and upload it.
Preset Bridges of Widgets
Some bridges are preset in the platform and configured in the corresponding preset widget packages. For example, bar or line chart data bridge is configured in the preset line chart widget package.
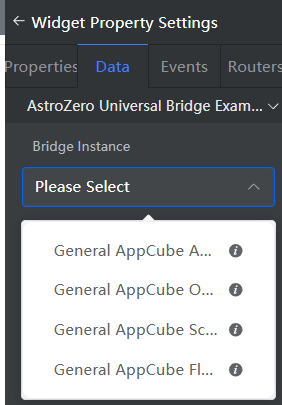
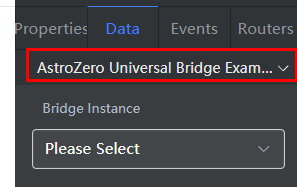
When developing advanced pages, you can select the line chart widget, then select the preset bridge on the data tab of the widget property setting panel on the right.

- Bridge Instance: Name of the called bridge. You can select a configured bridge from the drop-down list. For details about how to configure a bridge in a widget, see Using a Common Bridge in a Widget.
- Data Type > Static Data: The static data defined in the bridge is obtained as the data source of the widget. You can modify or reset the static data in the static data editor.
- Data Type > Dynamic Data: The bridge dynamically calls data from a flow or script as the data source of the widget.
- URL: The bridge dynamically calls data from a flow or script as the data source of the widget. You need to specify the API URL of the desired flow or script.
The structure of the API data output must be consistent with the data displayed in the static data editor.
- Share Data: When a common request is called by multiple widgets to access the data of the same API with the same request parameters, you can select this option to avoid repeating calling.
- URL: The bridge dynamically calls data from a flow or script as the data source of the widget. You need to specify the API URL of the desired flow or script.
- Execution Cycle: You can configure the interval for calling the backend APIs or obtaining static data, in seconds. The default value is 0, indicating that APIs are called only once or static data is obtained only once.
Using a Common Bridge in a Widget
During widget development, you can use the following common bridges preset on the platform to call backend APIs: API data bridge, flow data bridge, script data bridge, and object data bridge.
This section describes how to call the script of the low-code platform in a widget to implement the addition and subtraction calculator.
- Develop a script.
Before calling a backend service in a widget, develop a backend service (script or flow) in an application first.
- Log in to the application designer by referring to Logging In to the Application Designer.
- In the navigation pane, choose Logic.
- Click
 next to Script to create a script, and click Add. Set Name to CalScript and Template to Demo Service Script.Figure 2 Creating a sample script
- Debug the script. On the toolbar, click
 to open the debugging console. In the area for inputting parameters, enter the following script:
 { "op": "+", "value1": 1, "value2": 1 }Click
 on the right of the debug console to run the script. In the output parameters area, you can view the following information:
{ "result": 2 } - Click
 in the upper part of the script editor to activate the script.
- Create a service.
Before calling the script created in 1, create a service first.
- In the application development designer, click Integrations in the navigation pane.
- Click
 next to Open API to create an open API.
 - Complete the configuration and click the save button. Figure 3 Creating the calculate API

- Operation Name: Set this parameter to calculate.
- Version: Set this parameter to 1.0.0.
- URL: Enter /calculate.
- Type: Select Script.
- Resource: Select the script created in 1 (the script must be activated).
- Method: Select POST.
- In the custom widget, develop the bridge logic and upload the widget to the widget library by referring to 1.
Configure the required bridge instance in the customized component, and use the API provided by the low-code platform to initiate a request and process the returned result. You can click BridgeTestWidget.zip to obtain the sample package or perform the following operations to develop a package.
- On the Huawei Cloud Astro Zero console, click Access Homepage to go to the application development page.
- Click
 in the upper left corner of the page and choose Environments > Environment Configuration.
 - Choose Maintenance from the main menu.
- In the navigation pane, choose Global Elements > Page Assets > Widget Templates.
- Click the widgetBridgeTemplate template. The template details page is displayed.
- On the template details page, click Download, set the component name to BridgeTestWidget, and click Save.
- Decompress the obtained widget package and configure the bridge instance in the BridgeTestWidget.editor.js file.
BridgeTestWidget = BridgeTestWidget.extend({
    /*
     * Config to define Widget Properties
     */
    propertiesConfig: [{
        config: [{
            "type": "connectorV2",
            "name": "APIConnector",
            "model": "ViewModel",
            "label": "Astro Zero Common Bridge Example",
            "value": ""
        }]
    }],

    /*
     * Triggered when the user creates a new widget and used to initialize the widget properties
     */
    create: function (cbk) {
        if (cbk) {
            this._super();
            cbk();
        }
    }
});

var params = {};
params.hasMultipleItems = false;
params.hasAreaSpecificEvents = false;
Studio.registerWidget("BridgeTestWidget", "", params);
The bridge configuration items are described as follows:
- type: Configuration item type. The value is fixed to connectorV2.
- name: Variable name of the bridge. You can use this value to obtain a bridge instance.
For example, for getConnectorInstanceByName ('APIConnector'), getConnectorInstanceByName is the API provided by Astro Zero.
- model: Model of the bridge instance. The model for common bridge instances is ViewModel. Only bridge instances belonging to this model can be configured on the Data tab page. Figure 4 Selecting a bridge
- label: Title of the configuration item. Figure 5 Configuring the bridge title
- value: Default value of the configuration item.
- Define the bridge processing logic in the BridgeTestWidget.js file.
For details about the APIs related to common bridges in widgets, see Table 1. The following is a complete configuration example of the BridgeTestWidget.js file:
Table 1 Bridge API list API
Description
getConnectorInstanceByName('APIConnector')
Obtains bridge instances based on bridge variable names. APIConnector is a string that indicates the bridge variable name.
ConnectorIns.process(renderCbk, errCbk)
Calls the process function using a bridge instance to initiate service calling requests and process returned results.
- Before initiating a request using the process function, set the requestParams attribute of a bridge instance to the request parameter as follows:
ConnectorIns.requestParams = param;
- renderCbk
Processes the returned information. This parameter is of the function type.
- errCbk
Processes errors if the URL property is not set. This parameter is of the function type.
ConnectorIns.query(param)
Calls the process function using a bridge instance to initiate service calling requests and process returned results.
- param: request parameter.
- The returned result is the Promise object.
var BridgeTestWidget = StudioWidgetWrapper.extend({
    /*
     * Triggered when initializing a widget and will have the code that invokes rendering of the widget
     * setParentContainer(JQueryParentContainerDOM) - binds event to this container
     * setItemContainer(JQueryItemContainerDOM) - binds studio item events for respective item containers
     * bindEvents() - binds the studio event to this widget
     */
    init: function () {
        var thisObj = this;
        thisObj._super.apply(thisObj, arguments);
        thisObj.render();
        if ((typeof (Studio) != "undefined") && Studio) {

        }
    },

    callFlowConn: function (connector, param, callbackFunc) {

        var thisView = this;
        if (connector) {
        // The following is an example of processing a request using the process method of the bridge instance:
            // connector.requestParams = param;
            // connector.process(function (response) {
            //     if (response) {
            //         callbackFunc.call(thisView, response);
            //     }
            // });
        // The following is an example of processing a request using the query method of the bridge instance:
            connector.query(param).then(res => callbackFunc(res));
        } else {
            console.log("No Connector or data type is set.");
        }
    },

    /*
     * Triggered from init method and is used to render the widget
     */
    render: function () {
        var thisObj = this;
        var widgetProperties = thisObj.getProperties();
        var elem = thisObj.getContainer();
        var items = thisObj.getItems();
        var connectorProperties = thisObj.getConnectorProperties();

        /*
         * API to get base path of your uploaded widget API file
         */
        var widgetBasePath = thisObj.getWidgetBasePath();
        if (elem) {
            var containerDiv = $(".scfClientRenderedContainer", elem);
            if (containerDiv.length) {
                $(containerDiv).empty();
            } else {
                containerDiv = document.createElement('div');
                containerDiv.className = "scfClientRenderedContainer";
                $(elem).append(containerDiv);
            }

            const app = Vue.createApp({
                data() {
                    return {
                        number1: 0,
                        number2: 0,
                        option: '+',
                        options: [
                            {value: '+'},
                            {value: '-'},
                        ],
                        result: '',
                        ConnectorIns: thisObj.getConnectorInstanceByName('APIConnector')
                    }
                },
                methods: {
                    calculate: function () {
                        let _this = this;
                        let connectorParam = {
                            "op": _this.option,
                            "value1": _this.number1,
                            "value2": _this.number2
                        };
                        let connector = _this.ConnectorIns;
                        thisObj.callFlowConn(connector, connectorParam, _this.setResult);
                    },
                    setResult: function (resData) {
                        let _this = this;
                        if (resData.data && resData.data.result != undefined) {
                            _this.result = resData.data.result;
                        }
                    }
                }
            });
            app.use(ElementPlus);
            app.mount($("#widgetBridgeTemplate", elem)[0]);
        }

        /*
         * API to refresh the previously bound events when a resize or orientation change occurs.
         *  thisObj.sksRefreshEvents(ItemIdx);
         * ItemIdx (Optional) - To refresh events for a specific item. Default value is 0.
         */
        $(window).resize(function () {
            thisObj.sksRefreshEvents();
        });
    }
});
The BridgeTestWidget.js file is described as follows:
- Obtain the bridge instance.
ConnectorIns: thisObj.getConnectorInstanceByName('APIConnector') - Construct request parameters and the renderCbk function.
calculate: function () { let _this = this; // Make request parameters. let connectorParam = { "op": _this.option, "value1": _this.number1, "value2": _this.number2 }; let connector = _this.ConnectorIns; // The defined callFlowConn function is used to process bridge-related operations in a unified manner. thisObj.callFlowConn(connector, connectorParam, _this.setResult); }, // Construct the renderCbk function. In this example, the return value is set. setResult: function (resData) { let _this = this; if (resData.data && resData.data.result != undefined) { _this.result = resData.data.result; } } - Initiate a request.
callFlowConn: function (connector, param, callbackFunc) {

    var thisView = this;
    if (connector) {
    // The following is an example of processing a request using the process method of the bridge instance:
        // connector.requestParams = param;
        // connector.process(function (response) {
        //     if (response) {
        //         callbackFunc.call(thisView, response);
        //     }
        // });
    // The following is an example of processing a request using the query method of the bridge instance:
        connector.query(param).then(res => callbackFunc(res));
    } else {
        console.log("No Connector or data type is set.");
    }
}
- Before initiating a request using the process function, set the requestParams attribute of a bridge instance to the request parameter as follows:
- Compress the file into a .zip package named BridgeTestWidget.zip.
- Upload the package BridgeTestWidget.zip to the widget library by referring to 1.
- Configure bridge properties.
Drag the example BridgeTestWidget to the page and configure the bridge properties of the widget.
Figure 6 Example
- Bridge Instance: Bridge type. In this example, select Common Astro Zero API Data Bridge.
- Data Type: Select Dynamic Data.
- Request method: This parameter needs to be set when the data is of the dynamic data type. The selected method corresponds to the method used by the widget to call the API. If multiple methods need to be used to call an API, you need to configure multiple methods. In this example, select post.
- Prefix: In this example, the prefix is /Namespace__customName23/1.0.0/calculate. The platform automatically generates the complete URL.
- Share Data: This parameter indicates whether to share data and is displayed only when Data Type is set to Dynamic Data. If this option is selected, multiple widgets in a project call a common request to access data of the same API, avoiding repeated API calling.
- Execution Cycle: interval for invoking the backend API or obtaining static data. The default value is 0, indicating that the backend interface is invoked only once or the static data is obtained only once.
- Preview the effect.
After the bridge properties of the widget are configured, save the page, release and preview the page in sequence, and check whether the effect meets the expectation.
Customizing a Bridge
When common bridges cannot meet your requirements, you can customize bridges and upload them to the platform for advanced pages. The following shows the main execution process available on the platform.

The main user-defined functions in a bridge are constructUrl and transform. You can encapsulate these functions as required to implement different bridges. Choose Maintenance > Global Elements > Page Assets Management > Bridge Templates, download the template, and decompress it to view the API calling example. For details about how to download a bridge template, see Managing Bridge Templates.
- Develop bridge files and compress them into a ZIP package.
- On the Huawei Cloud Astro Zero console, click Access Homepage to go to the application development page.
- Click
 in the upper left corner of the page and choose Environments > Environment Configuration.
 - Choose Maintenance from the main menu.
- In the navigation pane, choose Global Elements > Page Assets > Bridge Templates.
- Click the template. On the template details page, click Download.
- In the Download Bridge Template dialog box, set the bridge name and bridge model name, and click Save.
For example, set Bridge Name to bridgeTest and Bridge Model Name to bridgeModel. If you select Download original template, the bridge name and bridge model name will retain their original values.
- Decompress the downloaded package and use a development tool with which you are familiar to edit it.
The following table describes the files in the ZIP package and their functions.
Table 2 Directory structure File Name
Description
mock\data.json
This file defines the static data of the bridge. When you set this bridge as data source and select static data as the bridge data type on the Data pane, the platform will obtain the static data from this file.
bridgeTest.js
This file implements the service logic of the bridge. The main functions and APIs are described as follows:
- var bridgeTest = ConnectorWrapper.extend() indicates that the custom bridge inherits the ConnectorWrapper class defined by the platform.
- init
- transform
- constructUrl
- Studio.registerConnector("bridgeTest", "bridgeTest", "", bridgeTest, bridgeModel) is used to register the bridge. The parameters define the namespace, name, description, instance, and model of the bridge.
bridgeModel.js
This file defines the bridge object model.
packageinfo.json
Metadata file of the bridge, which is used to describe the bridge. The parameters are described as follows:
- connectorApi.name: bridge name.
- connectorApi.namespace: bridge namespace.
- connectorApi.model: bridge model.
- connectorDescription: bridge description.
- authorName: bridge developer.
The code in bridgeTest.js is as follows. The code in bold is the preset bridge API.
var bridgeTest = ConnectorWrapper.extend({ init: function () { this.setInputParams([{ label: "URL", type: "text", name: "url", value: "/service/v1.0/getBasicInfo", validation: { rules: { required: true, }, messages: { required: "Please enter the URL." } } }]); }, transform: function (resultData, cbk) { if (resultData.resCode == "0") { var modelObj = new bridgeModel(); modelObj.setName(resultData.result[0].name); cbk(modelObj); } }, constructUrl: function (inputParamsObj) { var options = { data: JSON.stringify(inputParamsObj.input), contentType: "text/html;charset=utf-8", beforeSend: function (xhr) { xhr.setRequestHeader("bass-method", "post"); xhr.setRequestHeader("Content-Type", "application/json"); } }; this.setLoadMethod("post", "json", "", "", options); this.setUrl(inputParamsObj.url); } }); Studio.registerConnector("bridgeTest", "bridgeTest", "", bridgeTest, bridgeModel); - Modify the JS file content as required and compress the decompressed file into a .zip package.
- Return to the environment configuration page. Choose Maintenance from the main menu. In the navigation pane, choose Global Elements > Page Assets > Bridges. On the displayed page, click the button to submit a new bridge.
- Enter the basic bridge information, select the ZIP package, and click Submit to upload the bridge.
When the upload is complete, you can view the bridge on the Tenant tab. On the Global tab area, the bridges are preset and cannot be edited or disabled.
- Configure the bridge in a widget. For details, see 4.
Feedback
Was this page helpful?
Provide feedbackThank you very much for your feedback. We will continue working to improve the documentation.See the reply and handling status in My Cloud VOC.
For any further questions, feel free to contact us through the chatbot.
Chatbot


