

Blocking Malicious Traffic Through IP Address Blacklist or Whitelist Rules
By default, WAF allows access from all IP addresses. If you find that your website is accessed from malicious IP addresses, you can add a WAF blacklist or whitelist rule to block malicious IP addresses.
The following example shows you how to configure an IP address whitelist or blacklist rule. In this example, we use the WAF cloud load balancer access mode.
- Website access mode: Cloud mode - Load balancer access
- Protected objects: domain names and IP addresses
- Billing mode: Yearly/Monthly
- Edition: Standard
- Protection rule: blacklist and whitelist settings
Process
| Procedure | Description |
|---|---|
| Sign up for a HUAWEI ID, enable Huawei Cloud services, top up your account, and assign WAF permissions to the account. | |
| Buy WAF and select the region and WAF mode. | |
| Step 2: Add Your Website to WAF in Load Balancer Access Mode | Add the website you want to protect to WAF for traffic inspection. |
| Add blacklist and whitelist rules to block malicious IP addresses. |
Preparations
- Before purchasing WAF, create a Huawei account and subscribe to Huawei Cloud. For details, see Signing Up for a Huawei Cloud Account and Real-Name Authentication.
If you have enabled Huawei Cloud services and completed real-name authentication, skip this step.
- Make sure that your account has sufficient balance, or you may fail to pay for your WAF orders.
- Make sure your account has WAF permissions assigned. For details, see Creating a User Group and Granting Permissions.
Table 1 System policies supported by WAF Role/Policy Name
Description
Category
Dependencies
WAF Administrator
Administrator permissions for WAF
System-defined role
Dependent on the Tenant Guest and Server Administrator roles.
- Tenant Guest: A global role, which must be assigned in the global project.
- Server Administrator: A project-level role, which must be assigned in the same project.
WAF FullAccess
All permissions for WAF
System-defined policy
None.
WAF ReadOnlyAccess
Read-only permissions for WAF.
System-defined policy
Step 1: Buy the Standard Edition Cloud WAF
You can use the load balancer access mode only after you purchase the standard, professional, or enterprise edition cloud WAF. The following describes how to buy the standard edition cloud WAF.
- Log in to the WAF console.
- In the upper right corner of the page, click Buy WAF. On the purchase page displayed, complete the purchase by referring to configurations below.
Table 2 Purchase parameters Parameter
Example Value
Description
WAF Mode
Cloud Mode
After purchasing WAF, submit a service ticket to enable the cloud load balancer access mode. WAF then can protect your websites deployed on Huawei Cloud. In this mode, the protected objects can be website domain names or IP addresses.
Billing Mode
Yearly/Monthly
Yearly/Monthly is a prepaid billing mode, where you pay in advance for a subscription term and receive a discounted rate. This mode is ideal when the resource use duration is predictable.
Region
CN-Hong Kong
You can select the region nearest to your services WAF will protect.
Edition
Standard
This edition is suitable for small and medium-sized websites.
- Confirm the product details and click Buy Now in the lower right corner of the page.
- Check the order details and read the WAF Disclaimer. Then, select the box and click Pay Now.
- On the payment page, select a payment method and pay for your order.

After the purchase is complete, submit a service ticket to enable WAF cloud load balancer access mode.
Step 2: Add Your Website to WAF in Load Balancer Access Mode
- Create a dedicated load balancer.
- Specifications: Select Application load balancing (HTTP/HTTPS).
- Set other parameters based on your service requirements.
- Add a listener to the load balancer created in Step 1. For details, see Adding an HTTP Listener or Adding an HTTPS Listener.
- Create a backend server group.
- In the upper left corner of the page, click
 and choose .
 - In the navigation pane on the left, choose Access Management.
Before adding a website to WAF, you can click Usage Guide in the upper right corner of the page to learn about the access process.
- On the Access Management page, click the Cloud Load Balancer tab and click the number next to Inaccessible.
If only one access mode is enabled, click the number next to Inaccessible.
- Locate the target load balancer and click Connect in the Operation column.
- On the displayed Connect Domain Name to Load Balancer pane, configure the access and click OK.
Table 3 Access configuration parameters Parameter
Description
Example Value
Protection Policy
Select the protection policy you want to use for the website.
One-click batch access allows you to use the same protection policy or different policies for multiple load balancers quickly.
- Use the same policy: Select this option if you want to use the same protection policy for all load balancers that are connected to WAF in one-click mode.
- Use different policies: Select a protection policy for each load balancer.
In either way, you can select system-generated policies or custom policies you created.- System-generated policy (default) includes:
- Basic Web Protection: General Check is enabled by default. It can defend against attacks such as SQL injections, XSS, remote overflow attacks, file inclusions, Bash vulnerability exploits, remote command execution, directory traversal, sensitive file access, and command/code injections.
General Check includes:
- Rule Set: Default rule set (medium) is selected.
- Protective Action: Log only is selected. It means WAF only logs detected attacks but does not block them.
- Anti-Crawler: Scanner detection is enabled by default, and Protective Action is set to Log only. WAF only logs detected attacks but does not block them. This type of detection can defend against web scans, such as vulnerability and virus scanning, and crawler behaviors from tools like OpenVAS and Nmap.
- Basic Web Protection: General Check is enabled by default. It can defend against attacks such as SQL injections, XSS, remote overflow attacks, file inclusions, Bash vulnerability exploits, remote command execution, directory traversal, sensitive file access, and command/code injections.
- A protection policy created manually: a custom policy you create based on your security requirements. Only the standard, professional, and enterprise editions support manually created protection policies. For more information, see Configuring Protection Policies.
Use the same policy > System-generated policy
Connection Configuration
Configure access information.
- Protected Domain Name: Set this parameter to the domain name or IP address (public or private IP address) you want to protect. Make sure that the domain name has been resolved to the EIP of the created load balancer.
- Domain Name: Single domain names or wildcard domain names are supported.
Single domain name: Enter a single domain name, for example, www.example.com.
Wildcard domain name:- If the server IP address of each subdomain name is the same, enter a wildcard domain name. For example, if the subdomain names a.example.com, b.example.com, and c.example.com have the same server IP address, you can add the wildcard domain name *.example.com to WAF to protect all three.
- If the server IP addresses of subdomain names are different, add subdomain names as single domain names one by one.
- Wildcard domain name * can be added.
- In ELB load balancer access mode, one load balancer supports only one wildcard domain name.
- IP: You can select a public or private IP address. If a private IP address is used, ensure that the corresponding network path is accessible so that WAF can correctly monitor and filter traffic.
- Domain Name: Single domain names or wildcard domain names are supported.
- ELB Listener: Select the listener configured for the ELB load balancer. You can select an ELB listener of another account.
- All listeners: Select all listeners under the ELB load balancer.
- Specific listener: Select a specific listener under the ELB load balancer.
- Policy: If you select User different policies for Protection Policy, you need to select a protection policy for each load balancer.
Protected Domain Name: *
ELB Listener: All listeners
Step 3: Configure an IP Address Blacklist or Whitelist Rule
- In the navigation pane on the left, choose .
- Click the name of the target policy to go to the protection configuration page.
- Choose Blacklist and Whitelist and enable it.
 : enabled
 : disabled
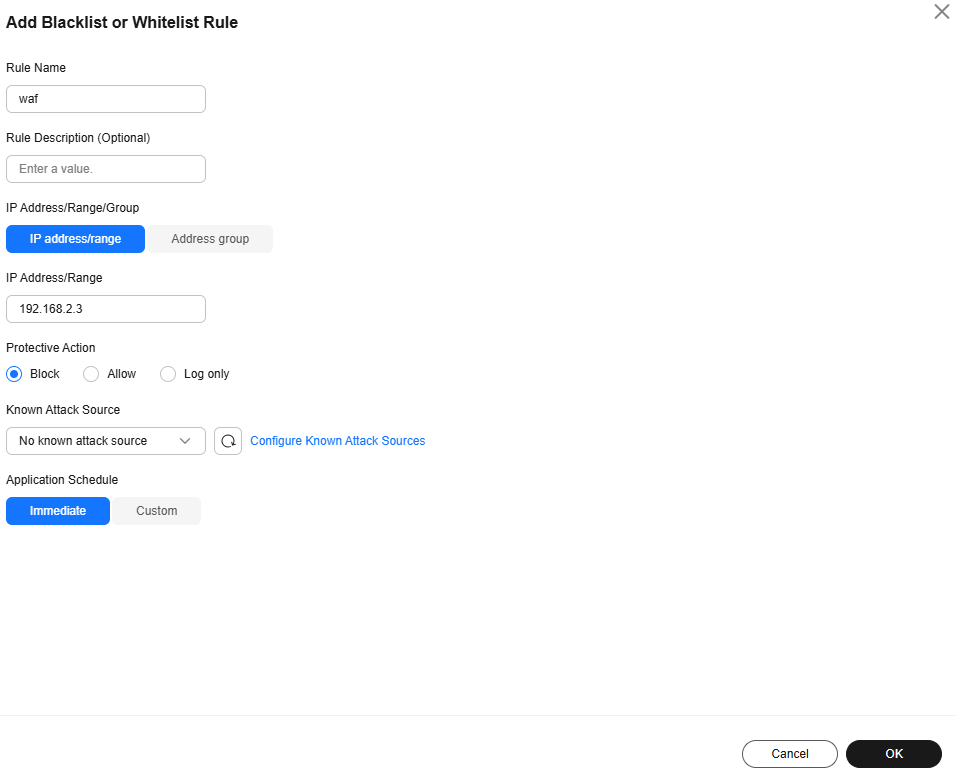
- Above the blacklist and whitelist rule list, click Add Rule and configure a rule as shown in Figure 1.
- IP Address/Range/Group: Select IP address/range. To block multiple IP addresses, select Address group.
- IP Address/Range: Configure the IP addresses or IP address ranges you want to block, for example, 192.168.2.3.
- Protective Action: Select Block.
- Click OK.
Related Information
- For details, see Configuring IP Address Blacklist and Whitelist Rules to Block or Allow Specified IP Addresses.
- The Cloud Mode - CNAME Access mode can be used for web services that are accessible through domain names, no matter where your web services are deployed, on Huawei Cloud, on other clouds, or even in on-premises data centers. For details, see the following procedure:
- Dedicated Mode is recommended for large websites that are deployed on Huawei Cloud, have special security requirements, and are accessible over domain names or IP addresses. For details, see the following procedure:
- Dedicated WAF instances are not available in some regions. For details, see Notice on Web Application Firewall (Dedicated Mode) Discontinued. If you have purchased a dedicated WAF instance, skip this step.
- Connect your website to WAF (dedicated mode).
- Step 3: Configure an IP Address Blacklist or Whitelist Rule.
What is your overall rating for this page?
Thank you very much for your feedback. We will continue working to improve the documentation.See the reply and handling status in My Cloud VOC.
For any further questions, feel free to contact us through the chatbot.
Chatbot


