Yearly/Monthly to Pay-per-Use
After creating a yearly/monthly DB instance, you can change it to pay-per-use for more flexibility.
The pay-per-use billing mode will be applied only after the yearly/monthly billed duration ends and auto-renewal will be not in effect.
Constraints
Resources such as EIPs that are used by a DB instance may not support the change with this DB instance. For details about their billing mode change rules and handling methods, see Table 1.
|
Change |
Change Description |
|---|---|
|
From yearly/monthly to pay-per-use upon expiration (billed by bandwidth) |
Directly change it on the console. For details, see From Yearly/Monthly to Pay-Per-Use upon Expiration (Billed by Bandwidth). |
|
From yearly/monthly to pay-per-use upon expiration (billed by traffic) |
Perform two steps to change it on the console:
|

Pay-per-use billing will be applied only after the yearly/monthly billing ends.
Changing the Billing Mode from Yearly/Monthly to Pay-per-Use
- Log in to the management console.
- Click
 in the upper left corner and select a region and project.
 - Click
 in the upper left corner of the page, choose .
 - On the Instances page, locate the yearly/monthly DB instance that you want to change to pay-per-use instance and choose More > Change to Pay-per-use in the Operation column.
Alternatively, click the DB instance name to go to the Basic Information page. In the Billing Information area, click Change under Billing Mode.
- On the displayed page, change the billing mode of the instance.
- On the Change to Pay-per-Use After Expiration page, confirm the instance billing information and click Change to Pay-per-Use.
- View the results on the Instances page.
In the upper right corner of the instance list, click
 to refresh the list. After the change completes, the instance status will change to Available and the billing mode will change to Pay-per-use.
- Log in to the management console.
- Click
 in the upper left corner and select a region and project.
 - Click
 in the upper left corner of the page and choose Databases > TaurusDB.
 - On the Instances page, locate a TaurusDB instance and click its name to access the Basic Information page.
- In the navigation pane, choose HTAP Analysis.
- Locate an HTAP instance and choose in the Operation column.
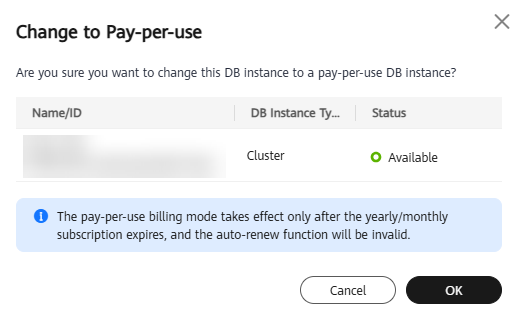
- In the displayed dialog box, click OK.
Figure 1 Changing the billing mode from yearly/monthly to pay-per-use

- On the displayed page, change the billing mode of the instance. On the Change to Pay-per-Use After Expiration page, confirm the instance billing information and click Change to Pay-per-Use.
- View the results on the Instances page. The instance status will become Available and the billing mode will become Pay-per-use after the change is complete.
Feedback
Was this page helpful?
Provide feedbackThank you very much for your feedback. We will continue working to improve the documentation.See the reply and handling status in My Cloud VOC.
For any further questions, feel free to contact us through the chatbot.
Chatbot


