
Obtaining Client Certificate Information Through a Dedicated Load Balancer
Scenarios
Suppose you have deployed an application on the cloud, used a load balancer to distribute traffic to your application, and enabled mutual authentication on the load balancer to offload client authentication from backend servers to the load balancer. This can save development and maintenance costs.
However, in certain cases like application-layer service authorization, custom services, and audits with high security requirements, backend servers may need to access the identity information of the client. In these cases, you can configure headers on the load balancer's listeners to include client certificate information in data packets sent to backend servers. This allows backend servers to access the client certificate information and enhance security control efficiently, without adding extra workload.

This feature is available in certain regions. You can see which regions support this feature on the console. If you want to use this feature, submit a service ticket.
Preparations
- Create a dedicated load balancer and bind an IPv4 EIP to it.
- Create an HTTPS backend server group, add an ECS (ECS01) to the server group, and deploy an application on ECS01.
- Create two ECSs running CentOS in the same VPC as the load balancer. The first ECS (ECS_client) is used as the client to send requests, and the second ECS (ECS_server) is used as the backend server for deploying the application.
- Prepare certificates for the load balancer.
- Either purchase a certificate or upload a third-party certificate to SSL Certificate Manager (SCM), and configure a public domain name for the certificate. It is recommended that you purchase an SSL certificate on the Cloud Certificate & Manager (CCM) console.
- Purchase a CA certificate and export it to the local PC, or use a self-signed CA certificate. If you do not have such certificates, you can purchase a private CA from Huawei Cloud CCM and export a private CA certificate.
- Prepare certificates for the client. After creating and activating a private CA on the Huawei Cloud CCM console, you can apply for a private certificate and configure it on the client.
- Set the private certificate file name to client.crt and the private key file name to client.key.
- Applying for a Private Certificate
- Downloading a Private Certificate
- Installing a Private Certificate on a Client
Step 1: Upload the Server Certificate to ELB
Before adding an HTTPS listener to a load balancer, you need to upload your certificate to the ELB console.
- Go to the load balancer list page.
- In the navigation pane on the left, choose Certificates.
- Click Add Certificate in the top right corner and set parameters by referring to Table 1.
Table 1 Server certificate parameters Parameter
Description
Certificate Type
Specifies the certificate type. Select Server certificate.
Source
Specifies the source of a certificate. There are two options: SSL Certificate Manager and Your certificate.
SSL Certificate Manager is used in this example, so that you can select the SSL certificates you have purchased on the CCM console.
Certificate
Specifies the certificate that you want to upload to the ELB console.
Enterprise Project
Specifies an enterprise project by which cloud resources and members are centrally managed.
SNI Domain Name (Optional)
All domain names of the SSL certificate will be automatically selected.
If the certificate is intended for SNI, you can select an SNI certificate based on the domain name in the HTTPS requests.
Description (Optional)
Provides supplementary information about the certificate.
- Click OK.
Step 2: Upload the CA Certificate to the ELB Console
Before adding an HTTPS listener to a load balancer, you need to upload your CA certificate to the ELB console.
- Go to the load balancer list page.
- In the navigation pane on the left, choose Certificates.
- Click Add Certificate in the top right corner and set parameters by referring to Table 2.
Table 2 CA certificate parameters Parameter
Description
Certificate Type
Specifies the certificate type. Select CA certificate.
Certificate Name
Specifies the name of the CA certificate.
Enterprise Project
Specifies an enterprise project by which cloud resources and members are centrally managed.
Certificate Content
Specifies the content of the CA certificate in PEM format.
Click Upload and select the CA certificate to be uploaded. Ensure that your browser is the latest version.
The format of the certificate body is as follows:
-----BEGIN CERTIFICATE-----
Base64–encoded certificate
-----END CERTIFICATE-----
Description (Optional)
Provides supplementary information about the certificate.
- Click OK.
Step 3: Add an HTTPS Listener and Configure Client Certificate Information
- Go to the load balancer list page.
- Locate the target load balancer and click Add Listener in the Operation column.
- On the displayed page, set the following parameters:
- Frontend Protocol: HTTPS
- Configure Certificate
- SSL Authentication: Mutual authentication
- Server Certificate: Select the server certificate uploaded to the ELB console in Step 1.
- CA Certificate: Select the CA certificate uploaded to the ELB console in Step 2.
Figure 1 Configuring mutual authentication for the HTTPS listener
- HTTP Headers
- Expand More (Optional).
- Expand Client Certificate Information under HTTP Headers.
- Select the headers you want to rewrite to transfer the client certificate information to backend servers and define the header names.
Only lowercase letters, digits, underscores (_), and hyphens (-) are allowed.
Figure 2 HTTP headers that can transfer client certificate information
- Click Next: Configure Request Routing Policy and select Use existing for Backend Server Group. Select the backend server group you have created and click Next: Confirm.
- Confirm the configurations and click Submit.
Step 4: Deploy an Application on the Backend Server
- Remotely log in to ECS_server.
Multiple methods are available for logging in to an ECS. For details, see Logging In to an ECS.
- Make sure the server uses Python 3 or a later version.
- Create the Test directory on the backend server.
mkdir Test
- Create the server.py file in the Test directory and deploy the application in the file to print the request headers received by the backend server.
- Create the server.py file.
vi server.py
- Press i to enter editing mode.
- Create the server.py file.
- Press Esc and enter :wq to save the server.py file.
- Run the server.py file.
python3 server.py
- Wait until the command output shown in Figure 3 is displayed, which indicates the backend application is successfully deployed.

Step 5: Access the Backend Application from the Client
- Remotely log in to ECS_client.
- Upload the client.crt private certificate and client.key private key file downloaded to the local PC to the client.
For details, see How Do I Upload Files to My ECS?
- Run the curl command on the client to specify the client certificate file and the private key file of the client certificate to access the backend application.
In this practice, you can run the following command to access the backend application:
curl -k --cert ./client.crt --key ./client.key https://<EIP-of-the-load-balancer>
Figure 4 Accessing the backend application using the curl command
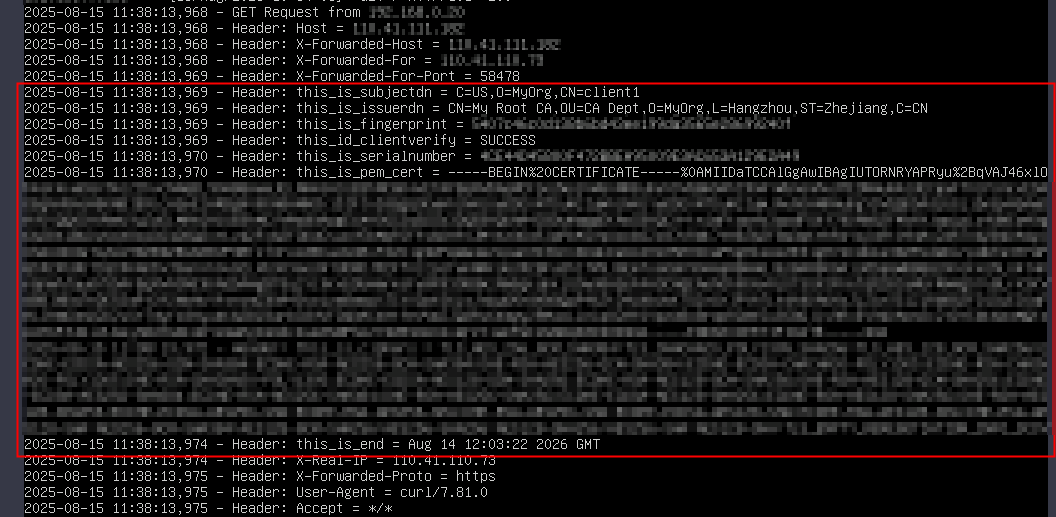
Step 6: Verify Client Certificate Information Transferring
- Remotely log in to ECS_server.
- Check the client certificate information transferred by the printed headers.
Figure 5 Checking the client certificate information obtained by the server
Feedback
Was this page helpful?
Provide feedbackThank you very much for your feedback. We will continue working to improve the documentation.See the reply and handling status in My Cloud VOC.
For any further questions, feel free to contact us through the chatbot.
Chatbot


