

Installing a Private Certificate on a Client
This topic describes how to install a private certificate on the client.
Application Scenarios
In two-way authentication, a client must have a certificate installed to establish a trusted connection with the server. When two-way authentication is enabled for intranet microservices, IoT devices, or enterprise service systems, the server verifies the client certificate presented by the client. If no client certificate is installed on the client, the server returns a 400 Bad Request error when the client attempts to access the service.
After the client certificate is installed on the client OS, the client can present the certificate during the TLS handshake. The server then verifies the client identity, enabling two-way authentication. Typical service scenarios: IoT device identity authentication, certificate-based two-way authentication for browsers on enterprise intranets, and smart card login for Windows domains.
Prerequisites
You have downloaded an issued private certificate. For details about how to download a certificate, see Downloading a Private Certificate.
Constraints
If the server needs to verify the client certificate, you need to add the root CA of the client certificate to the trusted root CA store on the server. For details, see Trusting a Private Root CA.
Procedure for Installing a Private Certificate on a Client
This procedure uses Windows as an example.
- Log in to the CCM console.
- In the navigation pane on the left, choose .
- Locate the row containing the desired certificate. In the Operation column, click Download.
- Select the IIS tab and click Download Certificate.
- Decompress the downloaded certificate file package client_iis.zip to obtain certificate file server.pfx and private key password file keystorePass.txt.
- Double-click certificate file server.pfx, select a certificate storage location based on its usage, and click Next.
- Confirm the name of the certificate file you want to import and click Next.
- Enter the password obtained from private key password file keystorePass.txt and click Next.
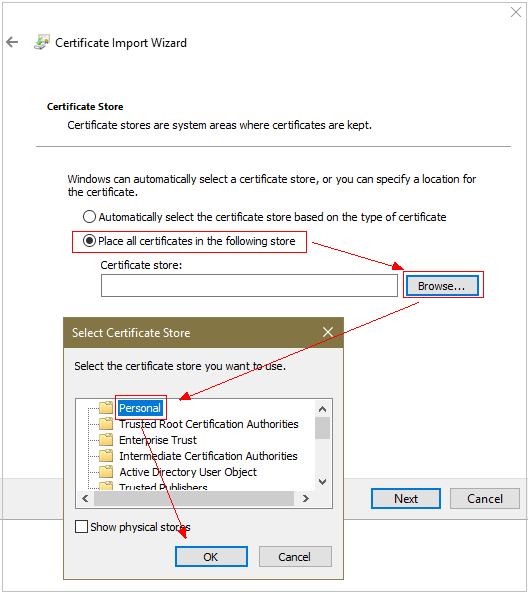
- Select Place all certificates in the following store, click Browse, select Personal, and click OK, as shown in Figure 1.
- Click Next and Finish. The certificate is installed when a dialog box is displayed indicating that the certificate is imported successfully.
References
- Downloading a Private Certificate: describes preparations for downloading a client certificate.
- Trusting a Root CA: describes how to import a root CA into the client to establish trust.
- Installing a Private Certificate on a Server: describes how to deploy a private certificate on a server.
What is your overall rating for this page?
Thank you very much for your feedback. We will continue working to improve the documentation.See the reply and handling status in My Cloud VOC.
For any further questions, feel free to contact us through the chatbot.
Chatbot


