Device-side Rules
Introduction
Cloud rules are parsed and executed on the cloud. IoTDA determines whether triggering conditions are met and triggers corresponding device linkage actions. Device-side rules are device linkage rules delivered to devices, where the device-side rule engine parses and executes the rules. Device-side rules can still run on devices when the network is interrupted or devices cannot communicate with the platform. Device-side rules can extend application scenarios and improve device running stability and execution efficiency. For example, when the indoor light intensity is lower than 20, lights can be automatically turned on. This implements intelligent control independent of network devices.
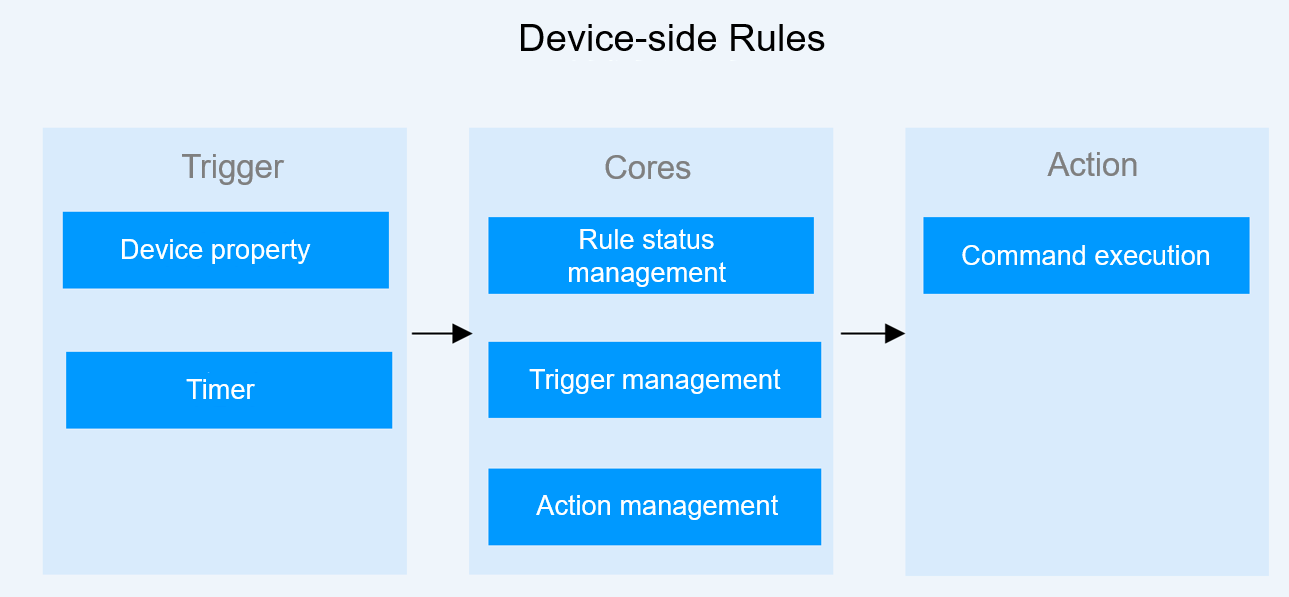
For details, see Basic Concepts.
Scenarios
There are a large number of surveillance devices in highway tunnels. The network environment is complex and the network quality is unstable. However, emergency handling has high requirements on real-time network performance. Linkage between emergency devices cannot completely depend on cloud rules. Device-side rules are required to implement emergency plan linkage. Device linkage plans can be formulated in advance based on different situations such as fires and traffic accidents. Monitoring personnel can start device linkage plans with one click based on tunnel conditions. Device-side rules enable simultaneous status changes of different types of devices. This reduces dependency on network quality and improves overall device linkage efficiency. For example, if the temperature of a flue pipe is too high, the controller can be linked to open the drainage valve to reduce the temperature. If the concentration of carbon monoxide (CO) is too high, a COVI device can be linked to control fans for ventilation.
Constraints
- Device-side rules support only command delivery actions.
- Devices must be integrated with IoT Device SDK (C) v1.1.2 or later.
- Devices need to report the SDK version number to IoTDA using the APIs provided by the SDK.
Procedure
The following uses a smart street light system as an example to describe how to use device-side rules.
- Access the IoTDA service page and click Access Console. Click the target instance card.
- Create a product and model.
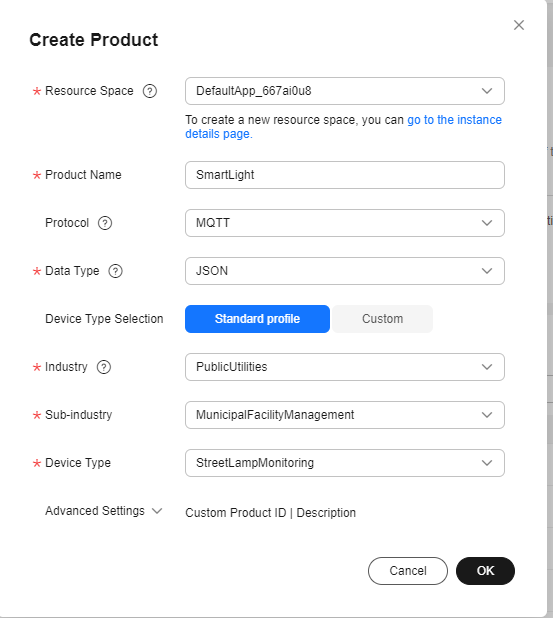
- Log in to the console and click the target instance card. Choose Products from the navigation pane and click Create Product. In the displayed dialog box, select StreetLampMonitoring for Device Type, enter the product name, and click OK.
Figure 2 Creating a product - SmartLight
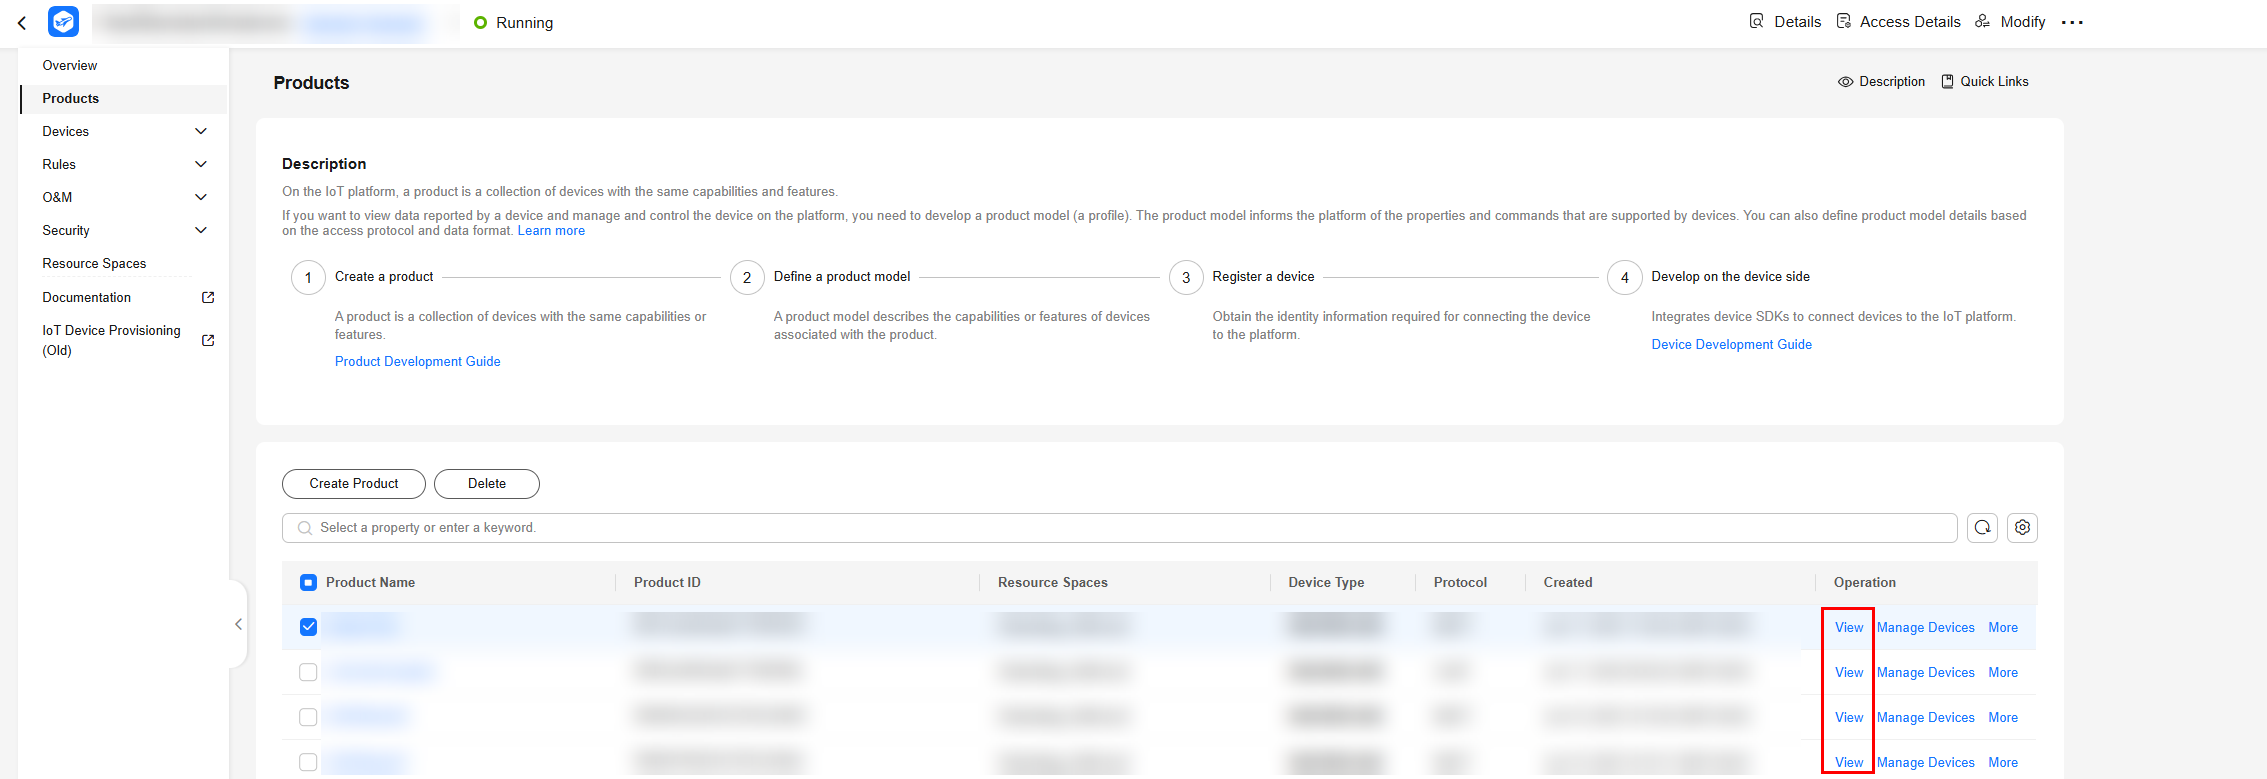
- Locate the SmartLight product and click View.
Figure 3 Viewing SmartLight details
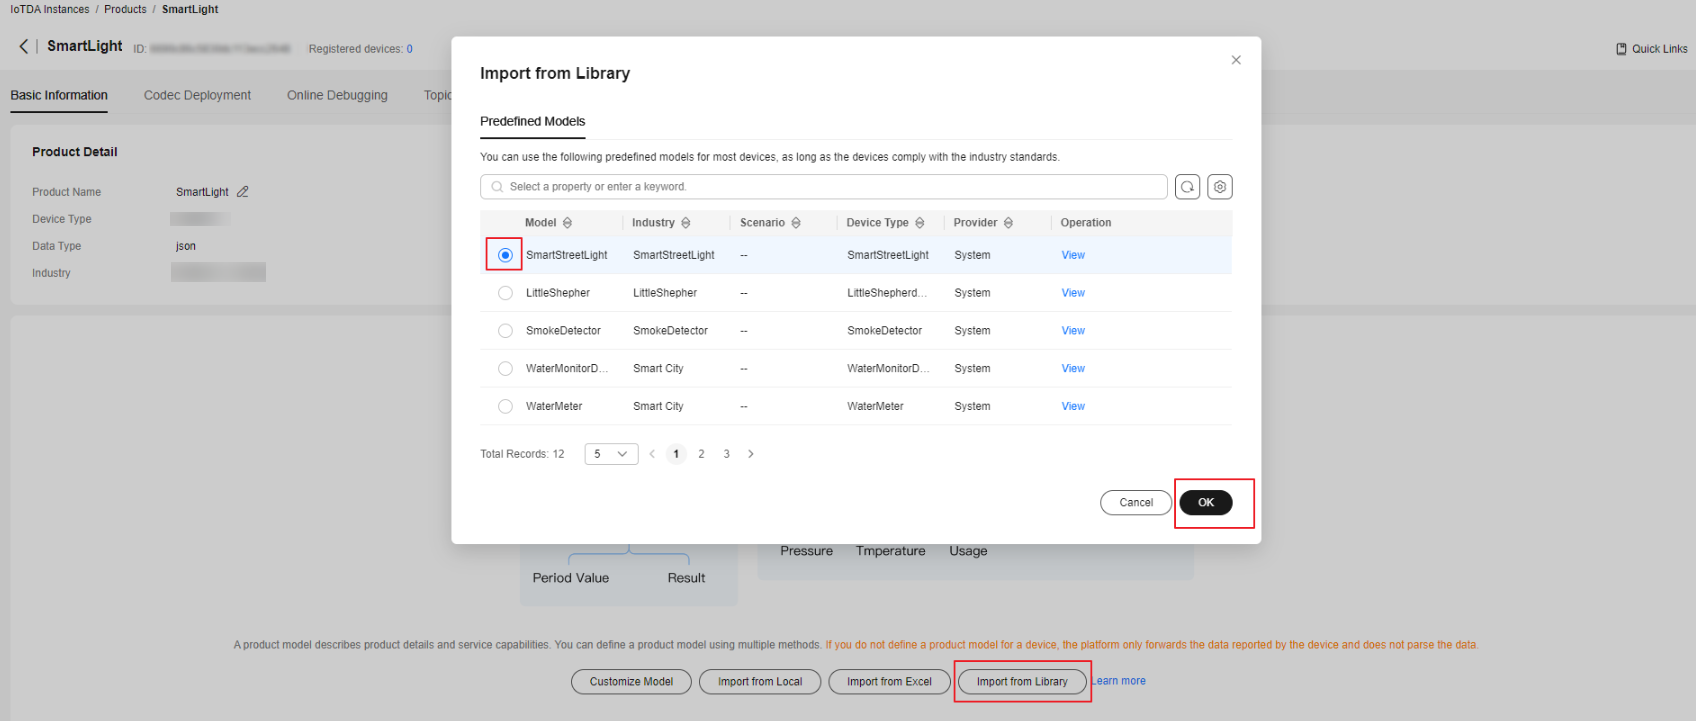
- On the product details page, click Import from Library, select SmartStreetLight, and click OK.
Figure 4 Product - Import model SmartStreetLight
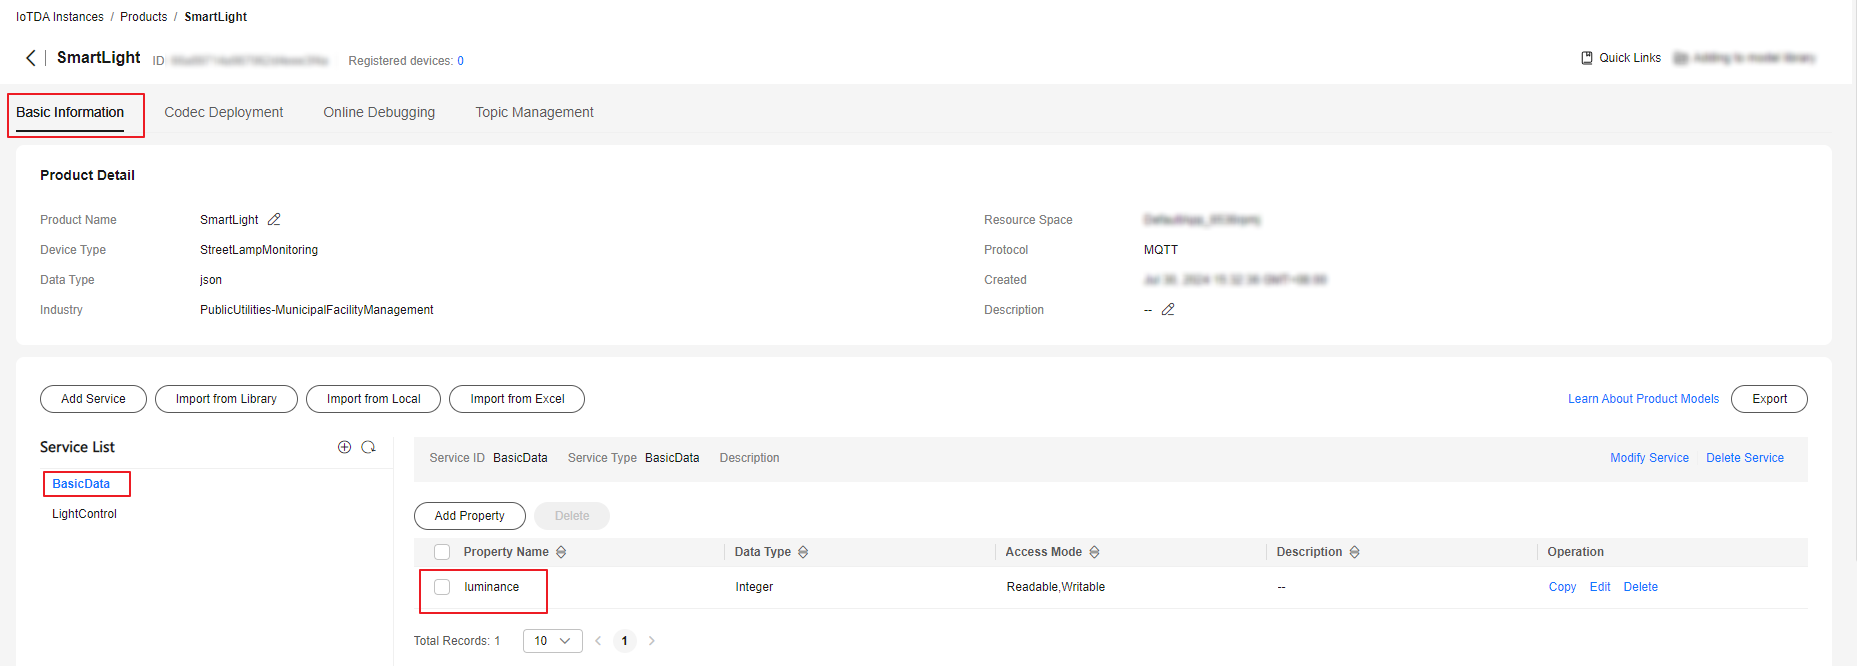
- On the Basic Information page, BasicData and LightControl services are displayed. The BasicData service contains the luminance property. The LightControl service contains a switch command.
Figure 5 Model definition - SmartLight
- Log in to the console and click the target instance card. Choose Products from the navigation pane and click Create Product. In the displayed dialog box, select StreetLampMonitoring for Device Type, enter the product name, and click OK.
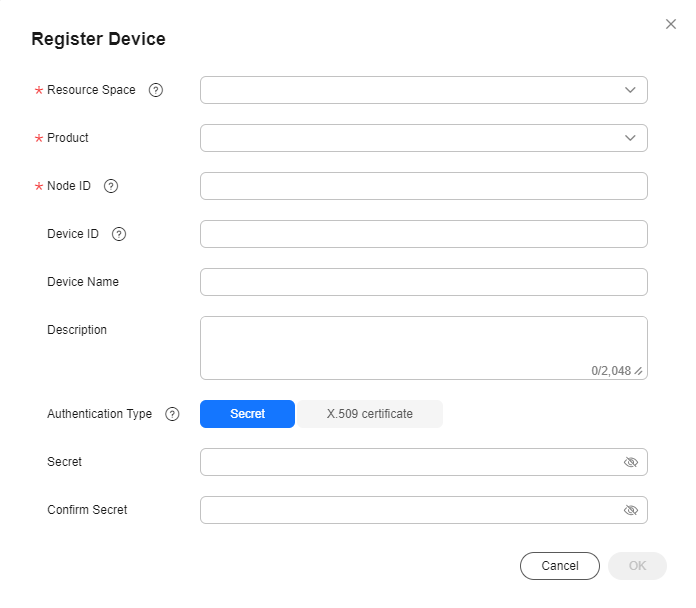
- In the navigation pane, choose Devices > All Devices and click Register Device. Select the resource space you select in Step 2 and a product, enter a node ID, and click OK.
Figure 6 Device - Registering a secret device
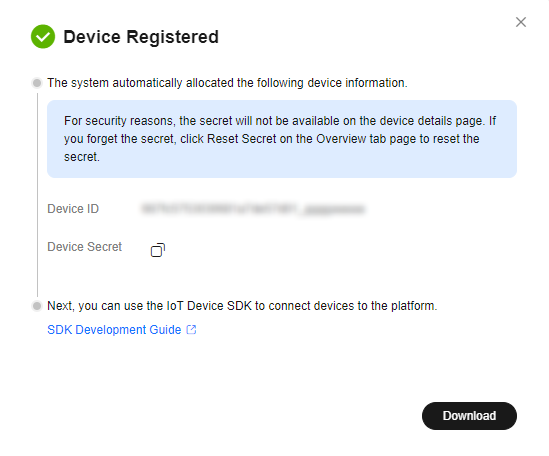
- After the device is created, copy and save the device secret for later use.
Figure 7 Device - Device registered
- Create a rule.
- In the navigation pane, choose Rules > Device Linkage. In the upper part of the page, select the resource space of the product to which the device belongs. Click Create Rule.
Figure 8 Device linkage - Creating a rule

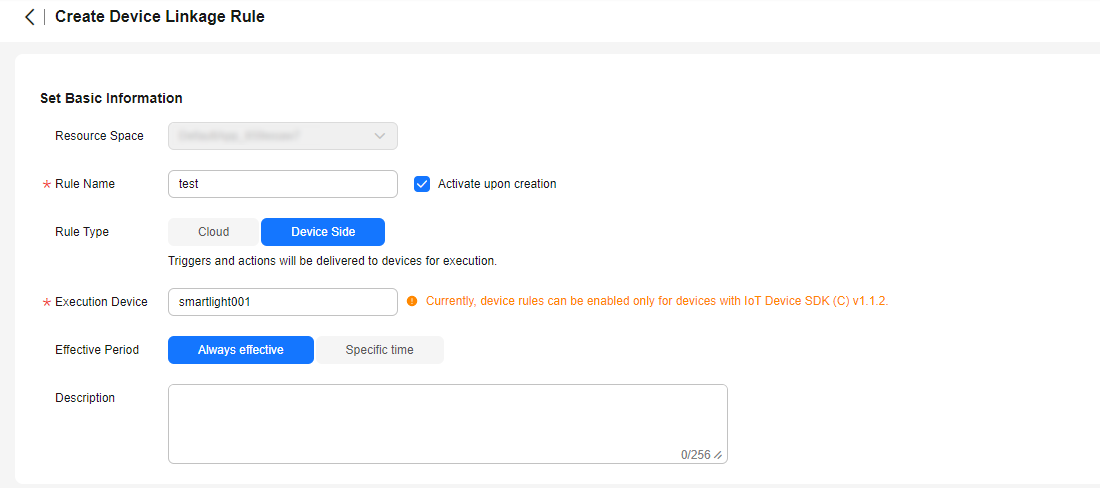
- On the page for creating a rule, enter a rule name, select Device Side for Rule Type, and select a device for Execution Device. The rule will be delivered to the device you select for parsing and execution.
Figure 9 Creating a linkage rule - Basic information on the device side
- Select smartlight001 and click OK.
Figure 10 Creating a linkage rule - Selecting a device
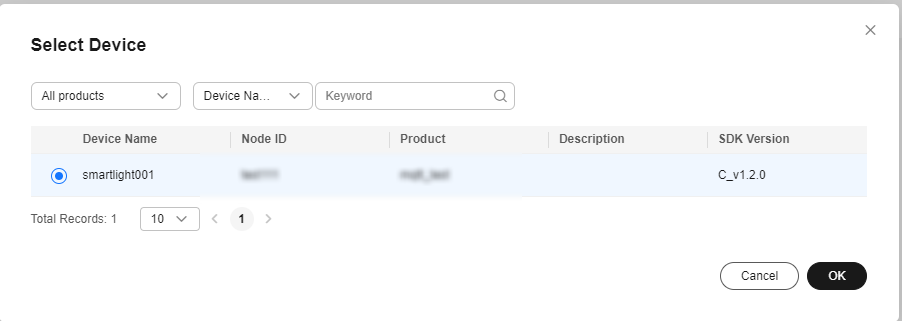

Device-side rules can be created only for devices with the IoT Device SDK. Currently, only IoT Device SDK (C) v1.1.2 is supported.
- Click Add Trigger. The current device is used by default, and other devices are not available. Click Add Action and select the current device or other devices.
Figure 11 Creating a linkage rule - Conditions and actions
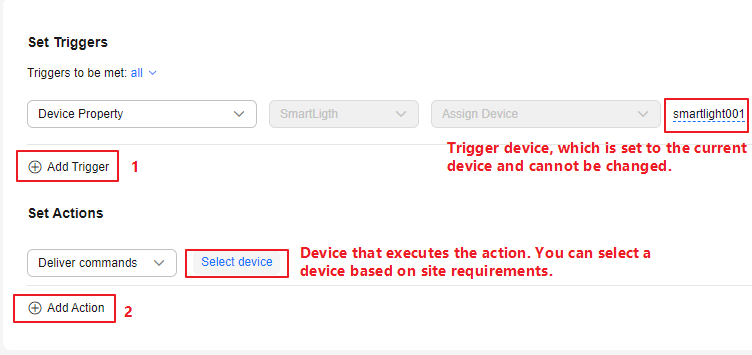
- In Set Triggers, set the property trigger to luminance<= 27. In Set Actions, configure the control_light command and configure the parameter to set light_state to on.
Figure 12 Creating a linkage rule - Conditions and actions

- In the navigation pane, choose Rules > Device Linkage. In the upper part of the page, select the resource space of the product to which the device belongs. Click Create Rule.
- Create a device linkage rule based on the table below.
Table 1 Parameters Parameter
Description
Rule Name
Specify the name of a rule to create.
Activate upon creation
Selected: The rule is activated upon creation.
Deselected: The rule is not activated after creation.
Effective Period
- Always effective: There is no time limit. IoTDA always checks whether conditions are met.
- Specific time: You can select a time segment during which the platform checks whether the conditions are met.
NOTE:
Device-side rules are stored in the memory. When a device is powered off, rules stored on the device are cleared. When the device is restarted or powered on, the device updates all historical rules from IoTDA.
Description
Describe the rule.
Set Triggers
You can set whether all conditions or any of the conditions need to meet.
NOTE:If all conditions need to meet, Device Property and Timer cannot be both set as triggers at the same time. You can only set multiple device properties as triggers.
Trigger type: Currently, only Device Property and Timer are supported.
- Device Property: The rule will be triggered when a device reports properties.
- Select service: Select the corresponding service type.
- Select property: Select a property in the data reported.
NOTE:- If the data type of a property is int or decimal, you can select multiple operators.
- If the data type of a property is string, you can only select the equal sign (=) as the operator.
- Timer: You can select Triggered every day or Triggered by policy.
- Triggered every day: Set the time at which the rule is triggered. It is usually used for periodic triggering conditions, such as turning off street lights at 07:00 every day.
- Triggered by policy
- Select a date and time: start time for triggering the rule.
- Repeat: number of times that the rule can be triggered. The value ranges from 1 to 1440.
- Interval: interval for triggering the rule after the start time. The value ranges from 1 to 1440, in units of minutes.
Set Actions
Click Add Action to set the action to execute after the rule is triggered.
Deliver commands: Select the device, service, and command to be delivered in sequence, and set the command delivery parameters.
- Click Create Rule in the lower right corner. Newly created rules are in the activated state by default. You can disable a rule in the Status column of the rule list.
- Compile the device-side code. In SDKs that supports device-side rules (only IoT Device SDK C is supported currently), you only need to implement the callback functions for property reporting and command processing. Click here to obtain the IoT Device SDK (C) and perform the following operations after the operations in Preparations are complete.
- Open the src/device_demo/device_demo.c file and find the HandleCommandRequest function.
Figure 13 Command processing
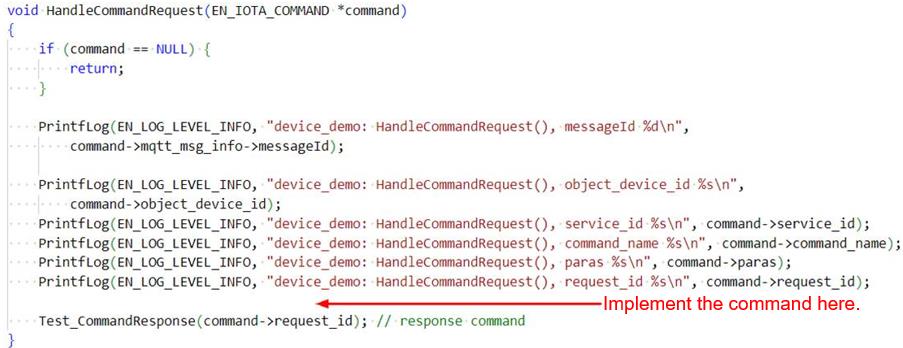
The following commands are use for demonstration only.
printf("----- execute command----- \n"); printf("service_id: %s\n", command->service_id); printf("command_name: %s\n", command->command_name); printf("paras: %s\n", command->paras); - Open the src/device_demo/device_demo.c file and find the TestPropertiesReport function.
Figure 14 Replacing the code

Use the following code:
const int serviceNum = 1; // reported services' total count ST_IOTA_SERVICE_DATA_INFO services[serviceNum]; #define MAX_BUFFER_LEN 70 char propsBuffer[MAX_BUFFER_LEN]; // This is an example of obtaining a temperature value. Obtain the actual value from a sensor. if(sprintf_s(propsBuffer, sizeof(propsBuffer), "{\"luminance\": %d}", 20) == -1){ printf("can't create string of properties\n"); return; } services[0].event_time = GetEventTimesStamp(); // if event_time is set to NULL, the time will be the iot-platform's time. services[0].service_id = "BasicData"; services[0].properties = propsBuffer; int messageId = IOTA_PropertiesReport(services, serviceNum, 0, NULL); if (messageId != 0) { printf("report properties failed, messageId %d\n", messageId); } free(services[0].event_time); - Compile and run the SDK. You can see the corresponding command from the output.
----- execute command-----
service_id: BasicData
command_name: control_light
paras: {
        "light_state":       "on"
}
The preceding log is only an example. You need to implement the specific command processing code in 1.
Before running commands across devices, ensure that the devices can communicate with each other. You may use different communication protocols, such as Wi-Fi, BLE, and ZigBee, so you need to call IOTA_SetDeviceRuleSendMsgCallback to register a custom sending function.
HandleDeviceRuleSendMsg is registered in the demo by default. You need to implement message sending in HandleDeviceRuleSendMsg. After receiving the message, the target device needs to parse and execute the command.
Figure 15 Parsing and executing commands
- Open the src/device_demo/device_demo.c file and find the HandleCommandRequest function.
Feedback
Was this page helpful?
Provide feedbackThank you very much for your feedback. We will continue working to improve the documentation.See the reply and handling status in My Cloud VOC.
For any further questions, feel free to contact us through the chatbot.
Chatbot


