

Installing the Agent
Before enabling database server backup, you also need to install the Agent on your ECSs.
If Agent is not installed on servers, database server backup will fail, but a common server backup can be performed instead. To ensure a successful database server backup, download and install the Agent first.
Operation Instructions
- Database server backup is available only for x86-based ECSs. It is not available for Kunpeng-based ECSs.
- During the Agent installation, the system requires the rdadmin user's permissions to run the installation program. To improve O&M security, change the user rdadmin's password of the Agent OS regularly and disable this user's remote login permission. For details, see Changing the Password of User rdadmin.
- Table 1 lists the OSs that can have the Agent installed. Only Windows OSs in English can have the Agent installed.
Table 1 OSs supporting the Agent Database
OS
Supported Versions
SQL Server 2008
Windows
Windows Server 2012, 2012 R2, 2019 for x86_64
SQL Server 2012
Windows
Windows Server 2012, 2012 R2, 2019 for x86_64
SQL Server 2019
Windows
Windows Server 2019 for x86_64
SQL Server 2014/2016/EE
Windows
Windows Server 2016 Datacenter for x86_64
MySQL 5.5/5.6/5.7
Red Hat
Red Hat Enterprise Linux 6 and 7 for x86_64
SUSE
SUSE Linux Enterprise Server 12, 15 SP1, 15 SP2 for x86_64
CentOS
CentOS 6 and 7 for x86_64
EulerOS
Euler OS 2.2 and 2.3 for x86_64
HANA 1.0/2.0
SUSE
SUSE Linux Enterprise Server 12 for x86_64

For Windows servers, ensure that Volume Shadow Copy is running properly. Otherwise, the backup will fail.
- Table 2 lists the supported SHA-256 values.
Table 2 SHA-256 values Package Name
SHA-256 Value
Cloud Server Backup Agent-CentOS6-x86_64.tar.gz
f0c59ccb4443bcb6e874bf6e3c574914f9f8b27f3f7379e2d81956a9972802f3
Cloud Server Backup Agent-CentOS7-x86_64.tar.gz
2d3028cb794e1699bae9f65746a60ae99be17d5c4c5e7ebe6b45ff261db9c3c7
Cloud Server Backup Agent-EulerOS2-x86_64.tar.gz
4fb4cf9cb6f5b0e6c13d8ad8bf928754cb95332ee645a97fd0bb3fcbeb53d003
Cloud Server Backup Agent-RedHat6-x86_64.tar.gz
6ae3838fb5644f0f47282c211fe20c6b57a7c5c1d683cd5a1f55860d259b2054
Cloud Server Backup Agent-RedHat7-x86_64.tar.gz
40fa68a808d9da04672678b2773e3345ea6c9dee3c17d598acb66a023cc5cacc
Cloud Server Backup Agent-SuSE11-x86_64.tar.gz
346cc9f1fc0a41a817abb2db61e657a4d615449e13bc46f1c1cfbadc0b281f47
Cloud Server Backup Agent-SuSE12-x86_64.tar.gz
625279b9c9d17ddcc4210b78242efebacdad73f808b86754659d243ece85a400
Cloud Server Backup Agent-WIN64.zip
b7b2067ac89f1fec635d82e3fe2ea794ce6482f9880838f34924b383be44ac4e
During Agent installation, the system automatically opens one of the firewall ports between 59526 and 59528 on the ECS. If port 59526 is in use, it will try 59527 and then move to the next available port in the range.
Prerequisites
- The username and password for logging in to the console have been obtained.
- The security group has been configured.
- The Agent Status of the ECS is Not installed.
- If you use Internet Explorer, you need to add the websites you will use to trusted sites.
Installing the Agent for a Linux OS (Method 1)
- Log in to the CBR console.
- Log in to the CBR console.
- In the upper left corner, click
 and select a region.
 - Click
 and choose Storage > Cloud Backup and Recovery.
- In the navigation pane, choose Cloud Server Backups.
- Click the Agent Installation tab. Figure 1 Installation page for Linux

- In method 1, select the corresponding Agent version as required, and copy the installation command in step 2.
- On the ECS page, select the target server and click Remote Login in the Operation column to log in to the ECS.
Ensure that the package's SHA-256 value is the same as that listed in Table 2.
In method 2, click Download, select a version based on the target ECS OS, and click OK to obtain the software package.
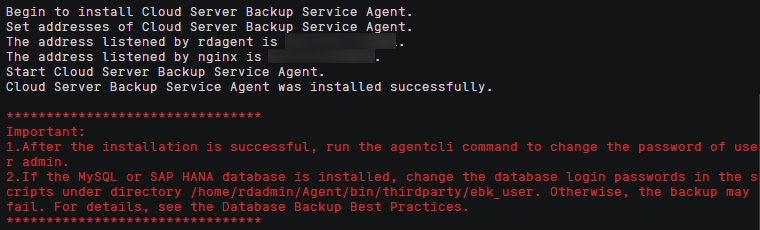
- Paste the installation command in step 2 to the ECS and run the command as user root. The system displays a message indicating that the agent is installed successfully. See Figure 2.
If the execution fails, run the yum install -y bind-utils command to install the dig module. If the installation still fails, use method 2 to install the Agent for a Linux OS.
- After the installation is complete, Agent is running properly. To implement application-consistent backup for MySQL, SAP HANA, or other types of databases, modify or compile a custom script by referring to the Cloud Backup and Recovery Best Practices.
Installing the Agent for a Linux OS (Method 2)
- Log in to the CBR console. Click
 in the upper left corner and select a region.
 - Click the Agent Installation tab. Figure 3 Installation page for Linux

- In method 2, click Download. On the displayed download page, select the version to be downloaded based on the OS of the target ECS, and click OK. See Figure 4.

- Check that the package's SHA-256 value is the same as that listed in Table 2.
- Use a file transfer tool, such as Xftp, SecureFX, or WinSCP, to upload the Agent installation package to your ECS.
- After the upload, go to the ECS page. Select the target server and click Remote Login in the Operation column to log in to the ECS.
- Run the tar -zxvf command to decompress the Agent installation package to any directory and run the following command to go to the bin directory:
cd bin
- Run the following command to run the installation script:
sh agent_install_ebk.sh
- Check that the system displays a message indicating that the Agent is installed successfully. See Figure 5.
- If the MySQL or SAP HANA database has been installed on the ECS, run the following command to encrypt the password for logging in to the MySQL or SAP HANA database:
/home/rdadmin/Agent/bin/agentcli encpwd
- Use the encrypted password in previous step to replace the database login password in the script in /home/rdadmin/Agent/bin/thirdparty/ebk_user/.
- After the installation is complete, Agent is running properly. To implement application-consistent backup for MySQL, SAP HANA, or other types of databases, modify or compile a custom script by referring to the Cloud Backup and Recovery Best Practices.

Installing the Agent for a Windows OS (Method 1)
- Log in to the CBR console. Click in the upper left corner and select a region.
- Click the Agent Installation tab. Figure 6 Installation page for Windows

- In method 1, click Download. Save the downloaded installation package to a local directory.
- Check that the package's SHA-256 value is the same as that listed in Table 2.
- Use a file transfer tool, such as Xftp, SecureFX, or WinSCP, to upload the Agent installation package to your ECS.
- Log in to the ECS console and access the ECS as the administrator.
- Decompress the installation package to any directory and go to the Installation path\bin directory.
- Double-click the agent_install_ebk.bat script to start the installation.
- Check that the system displays a message indicating that the Agent is installed successfully. See Figure 7.

Installing the Agent for a Windows OS (Method 2)
- Log in to the CBR console. Click in the upper left corner and select a region.
- Click the Agent Installation tab. Figure 8 Installation page for Windows

- On the ECS page, select the target server and click Remote Login in the Operation column to log in to the ECS as the administrator.
- Copy the installation commands in step 2 of method 2 to the server and run the command in the Command Prompt.
- Copy the installation command in step 3 of method 2 to the browser. The following uses ap-southeast-1 as the example region. Then press Enter to download the installation package.
https://csbs-agent-ap-southeast-1.obs.ap-southeast-1.myhwclouds.com/Cloud Server Backup Agent-WIN64.zip
- Check that the package's SHA-256 value is the same as that listed in Table 2.
- Decompress the installation package to any directory. Then go to the Installation path\bin directory.
- Double-click the agent_install_ebk.bat script to start the installation.
- Check that the system displays a message indicating that the Agent is installed successfully. See Figure 9.

What is your overall rating for this page?
Thank you very much for your feedback. We will continue working to improve the documentation.See the reply and handling status in My Cloud VOC.
For any further questions, feel free to contact us through the chatbot.
Chatbot


