Managing Scheduled Tasks
Disabling a Scheduled Task
By default, a created scheduled task is active and runs at the set time or on a schedule. To stop the scheduled task, disable it.
- Log in to the application designer by referring to Logging In to the Application Designer.
- In the navigation pane, choose BPMs.
- In Scheduled Task, click a created scheduled task. The task details page is displayed.
- In the upper right corner of the page, click Disable.
Importing Scheduled Tasks in Batches
If a large number of scheduled tasks need to be created, you can import scheduled tasks in batches. Before importing scheduled tasks, ensure that scheduled tasks have been created by referring to Managing Scheduled Tasks in Applications.
- Log in to the application designer by referring to Logging In to the Application Designer.
- In the navigation pane, choose BPMs.
- Click
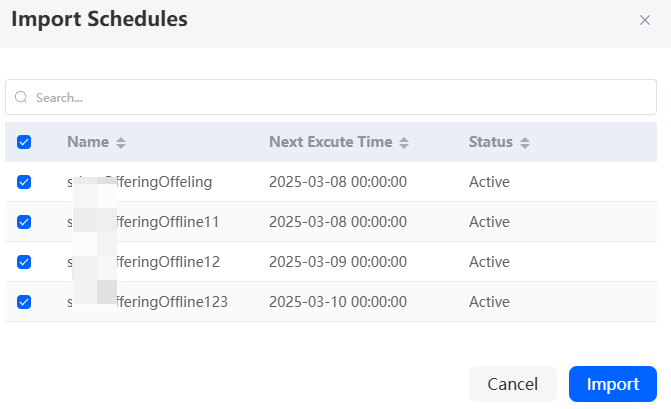
 next to Scheduled Task. The page for importing scheduled tasks is displayed.
 - Select the scheduled task to be imported and click Import.
After the import is successful, choose BPMs > Scheduled Task to view the imported scheduled tasks.Figure 1 Importing scheduled tasks

Moving a Scheduled Task
After a scheduled task is created, you can move the scheduled task to an application with development permissions. For example, if a scheduled task created in application A is needed in application B, you can clone it in application A and move the clone to application B.
- Log in to the application designer by referring to Logging In to the Application Designer.
- In the navigation pane, choose BPMs.
- Move the cursor to
 of a scheduled task, and choose Move.
 - On the Move to another app page, click Next.
You can also select other elements and move them together.
- Select the target application and click Confirm.
- After the scheduled task is moved, click Open Now in the prompt message. Then you can access the target application.
In the navigation pane, choose BPMs > Scheduled Task to view the scheduled task.Figure 2 Clicking Open Now

Cloning a Scheduled Task
You can clone a scheduled task to an application. For example, if application A contains scheduled tasks with similar functions, you can clone one scheduled task to make a new one. This allows you to editing the clone without starting the creation process over.
- Log in to the application designer by referring to Logging In to the Application Designer.
- In the navigation pane, choose BPMs.
- Move the cursor to
 of a scheduled task, and choose Clone.
 - Set the unique ID of the scheduled task and click Confirm.
After the cloning is successful, you can view the scheduled task in the scheduled task folder.
Deleting a Scheduled Task
If a scheduled task in an application is no longer used, you can delete it from the application to prevent it from occupying the resource quota of the account.
- Log in to the application designer by referring to Logging In to the Application Designer.
- In the navigation pane, choose BPMs.
- Under Scheduled Task, click the scheduled task to be deleted. The task details page is displayed.
- On the details page, click Disable to disable the task.
- Move the cursor to
 of the disabled task and choose Delete.
 - In the displayed dialog box, select Delete the records in the resource and click Confirm.
If you do not select Delete the records in the resource, only the scheduled task is deleted. The functional modules that use the scheduled task are not affected.
Feedback
Was this page helpful?
Provide feedbackThank you very much for your feedback. We will continue working to improve the documentation.See the reply and handling status in My Cloud VOC.
For any further questions, feel free to contact us through the chatbot.
Chatbot


