Managing Scheduled Tasks in Applications
You can create a scheduled task to enable the system to automatically execute a script and orchestrate services to implement service functions.
Scenario
Let's assume that you need to create a scheduled task OfferingOffline to remove expired products at 00:00 every day from November 25, 2021. This function is realized using the OfferingOffline script. Before creating a scheduled task, develop a script for implementing the schedule. For details, see Scripts.
In addition to creating a scheduled task in the environment configuration page, you can also create a scheduled task during application development. For details, see Scheduled Tasks. The difference is that scheduled tasks created in the application development designer can be packaged and released together with applications. Scheduled tasks created in the environment configuration cannot be released with applications. In addition, the scheduled task created during application development is valid only for the current application. The scheduled task created in the environment configuration page can be used in multiple applications.
Creating a Scheduled Task
- Log in to the Huawei Cloud Astro Zero console and click Access Homepage. The application development page is displayed.
- In the upper left corner of the page, click
 and choose Environments > Environment Configuration.
 - Choose Maintenance from the main menu.
- In the navigation pane, choose Global Elements > Schedule Tasks and click New.
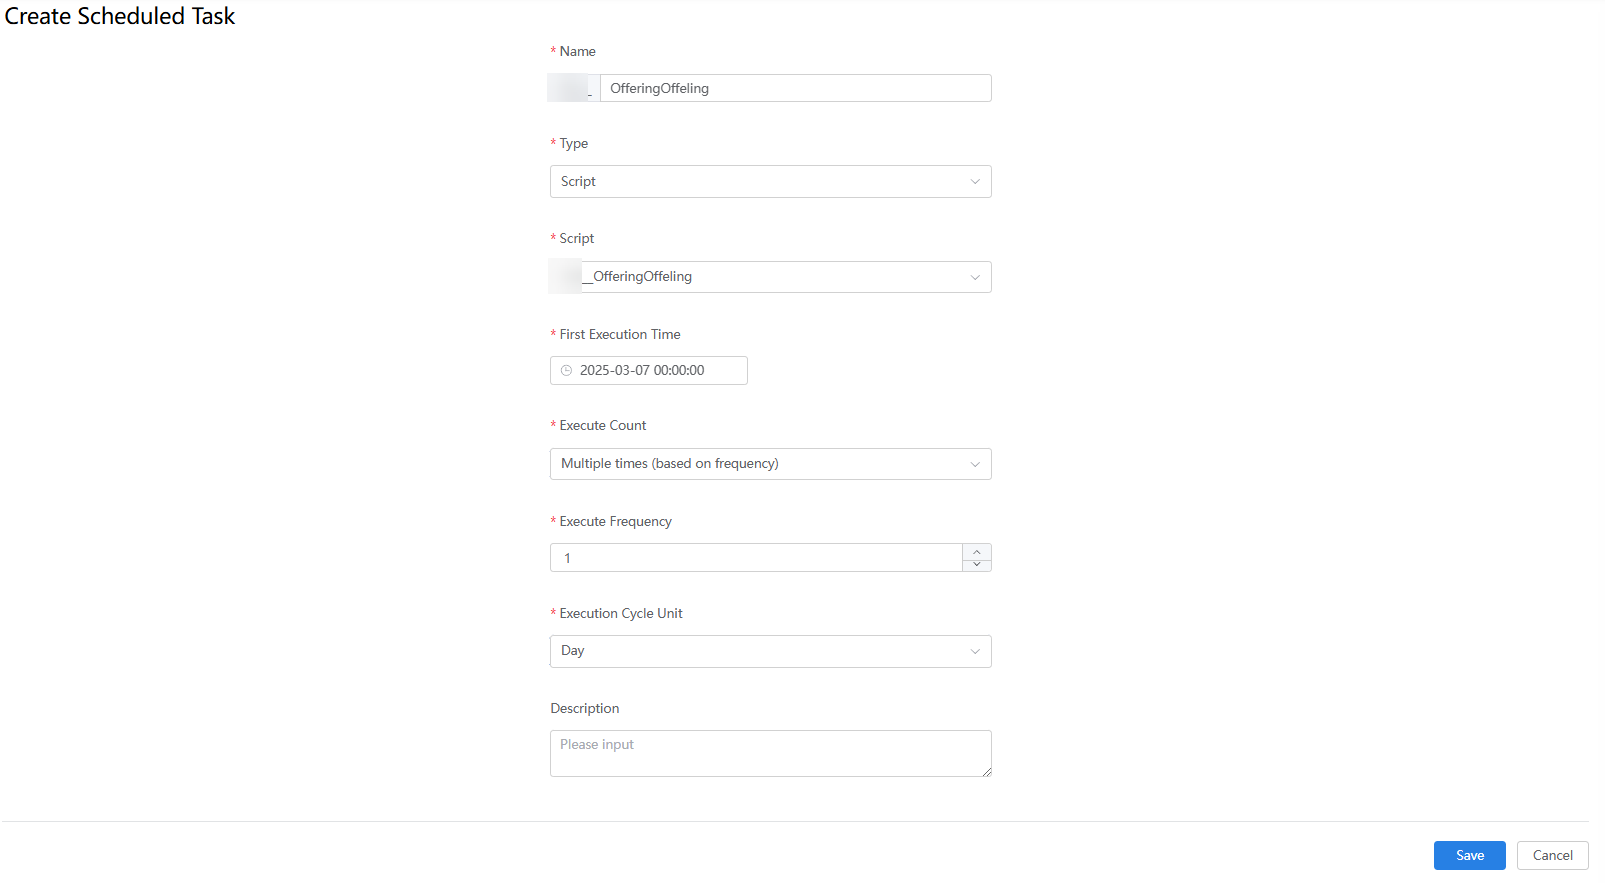
- Configure the scheduled task and click Save.
After the settings are saved, the scheduled task is in the Enabled state.
Figure 1 Configuring a scheduled task
Table 1 Scheduled task parameters Parameter
Description
Name
Scheduled task name. The naming requirements are as follows:
- Enter up to 64 characters.
- Start with a letter and can contain only letters, digits, and underscores (_). It cannot end with an underscore (_).
Type
Type of the scheduled task. Scripts and flows are supported.
Script/Flow
Select the script or flow to be executed by the scheduled task.
Input Parameters
Input parameters of a script or flow. This parameter is displayed only when input parameters are defined in the script or flow.
First Execution Time
Time when a script or flow is executed for the first time.
Execute Count
Frequency for executing the task. The options are as follows:
- Once: The task is executed either immediately or at a specified time, but only once.
- Multiple times (based on frequency): The task is executed periodically at the specified interval, starting from the specified time.
- By Cron Expression: The task is executed based on the configured Cron expression.
By Cron Expression
If Execute Count is set to By Cron Expression, you need to set the expression of the scheduled task.
A Cron expression is a time-based syntax used to specify the execution time, frequency, and interval of a scheduled task. A Cron expression consists of six fields: second, minute, hour, date, month, and day of the week. For details on the values for each field, see Table 2.
Example:
Description                           Expression
Execute at 6:00 every day                     0 0 6 * * ?
Execute at 0:00, 6:00, and 12:00 daily   0 0 0,6,12 * * ?
Execute at 2:00 every Saturday                0 0 2 ? * SAT
Trigger at 10:20 AM from Monday to Friday        0 20 10 ? * MON-FRI
Execute Frequency
Number of times the task will be executed. This parameter is available only when Execute Count is set to Multiple times (based on frequency).
Example: 1
Execution Cycle Unit
Time unit for executing the task. This parameter is available only when Execute Count is set to Multiple times (based on frequency).
Example: Day
Description
Description of the scheduled task.
Value: 1–255 characters.
Table 2 Cron expression field values Field
Allowed Value
Allowed Special Character
Second
0–59
Not supported
Minute
0–59
* /
Hour
0–23
- * /
Date
1–31
- * ? /
Month
1–12
JAN-DEC - * /
Day of Week
1–7
SUN-SAT - * ? /
Table 3 Supported special characters in a cron expression Character
Description
Example
,
Used to specify additional values.
1,3,4,7,8.
*
Used to select all values within a field.
If the Minute field is set to *, an event is triggered every minute.
?
Used to match any value of a field. However, it can be used only in the Date and Day of week fields because the two fields affect each other.
To trigger a scheduled task on the 20th day of each month, regardless of the day of week, use the following format: 13 13 15 20 *?
The 20th day is specified in the Date field, the last character of the Day of week field can only be a question mark (?) instead of an asterisk (*). If the last character is *, it indicates that the event is triggered on any day of a week, which is exclusive with the 20th day of the date field. In this case, the expression is incorrect.
-
Used to specify ranges.
For the Hour field, the value ranges from 8 to 10, indicating that the incident is triggered every hour from 8:00 to 10:00.
/
Used to specify increments. An incident is triggered from the specified time and at a fixed interval.
In the Hour field, */3 is equivalent to "every three hours". That is, an incident is triggered at the following time points in a day: 0, 3, 6, 9, 12, 15, 18, and 21.
Using a Scheduled Task
Scheduled tasks created in the Huawei Cloud Astro Zero environment configuration page can be directly imported and used during application development.
- Log in to the application designer by referring to Logging In to the Application Designer.
- In the navigation pane, choose BPMs.
- Click
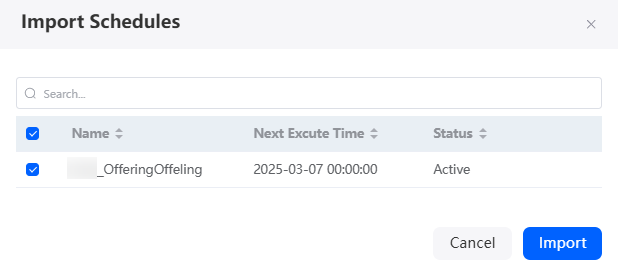
 next to Scheduled Task. The page for importing scheduled tasks is displayed.
 - Select the scheduled task to be imported and click Import.
After the import is successful, choose BPMs > Scheduled Task to view the imported scheduled tasks.Figure 2 Importing a scheduled task

Disabling a Scheduled Task
When a scheduled task is created, it is activated by default. You can deactivate the task.
- Log in to the Huawei Cloud Astro Zero console and click Access Homepage. The application development page is displayed.
- In the upper left corner of the page, click
 and choose Environments > Environment Configuration.
 - Choose Maintenance from the main menu.
- In the navigation pane, choose Global Elements > Scheduled Tasks.
- Click ON next to the scheduled task to be disabled.
You can also go to the scheduled task details page and click Disable.
Viewing the Task Execution History
You can view the task execution history, including the start time, end time, and execution status.
- Log in to the Huawei Cloud Astro Zero console and click Access Homepage. The application development page is displayed.
- In the upper left corner of the page, click
 and choose Environments > Environment Configuration.
 - Choose Maintenance from the main menu.
- In the navigation pane, choose Global Elements > Scheduled Tasks and click Execution History.
- You can set the name, start time, and end time of the task, or search for the execution history of a task in a specified period.
Feedback
Was this page helpful?
Provide feedbackThank you very much for your feedback. We will continue working to improve the documentation.See the reply and handling status in My Cloud VOC.
For any further questions, feel free to contact us through the chatbot.
Chatbot


