
Migrating Data from Doris to MRS with CDM
Scenarios
This section describes how to use CDM to migrate data from Doris clusters in an on-premises IDC or on a public cloud to Huawei Cloud MRS. CDM is a service that facilitates batch data migration between homogeneous/heterogeneous data sources, enabling you to achieve smooth data transfer.
This section uses data migration from Doris on a public cloud to MRS as an example.
Solution Architecture
Doris data migration involves metadata migration and data migration. Figure 1 shows the migration architecture.

- Run SQL statements to query all metadata at the source and then run the same table creation statement at the destination to complete the migration.
Export all table creation statements and compare them with the table creation statements exported last time to identify incremental metadata and migrate it.
- Use Stream Load to migrate both historical and incremental service data. For non-partitioned tables, incremental data is migrated after table clearing. For partitioned tables, only data in new partitions is migrated.
- Historical data migration: Use CDM to migrate all historical data to the destination.
- Incremental data migration: Use CDM to migrate incremental data. For non-partitioned tables, incremental data is migrated after table clearing. For partitioned tables, only data in new partitions is migrated.
Migration Survey
Before migrating Doris data, you need to conduct a survey on the source Doris component to evaluate the risks that may occur during the migration and impact on the system. The survey covers the Doris component version, deployment mode, data storage, and performance optimization. For details, see Table 1.
|
Survey Item |
Content |
Example |
|---|---|---|
|
Version compatibility |
Doris cluster version |
The Doris cluster version is 1.2.0. |
|
Specifications |
Instance specifications in the Doris cluster |
There are three instances in the Doris cluster, each with 8 vCPUs and 8 GB of memory. |
|
Data volume |
Amount of data processed by Doris |
100 TB per node |
|
Tables |
How many Doris tables need to be migrated, the number of partitioned tables, and how many tables there are of different sizes (tables smaller than 1 GB, tables smaller than 1 TB, and the size of the largest table); and the largest number of partitions in any table (it cannot be more than several tens of thousands) |
There are three databases for Doris tables to be migrated, each database has 3000 tables, and 10% of the tables have partitions. The largest table is 10 TB, most tables are 20 GB, and the largest number of partitions is 1000. |
|
Destination cluster |
|
Kerberos authentication is enabled for the destination MRS cluster. There are ten Doris users with different permissions and cross-authorization. |
|
User-defined function (UDF) jobs |
Whether UDFs are used. If UDFs are used, collect the number and types of UDFs. |
There are 20 UDFs |
|
Disk size |
Total storage capacity required (planned total disk capacity = estimated capacity x number of replicas) |
The total capacity is 300 TB. |
|
Used disk size |
Used storage capacity |
The used capacity is 160 TB. |
|
Multi-replica storage |
Number of replicas. Three replicas are used by default, and you can change it if required. |
Three replicas |
|
Data source |
Source of data written to Doris tables |
Flink, Kafka, and Load |
Networking Types
The migration solution supports various networking types, such as the public network, VPN, and Direct Connect. Select a networking type based on the site requirements. The migration can be performed only when the source and destination networks can communicate with each other.
|
Migration Network Type |
Advantage |
Disadvantage |
|---|---|---|
|
Direct Connect |
|
|
|
VPN |
|
|
|
Public IP address |
|
|
Notes and Constraints
- During migration, if the source cluster continues receiving real-time data writes, the migration job may experience inconsistent runtime and result in data inconsistency. In this case, you can use the verification tool to identify inconsistent tables and check whether data is consistent based on the service time.
- The migration may cause the performance of the source cluster to deteriorate, increasing the response time of source services. You need to properly configure resources, including compute, storage, and network resources, in the source cluster to ensure that it can handle the migration workloads.
- For CDM-based migration, it's recommended to limit the data volume to 50 GB per batch. If the total data exceeds 50 GB, it should be migrated in multiple batches.
- CDM does not support migration of bitmap tables. For details, see Notes and Constraints on CDM Data Migration.
Prerequisites
- You have prepared the destination MRS Doris cluster. For example, the cluster version is MRS 3.3.1-LTS.1, the component is Doris cluster, and Kerberos authentication is disabled.
- You have created a CDM cluster. The security group, VPC, and subnet of the CDM cluster must be the same as those of the destination MRS Doris cluster to ensure that the CDM cluster can communicate with the MRS cluster.
Migrating All Doris Metadata
Run show create on the source to query the table creation statement, and run the same table creation statement on the destination to migrate Doris metadata.
- Use the MySQL client to connect to the source Doris cluster and run the following command to check the source database:
show databases;
Record the name of the database to be migrated, for example, test_w. System tables do not need to be migrated.
Figure 2 Checking the database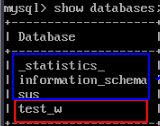
- Check the commands for creating databases and tables in the source Doris cluster.
- Run the following command to check and record the command for creating databases:
show create database test_w;Figure 3 Checking the command for creating databases
- Run the following command to switch the database:
use test_w; - Run the following command to check database tables:
show tables;
Figure 4 Checking tables
- Run the following commands in sequence to check and record the commands for creating the tables to be migrated. For example, run the following command to check the command for creating the orders1 table:
show create table test_w.orders1;
When running the table creation command in the destination cluster, delete Table name | from the obtained command and directly run create...;.
Figure 5 Checking the table creation command
- Run the following command to check and record the command for creating databases:
- Create the databases and tables to be migrated in the destination cluster to complete metadata migration.
- Use the MySQL client to connect to the destination Doris cluster.
- Run the database creation command obtained in 2.a to create the database in the destination Doris cluster.
- Switch to the newly created database, for example, test_w.
use test_w; - Run the table creation command obtained in 2.d to create the table in the destination Doris cluster.
Migrating All Data
- Log in to the CDM console.
- On the Cluster Management page, locate the row containing the desired cluster and click Job Management in the Operation column.
- On the Links tab page, click Create Link to create a source link and a destination link.
- Select DORIS for Data Warehouse, and click Next.
- On the configuration page, set the following parameters. For details, see Doris Link Parameters.
Table 3 Doris link parameters Parameter
Description
Example Value
Name
Link name, which should be defined based on the data source type, so it is easier to remember what the link is for
- doris_source
- doris_target
Database Server
IP address or domain name of the database server. List of one or more servers separated by semicolons (;).
192.168.0.1;192.168.0.2
Port
Port of the database to connect
9030
Database Name
Name of the database to connect
dbname
Username
Username used for accessing the database. This user must have the permissions required to read and write data tables and metadata.
cdm
Password
Password of the user
-
SSL Encryption
Whether SSL encryption is enabled for Doris connection
Yes
stream load port
Stream load port
8030
check streamLoad
Whether to check the streamLoad link
Yes
Reference Sign
Delimiter used to separate referenced table names or column names
`
Driver Version
Upload the required driver.
-
Fetch Size
(Optional) Displayed when you click Show Advanced Attributes.
Number of rows obtained by each request. Set this parameter based on the data source and the job's data size. If the value is either too large or too small, the job may run for a long time.
1000
Commit Size
(Optional) Displayed when you click Show Advanced Attributes.
Number of records submitted each time. Set this parameter based on the destination and data size of the job. If the value is either too large or too small, the job may run for a long time.
-
Link Attributes
(Optional) Click Add to add the JDBC connector attributes of multiple specified data sources. For details, see the JDBC connector document of the corresponding database.
The following are some examples:
query_timeout=259200 and socketTimeout=300000: When a large amount of data needs to be migrated or the entire table is retrieved using query statements, the migration fails due to connection timeout. In this case, you can customize the connection timeout interval (ms) and socket timeout interval (ms) to prevent failures caused by timeout.
query_timeout=259200
Link Secret Attributes
Custom secret attributes of the link
-
- Click Test to check connectivity, and then click Save.
- Create and execute a job.
- Choose the Table/File Migration tab and click Create Job. On the displayed page, set the parameters.
- Job Name: Name of the job to create. You can define the name based on the data source type, for example, doris-test_w.sales-data, so it is easier to remember.
- Source Job Configuration: For details about the source job parameters, see From Doris.
Table 4 Source job parameters for Doris Parameter
Description
Example Value
Source Link Name
Select the source Doris link created in 3.
doris-source
Use SQL Statement
Whether to use SQL statements to extract source data
No
Schema/Tablespace
Name of the database to be migrated
Click the icon next to the text box to select a schema or tablespace.
test_w
Table Name
Name of the table to be migrated.
sales
Where Clause
WHERE clause that specifies the data extraction range. If this parameter is not set, data of the entire table will be extracted. If the table to be migrated does not contain the fields specified by the WHERE clause, the migration will fail.
age > 18 and age <= 60
Retain One Decimal Place for Date Values
Whether to retain one decimal place for date values
No
Partition Column
Column used to split data during data extraction to implement parallel extraction. Fields of string type cannot be selected.
id
Null in Partition Column
During concurrent extraction, if the partition column does not contain null, set this parameter to No to improve performance. If you are not sure whether the partition column contains null, set this parameter to Yes to avoid data loss.
Yes
- Destination Job Configuration: For details about the destination job parameters, see To Doris.
Table 5 Destination job parameters for Doris Parameter
Description
Example Value
Destination Link Name
Select the destination Doris link created in 3.
doris_target
Schema/Tablespace
Name of the destination database to which data will be written. The schema can be automatically created.
Click the icon next to the text box to select a schema or tablespace.
test_w
Table Name
Name of the destination table to which data will be written.
Click the icon next to the text box to select a table.
sales
Clear Data Before Import
Whether to clear the data in the destination table before data import. The options are as follows:
- Do not clear: The data in the destination table is not cleared before data import. The imported data is just added to the table.
- Clear all data: All data is cleared from the destination table before data import.
- Clear part of data: Part of the data in the destination table is cleared before data import. If you select Clear part of data, you must configure Where Clause to specify which part will be deleted.
Do not clear
Where Clause
If Clear Data Before Import is set to Clear part of data, data in the destination table will be deleted based on the WHERE clause after the configuration is complete and before the import starts.
age > 18 and age <= 60
Prepare for Data Import
The SQL statement that is first executed before a task is executed. Currently, only one SQL statement can be executed.
create table xxx
Complete Statement After Data Import
The SQL statement that is executed after a task is executed. Currently, only one SQL statement can be executed.
create table xxx
Loader Threads
Number of threads started in each loader. A larger number allows more concurrent write operations.
Conflict handling policies do not support "replace into" or "on duplicate key update".
4
- Click Next. On the displayed Map Field page, view field mappings.
- Click Next. On the displayed Configure Task page, set the following parameters and click Save and Run.
- Retry if Failed: You are advised to configure automatic retry for only file migration jobs and database migration jobs with Import to Staging Table enabled to avoid data inconsistency caused by repeated data writes. For example, set this parameter to Never.
- Job: Select the group where the job resides. For example, select the default group DEFAULT.
- Schedule Execution: Determine whether to automatically execute the job at a scheduled time. For example, set this parameter to No.
- View the job status in the job list. If the status is Succeeded, the job is successfully executed.
- Choose the Table/File Migration tab and click Create Job. On the displayed page, set the parameters.
Identifying and Migrating Incremental Metadata
- Run the mysqldump command on the node where the destination MySQL database is located to export the database table structures of the source and destination databases and save the results to two different files.
mysqldump -hhost -Pport -uUsername -pPassword --no-tablespaces --all-databases --no-data > File path
For example, save the source database table structure in /opt/doris/doris-source-meta, and the destination database table structure in /opt/doris/doris-target-meta.
- Run the vimdiff command to compare the differences between the two files exported in 1.
vimdiff /opt/doris/doris-source-meta /opt/doris/doris-target-meta

- The system table varies depending on versions and does not need to be migrated.
- If the differences are in properties, only the new fields and new partitions need to be migrated.
For example, the following comparison result shows:
- Table part2 is newly added to the source.
Figure 6 Table added to the source

- Field type is newly added to source table mrs_table.
Figure 7 Field added to the source table

- Add the table or modify the table structure to add the field in the destination database based on the comparison result in 2. The command for modifying the table structure is as follows:
ALTER TABLE db.table_name ADD COLUMN column_name TYPE;
Migrating Incremental Data
When you use CDM to migrate incremental Doris data, partitioned tables are handled by adding a WHERE clause during migration job configuration. For non-partitioned tables, all existing data is cleared before import, and then all data is migrated.
- Add the source and destination Doris connections by referring to 1 to 3 in Migrating All Data.
- Create and execute a job.
- Click Job Management. Choose the Table/File Migration tab and click Create Job. On the displayed page, set the parameters.
- Job Name: Name of the job to create. You can define the name based on the data source type, for example, doris-increase, so it is easier to remember.
- Source Job Configuration: For details about the source job parameters, see From Doris.
Table 6 Source job parameters for Doris Parameter
Description
Example Value
Source Link Name
Select the source Doris link created in 3.
doris-source
Use SQL Statement
Whether to use SQL statements to extract source data
No
Schema/Tablespace
Name of the database to be migrated
Click the icon next to the text box to select a schema or tablespace.
test_w
Table Name
Name of the table to be migrated.
sales
Where Clause
WHERE clause that specifies the data extraction range. If this parameter is not set, data of the entire table will be extracted. If the table to be migrated does not contain the fields specified by the WHERE clause, the migration will fail.
This parameter is mandatory if incremental data of a partitioned table needs to be migrated.
sale_data="2024-06-13"
Retain One Decimal Place for Date Values
Whether to retain one decimal place for date values
No
Partition Column
Column used to split data during data extraction to implement parallel extraction. Fields of string type cannot be selected.
id
Null in Partition Column
During concurrent extraction, if the partition column does not contain null, set this parameter to No to improve performance. If you are not sure whether the partition column contains null, set this parameter to Yes to avoid data loss.
Yes
- Destination Job Configuration: For details about the destination job parameters, see To Doris.
Table 7 Destination job parameters for Doris Parameter
Description
Example Value
Destination Link Name
Select the destination Doris link created in 3.
doris_target
Schema/Tablespace
Name of the destination database to which data will be written. The schema can be automatically created.
Click the icon next to the text box to select a schema or tablespace.
test_w
Table Name
Name of the destination table to which data will be written.
Click the icon next to the text box to select a table.
sales
Clear Data Before Import
Whether to clear the data in the destination table before data import. The options are as follows:
- Do not clear: The data in the destination table is not cleared before data import. The imported data is just added to the table.
- Clear all data: All data is cleared from the destination table before data import.
If incremental migration of non-partitioned table data is required, select Clear all data.
- Clear part of data: Part of the data in the destination table is cleared before data import. If you select Clear part of data, you must configure Where Clause to specify which part will be deleted.
Do not clear
Where Clause
If Clear Data Before Import is set to Clear part of data, data in the destination table will be deleted based on the WHERE clause after the configuration is complete and before the import starts.
age > 18 and age <= 60
Prepare for Data Import
The SQL statement that is first executed before a task is executed. Currently, only one SQL statement can be executed.
create table xxx
Complete Statement After Data Import
The SQL statement that is executed after a task is executed. Currently, only one SQL statement can be executed.
create table xxx
Loader Threads
Number of threads started in each loader. A larger number allows more concurrent write operations.
Conflict handling policies do not support "replace into" or "on duplicate key update".
4
- Click Next. On the displayed Map Field page, view field mappings.
- Click Next. On the displayed Configure Task page, set the following parameters and click Save and Run.
- Retry if Failed: You are advised to configure automatic retry for only file migration jobs and database migration jobs with Import to Staging Table enabled to avoid data inconsistency caused by repeated data writes. For example, set this parameter to Never.
- Job: Select the group where the job resides. For example, select the default group DEFAULT.
- Schedule Execution: Determine whether to automatically execute the job at a scheduled time. For example, set this parameter to No.
- View the job status in the job list. If the status is Succeeded, the job is successfully executed.
- Click Job Management. Choose the Table/File Migration tab and click Create Job. On the displayed page, set the parameters.
Verifying Doris Data Migration
The following operations use the MgC Agent for Linux as an example to describe how to verify Doris data consistency after the migration. The MgC Agent version is 25.3.3. The actual operations may vary depending on the Agent version. For details, see Big Data Verification.
- Create two Linux and one Windows ECSs. The security groups, VPCs, and subnets of the ECSs must be the same as those of the destination MRS cluster. For details, see Purchasing an ECS in Custom Config Mode.
In subsequent operations, the MRS cluster client and MgC Agent need to be installed on different ECSs.
- Install an MRS cluster client.
Install the MRS cluster client on the newly created Linux host. For details, see Installing a Client (MRS 3.x).
- Create an MgC project.
- Log in to the MgC console.
- In the navigation pane, choose Other > Settings.
- Choose Migration Projects and click Create Project.
- In the window displayed on the right, select Complex migration (for big data) for Project Type and set Project Name. For example, set the name to doris_datacheck.

The project type cannot be changed after the project is created.
- Click Create. After the project is created, you can view it in the project list.
- Deploy the MgC Agent.
- On the top of the navigation pane, select the created project and choose Overview > MgC Agent to download the Agent installation package.
In the Linux area, click Download Installation Package or Copy Download Command to download the MgC Agent installation program to the Linux host.
The following operations demonstrate how to install the MgC Agent on a Linux host that can communicate with the source and destination networks. You have prepared a Windows host for logging in to the MgC Agent console. For details about how to deploy the MgC Agent, see Deploying the MgC Agent (Formerly Edge).
- Decompress the MgC Agent installation package.
tar zxvf MgC-Agent.tar.gz
- Go to the scripts directory in the MgC Agent installation directory.
cd MgC-Agent/scripts/
- Run the MgC Agent installation script.
./install.sh
- Enter the EIP bound to the NIC of the Linux host. The IP address will be used for accessing the MgC Agent console.
If the entered IP address is not used by the Linux host, the system will display a message, asking you whether to use a public IP address of the Linux host as the MgC Agent access address.
- Check if the message shown in the following figure is displayed. If it is, the MgC Agent for Linux has been installed. The port in the following figure is for reference only. Note the actual port returned.
Figure 8 MgC Agent successfully installed

Update environment variables.
source /opt/cloud/MgC-Agent/scripts/setenv.sh
You need to allow inbound TCP traffic on port 27080. You can do that by adding an inbound rule to the security group of the Linux host where the MgC Agent is installed. For the rule, set Source to the IP address of the Windows host you use to remotely access the MgC Agent console.
- After the installation is complete, open a browser on the Windows host and enter https://<IP-address>:<Port-number> to access the MgC Agent login page. For example, if the IP address is 192.168.x.x and the port number is 27080, the MgC Agent access address is https://192.168.x.x:27080.
The IP address is the one you entered in 4.e, and the port number is the one displayed in 4.f after the MgC Agent is successfully installed.
- On the top of the navigation pane, select the created project and choose Overview > MgC Agent to download the Agent installation package.
- Create a connection.
- Log in to the MgC Agent console.
- On the login page, select Huawei Cloud Access Key.
- Enter an AK/SK pair of your Huawei Cloud account, and select the region where you create the migration project on MgC from the drop-down list.
- Click Log In. The Overview page of the MgC Agent console will open.
- (Required only for the first login) On the Overview page, click Connect Now in the upper right corner. The Connect to MgC page is displayed.
- Set the following parameters on the displayed page:
- Step 1: Select Connection Method
Enter an AK/SK pair of your Huawei Cloud account.
- Step 2: Select MgC Migration Project
MgC Migration Project: Click List Migration Projects, and select the migration project created in 3 from the drop-down list.
- Step 3: Preset MgC Agent Name
MgC Agent Name: Enter a custom MgC Agent name, for example, Agent.
- Step 1: Select Connection Method
- Click Connect, confirm the connection to MgC, and click OK.
If Connected shows up on the overview page, the connection to MgC is successful.
- Set the following parameters on the displayed page:
- Log in to the MgC Agent console.
- Add the source and destination Doris credentials.
- In the navigation pane, choose Agent-based Discovery > Credentials.
- Click Add Credential above the list and set the following parameters to create source and destination credentials.
Table 8 Parameters for creating a Doris credential Parameter
Configuration
Resource Type
Select Bigdata.
Resource Subtype
Select Doris.
Credential Name
Enter a custom credential name. For example, the source credential name is doris_source, and the destination credential name is doris_target.
Authentication Method
Select Username/Password.
Username
Enter the username for connecting to the source or destination Doris cluster.
Password
Enter the user password.
After the credential is created, wait until Sync Status of the credential in the credential list changes to Synced.
- Select and enable the MgC Agent (required only when you use it for the first time).
- Log in to the MgC console.
- In the upper left corner of the page, select the project created in 3.
- In the navigation pane, choose Migrate > Big Data Verification.
- Click Select MgC Agent. The Select MgC Agent dialog box is displayed.
- Select the MgC Agent that has been successfully connected to MgC from the drop-down list and click Enable.
Figure 9 Enabling the MgC Agent

- Create source and destination Doris connections.
- In the Features area of the Big Data Verification page, click Migration Preparations. The Migration Preparations page is displayed.
- Choose Connection Management and click Create Connection. On the displayed page, select Doris for Big Data Component and click Next.
- On the Configure Connection page, set the following parameters to create the source and destination connections.
Table 9 Parameters for creating a Doris connection Parameter
Configuration
Connection To
Select Source or Target.
Connection Name
The default name is Doris-4 random characters (including letters and digits). You can also enter a custom name, for example, Doris-source or Doris-target.
MgC Agent
Select the enabled MgC Agent.
Doris Credential
Select the credentials added to the MgC Agent in 6 for accessing your source and destination Doris clusters.
Database Address
Enter the IP address for connecting to the source or destination Doris FE node.
Database Port
Enter the port number for connecting to the source or destination Doris FE node. The default value is 9030.
Database
Enter the name of the source or destination Doris database.
- Click Test. After the test is successful, click Confirm to create the source or destination Doris connection.
- Create and run a metadata collection task.
- On the Migration Preparations page, click Metadata Management. In the displayed area, click Create Metadata Collection Task on the Tasks tab page. In the displayed Create Task -Metadata Collection window, set the following parameters and click Confirm.
- Task Name: Enter a task name.
- Metadata Connection: Select the source Doris connection created in 8.
- Databases (Optional): Enter the name of the database whose data needs to be verified, for example, test_w.
- Locate the row that contains the created task in the task list and click Execute Task in the Operation column.
- After the task is executed, click the Task Executions tab to view the task status.
- Click the Tables tab to view the collected tables.
- On the Migration Preparations page, click Metadata Management. In the displayed area, click Create Metadata Collection Task on the Tasks tab page. In the displayed Create Task -Metadata Collection window, set the following parameters and click Confirm.
- Create a table group and add tables to the table group.
- In the navigation pane, choose Migrate > Big Data Verification. In the Features area, click Table Management.
- On the Table Groups tab page, click Create. In the displayed Create Table Group dialog box, set the following parameters and click Confirm.
- Table Group: Enter a table group name.
- Metadata Connection: Select the source Doris connection created in 8.
- Verification Rule: Select a verification rule based on your requirements.
- Click the Tables tab and add the tables to be verified to the table group created in 10.b.
In the table list, locate the row that contains the table to be verified and click Add. On the displayed page, select the table group created in 10.b and click Confirm.
- After the table is added to the table group, you can view the table group name of the table in the table list. The name is that of the table group to which the table is added.
- Create and execute a verification task.
- In the navigation pane, choose Migrate > Big Data Verification. In the Features area, click Task Management.
- Click Create Task in the upper right corner of the page. In the displayed window on the right, set the following parameters and click Next.
- Big Data Component: Select Doris.
- Verification Method: Select a method as required. The options are Full Verification, Daily Incremental Verification, and Hourly Incremental Verification. For example, select Full Verification.
- Big Data Component: Select Doris.
- Set the following parameters and click Save to create a source task.
Table 10 Parameters for creating a task Parameter
Configuration
Task Name
Enter a task name.
Table Groups
Select the table group created in 10.b.
Doris Connection
Select the source Doris connection created in 8.
OBS Bucket Check
Determine whether you need to select I confirm that I only need to view logs and data verification results on MgC Agent and do not need to upload them to OBS as required.
- Create a task for the destination by referring to 11.b to 11.c. Select the destination Doris connection created in 8 for Doris Connection.
- In the task list, locate the rows that contain the tasks created for the source and destination and click Execute in the Operation column. Click OK in the displayed dialog box.
- View the verification results.
- View the verification task status on the Task Executions tab page.
- In task execution list, locate the row that contains the verification task, choose More > View Verification Results. On the displayed page, view the verification results.
Feedback
Was this page helpful?
Provide feedbackThank you very much for your feedback. We will continue working to improve the documentation.See the reply and handling status in My Cloud VOC.
For any further questions, feel free to contact us through the chatbot.
Chatbot


