Migrating Data from HBase to MRS with CDM
Scenarios
Cloud Data Migration (CDM) is an efficient and easy-to-use service for batch data migration. Leveraging cloud-based big data migration and intelligent data lake solutions, CDM offers user-friendly functions for migrating data and integrating diverse data sources into a unified data lake. These capabilities simplify the complexities of data source migration and integration, significantly enhancing efficiency.
This section describes how to use CDM to migrate data from HBase clusters in an on-premises IDC or on a public cloud to Huawei Cloud MRS clusters. The data volume can be tens of TBs or less.
Solution Architecture
HBase stores data in HDFS, including HFile and WAL files. The hbase.rootdir configuration item specifies the HDFS path. By default, data is stored in the /hbase folder in MRS clusters.
HBase has some built-in mechanisms and tool commands that can also be used to migrate data. For example, you can migrate data by exporting snapshots, exporting/importing data, and CopyTable. For details, see the Apache official website.
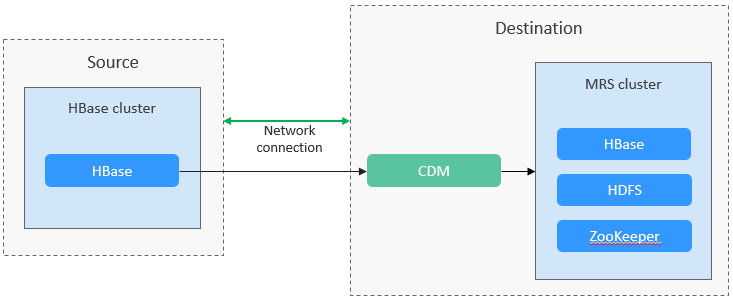
Solution Advantages
Scenario-based migration migrates snapshots and then restores table data to speed up migration.
Migration Survey
Before migrating HBase data, you need to conduct a survey on the source HBase component to evaluate the risks that may occur during the migration and impact on the system. The survey covers the HBase component version, deployment mode, data storage, and performance optimization. For details, see Table 1.
|
Survey Item |
Content |
Example |
|---|---|---|
|
Version compatibility |
HBase versions at the source and destination |
Apache HBase 2.x |
|
Compatibility with standard APIs by the source and destination HBase |
Compatible with standard APIs and support for enhanced functions of Huawei Cloud |
|
|
Deployment mode |
Deployment modes of source and destination HBase |
Self-built physical/virtual clusters and cloud-native services, supporting elastic scaling |
|
Data storage |
Data storage modes of source and destination HBase |
Local HDFS- or S3-compatible storage, such as Huawei Cloud Object Storage Service (OBS) that supports hot and cold data separation |
|
Performance tuning |
Performance tuning policies of source and destination HBase |
|
|
Monitoring and O&M |
Monitoring and O&M tools used by source and destination HBase |
Log Tank Service (LTS), supporting automatic O&M |
|
Security |
Security configurations used by source and destination HBase |
SSL encryption, Kerberos authentication, VPC network isolation, encrypted data transmission, and fine-grained ACLs |
Networking Types
The migration solution supports various networking types, such as the public network, VPN, and Direct Connect. Select a networking type based on the site requirements. The migration can be performed only when the source and destination networks can communicate with each other.
|
Migration Network Type |
Advantage |
Disadvantage |
|---|---|---|
|
Direct Connect |
|
|
|
VPN |
|
|
|
Public IP address |
|
|
Notes and Constraints
- This section uses Huawei Cloud CDM 2.9.1.200 as an example to describe how to migrate data. The operations may vary depending on the CDM version. For details, see the operation guide of the required version.
- For details about the data sources supported by CDM, see Supported Data Sources. If the data source is Apache HBase, the recommended version is 2.1.X or 1.3.X. Before performing the migration, ensure that the data source supports migration.
- During the migration, data inconsistency may occur if data has been deleted from or added to the source HBase and the data changes are not timely synchronized to the destination cluster. Then, you need to perform the migration again.
- Migrating a large volume of data has high requirements on network communication. When a migration task is executed, other services may be adversely affected. You are advised to migrate data during off-peak hours.
Performing Full HBase Data Migration
- Log in to the CDM console.
- Create a CDM cluster. The security group, VPC, and subnet of the CDM cluster must be the same as those of the destination cluster to ensure that the CDM cluster can communicate with the MRS cluster.
- On the Cluster Management page, locate the row containing the desired cluster and click Job Management in the Operation column.
- On the Links tab page, click Create Link.
- Create a link to the source cluster by referring to Creating a CDM Link. Select a connector type based on the actual cluster, for example, Apache HBase.

(Optional) Use a user with high permissions to migrate HBase. Click Show Advanced Attributes and add a user required for the migration with the following settings: hadoop.user.name = Username (for example, omm).
Figure 2 Link to the source cluster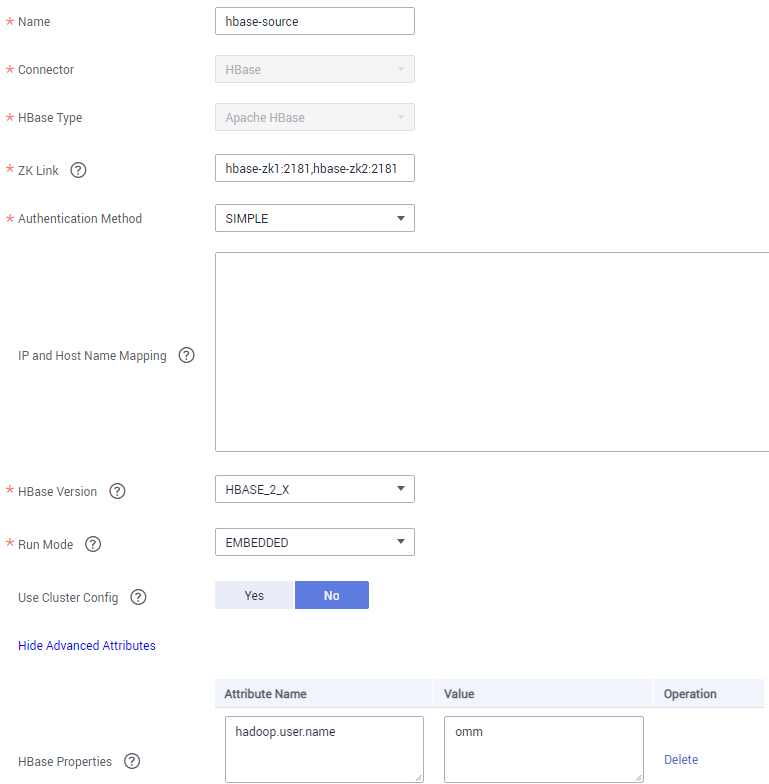
- On the Links tab page, click Create Link.
- Create a link to the destination cluster by referring to Creating a CDM Link. Select a connector type based on the actual cluster, for example, MRS HBase.

(Optional) Use a user with high permissions to migrate HBase. Click Show Advanced Attributes and add a user required for the migration with the following settings: hadoop.user.name = Username (for example, omm).
Figure 3 Link to the destination cluster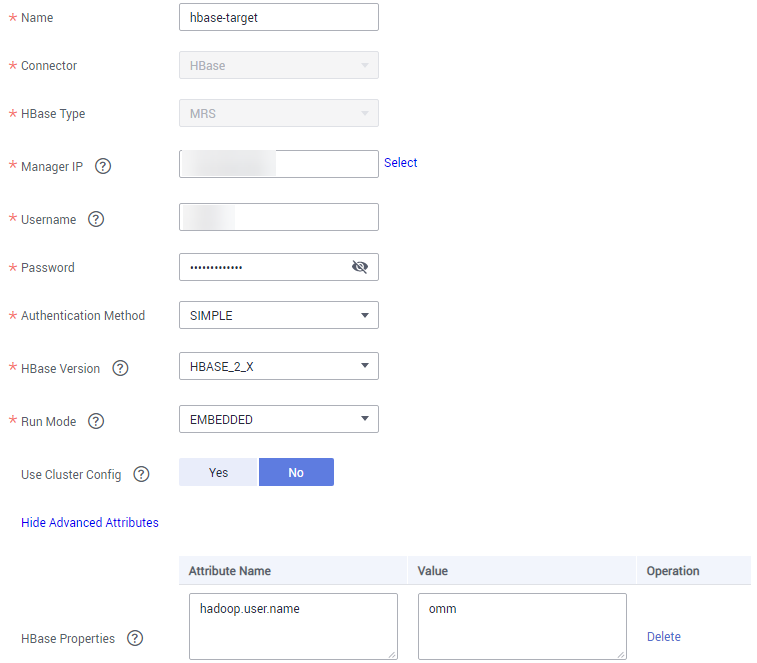
- Choose Job Management and click the Table/File Migration tab. Then, click Create Job.
- In the job creation dialog box, configure the job name, source job parameters, and destination job parameters, select the data table to be migrated, and click Next.
Figure 4 HBase job configuration

- Configure the mapping between the source fields and destination fields and click Next.
- On the task configuration page that is displayed, click Save without any modification.
- Choose Job Management and click the Table/File Migration tab. Locate the row containing the job to run, click Run in the Operation column, and click OK in the displayed dialog box to start migrating HBase data.
- After the migration is complete, you can run the same query statement in HBase Shell in the source and destination clusters to compare the query results.
Example:
- Query the number of records in the BTable table in the source and destination clusters to check whether the number of data records is the same. Add the --endtime parameter to eliminate the impact of data updates on the source cluster during the migration.
hbase org.apache.hadoop.hbase.mapreduce.RowCounter BTable --endtime=1587973835000
Figure 5 Querying the number of records in the BTable table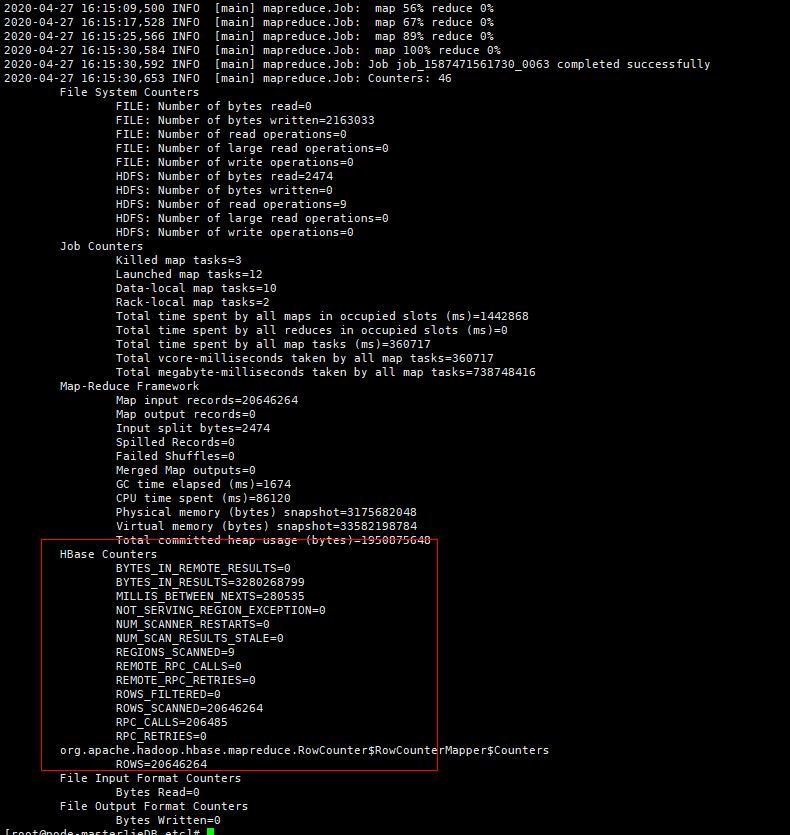
- Run the following command to query the data generated in a specified period for comparison:
scan 'BTable ', {TIMERANGE=>[1587973235000, 1587973835000]}
- Query the number of records in the BTable table in the source and destination clusters to check whether the number of data records is the same. Add the --endtime parameter to eliminate the impact of data updates on the source cluster during the migration.
Performing Incremental HBase Data Migration
If new data exists in the source cluster before the service cutover, you need to periodically migrate the new data to the destination cluster. If the data volume updated every day is at the GB level, you can use the Entire DB migration function of CDM to specify the time period and migrate new HBase data.
If the Entire DB Migration function of CDM is used, the deleted data in the source HBase cluster cannot be synchronized to the destination cluster.
The HBase connector for scenario-based migration cannot be used for entire database migration. Therefore, a new HBase connector is required.
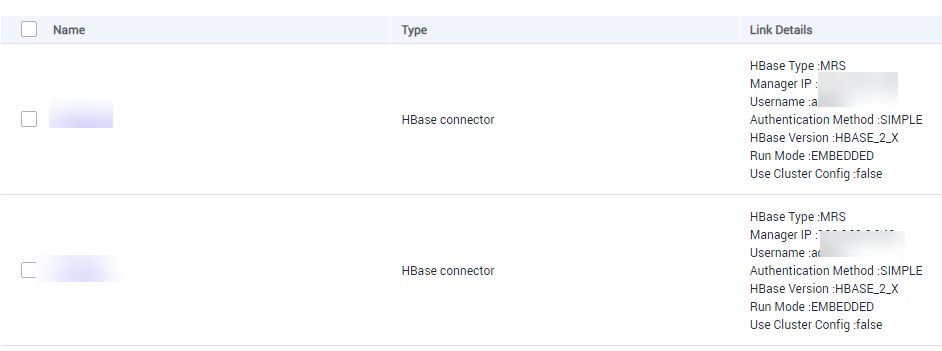
- Add two HBase connectors by referring to 1 to 7 in Performing Full HBase Data Migration. Set the connector type based on the actual cluster.
For example, set the connector type to MRS HBase for the source cluster and to Apache HBase for the destination cluster.Figure 6 HBase incremental migration link
- Choose Job Management and click the Entire DB Migration tab. Then, click Create Job.
- On the job parameter configuration page, configure job parameters and click Next.
- Job Name: Enter a user-defined job name, for example, hbase-increase.
- Source Job Configuration: Set Source Link Name to the name of the newly created link to the source cluster, and click Show Advanced Attributes to configure the time range for data migration.
- Destination Job Configuration: Set Destination Link Name to the name of the newly created link to the destination cluster. Leave other parameters blank.
Figure 7 HBase incremental migration job configuration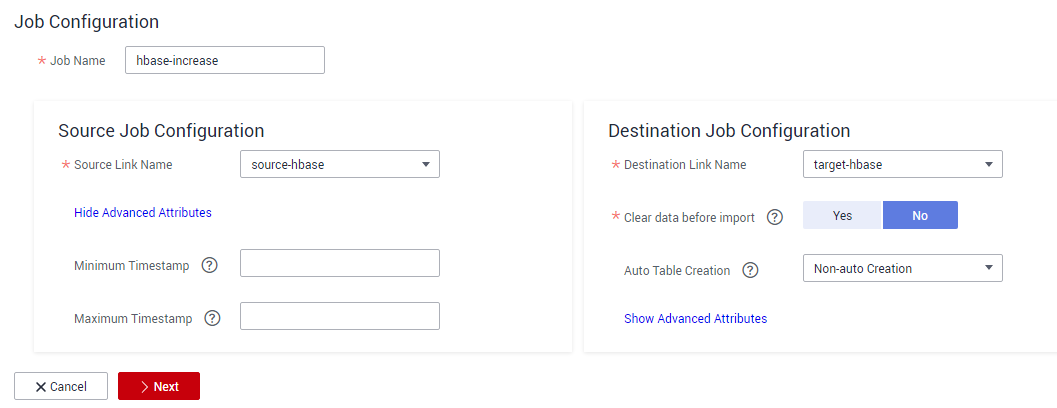
- Select the data table to be migrated, click Next, and click Save.
- Choose Job Management and click the Entire DB Migration tab. Locate the row containing the job to run, click Run in the Operation column, and click OK in the displayed dialog box to start migrating incremental HBase data.
Verifying HBase Data Migration
The following operations use the MgC Agent for Linux as an example to describe how to verify HBase data consistency after the migration. The involved clusters are in normal mode, and the MgC Agent version is 25.3.3. The actual operations may vary depending on the Agent version. For details, see Big Data Verification.
- Create a project.
- Log in to the MgC console.
- In the navigation pane, choose Other > Settings.
- Choose Migration Projects and click Create Project.
- In the window displayed on the right, select Complex migration (for big data) for Project Type and set Project Name. For example, set the name to mrs-hbase.

The project type cannot be changed after the project is created.
- Click Create. After the project is created, you can view it in the project list.
- Deploy the MgC Agent.
- On the top of the navigation pane, select the created project and choose Overview > MgC Agent to download the Agent installation package.
In the Linux area, click Download Installation Package or Copy Download Command to download the MgC Agent installation program to the Linux host.
The following operations demonstrate how to install the MgC Agent on a Linux host that can communicate with the source and destination networks. You have prepared a Windows host for logging in to the MgC Agent console. For details about how to deploy the MgC Agent, see Deploying the MgC Agent (Formerly Edge).
- Decompress the MgC Agent installation package.
tar zxvf MgC-Agent.tar.gz
- Go to the scripts directory in the MgC Agent installation directory.
cd MgC-Agent/scripts/
- Run the MgC Agent installation script.
./install.sh
- Enter the EIP bound to the NIC of the Linux host. The IP address will be used for accessing the MgC Agent console.
If the entered IP address is not used by the Linux host, the system will display a message, asking you whether to use a public IP address of the Linux host as the MgC Agent access address.
- Check if the message shown in the following figure is displayed. If it is, the MgC Agent for Linux has been installed. The port in the following figure is for reference only. Note the actual port returned.
Figure 8 MgC Agent successfully installed

Update environment variables.
source /opt/cloud/MgC-Agent/scripts/setenv.sh
You need to allow inbound TCP traffic on port 27080. You can do that by adding an inbound rule to the security group of the Linux host where the MgC Agent is installed. For the rule, set Source to the IP address of the Windows host you use to remotely access the MgC Agent console.
- After the installation is complete, open a browser on the Windows host and enter https://<IP-address>:<Port-number> to access the MgC Agent login page. For example, if the IP address is 192.168.x.x and the port number is 27080, the MgC Agent access address is https://192.168.x.x:27080.
The IP address is the one you entered in 2.e, and the port number is the one displayed in 2.f after the MgC Agent is successfully installed.
- On the top of the navigation pane, select the created project and choose Overview > MgC Agent to download the Agent installation package.
- Create a connection.
- Log in to the MgC Agent console.
- On the login page, select Huawei Cloud Access Key.
- Enter an AK/SK pair of your Huawei Cloud account, and select the region where you create the migration project on MgC from the drop-down list.
- Click Log In. The Overview page of the MgC Agent console will open.
- (Required only for the first login) On the Overview page, click Connect Now in the upper right corner. The Connect to MgC page is displayed.
- Set the following parameters on the displayed page:
- Step 1: Select Connection Method
Enter an AK/SK pair of your Huawei Cloud account.
- Step 2: Select MgC Migration Project
MgC Migration Project: Click List Migration Projects, and select the migration project created in 3 from the drop-down list.
- Step 3: Preset MgC Agent Name
MgC Agent Name: Enter a custom MgC Agent name, for example, Agent.
- Step 1: Select Connection Method
- Click Connect, confirm the connection to MgC, and click OK.
If Connected shows up on the overview page, the connection to MgC is successful.
- Set the following parameters on the displayed page:
- Log in to the MgC Agent console.
- Create an HBase credential.
- In the navigation pane, choose Agent-based Discovery > Credentials.
- Click Add Credential above the list and set the following parameters to create source and destination credentials.
Table 3 Parameters for creating an HBase credential Parameter
Configuration
Resource Type
Select Bigdata.
Resource Subtype
Select HBase.
Credential Name
Enter a custom credential name. For example, the source credential name is hbase-credentials, and the destination credential name is hbase-target.
Authentication Method
Select Username/Key.
Username
Select root.
Select File
Click Select File and upload the core-site.xml, hdfs-site.xml, yarn-site.xml, mapred-site.xml, and hbase-site.xml files of the source or destination HBase cluster.
The configuration files of the source cluster are usually stored in the conf subdirectory of the Hadoop installation directory. The configuration files of the destination cluster are usually stored in the HBase client installation directory/hbase/conf directory.
After the credential is created, wait until Sync Status of the credential in the credential list changes to Synced.
- Select and enable the MgC Agent (required only when you use it for the first time).
- Log in to the MgC console.
- In the navigation pane, choose Migrate > Big Data Verification.
- Click Select MgC Agent. The Select MgC Agent dialog box is displayed.
- Select the MgC Agent that has been successfully connected to MgC from the drop-down list and click Enable.
Figure 9 Enabling the MgC Agent

- Expand Process Flow. In Step 1: Select the Source and Target Components, select HBase for Source Component and MRS(HBase) for Target Component.
- In Step 2: Select a Verification Method, select a verification method as required, for example, Full Verification.
- In Step 3: View the Verification Process, click Collect Metadata in the Group Database Tables area. The Migration Preparations page is displayed.
- Create source and destination HBase connections.
- Choose Connection Management and click Create Connection. In the displayed window, select HBase for Big Data Component and click Next.
- Configure the following parameters on the displayed page:
Table 4 Parameters for the source HBase connection Parameter
Configuration
Connection To
Select Source.
Connection Name
The default name is HBase-4 random characters (including letters and digits). You can also enter a custom name.
MgC Agent
Select the enabled MgC Agent.
HBase Credential
Select the source HBase credential added to the MgC Agent in 4.a.
Secured Cluster
Select No. This parameter specifies whether the cluster in security mode is used.
ZooKeeper IP Address
Enter the IP address for connecting to the source ZooKeeper. You can enter the public or private IP address of the ZooKeeper server.
ZooKeeper Port
Enter the port for connecting to the source ZooKeeper. The default value is 2181.
HBase Version
Select the source HBase version.
- Click Test. After the test is successful, click Confirm to create the source HBase connection.
- Click Create Connection again. In the displayed window, select HBase for Big Data Component and click Next.
- Configure the following parameters on the displayed page:
Table 5 Parameters for the destination HBase connection Parameter
Configuration
Connection To
Select Target.
Connection Name
The default name is HBase-4 random characters (including letters and digits). You can also enter a custom name.
MgC Agent
Select the enabled MgC Agent.
HBase Credential
Select the destination HBase credential added to the MgC Agent in 4.a.
Secured Cluster
Select No. This parameter specifies whether the cluster in security mode is used.
ZooKeeper IP Address
Enter the IP address for connecting to the destination ZooKeeper. You can enter the public or private IP address of the ZooKeeper server.
ZooKeeper Port
Enter the port for connecting to the destination ZooKeeper. The default value is 2181.
HBase Version
Select the destination HBase version.
- Click Test. After the test is successful, click Confirm to create the destination HBase connection.
- Create and run a metadata collection task.
- In the Process Flow area on the Migration Preparations page, click Create Metadata Collection Task under Manage Metadata. In the displayed Create Task -Metadata Collection window, set the task name and metadata connection (HBase source connection created in 6), and click Confirm.
- Click Metadata Management. In the displayed area, locate the row that contains the created task and click Execute Task in the Operation column.
- Click the Tables tab and check the collected tables.
- Create a table group.
- In the navigation pane, choose Migrate > Big Data Verification.
- In the Features area, click Table Management. On the displayed Table Groups tab page, confirm the MgC Agent displayed on the right of Table Management.
- Click Create. In the displayed Create Table Group dialog box, set the following parameters and click Confirm.
- Table Group: Enter a table group name.
- Metadata Source: Select the source connection created in 6.
- Verification Rule: Select a verification rule based on your requirements.
- Click the Tables tab. Locate the row that contains the table with the same rule and click Add. In the displayed window, select the table group created in 8.c and click Confirm.
- Create and execute a verification task.
- Return to the Big Data Verification page. In the Features area, click Task Management. The Task Management page is displayed.
- Click Create Task in the upper right corner of the page. In the displayed window, set Big Data Component to HBase, select a verification method as required, for example, Full Verification, and click Next.
- Set the following parameters and click Save to create a source task.
Table 6 Parameters for creating a task Parameter
Configuration
Task Name
The default name is Component-Full-Verification-4 random characters (including letters and digits). You can also enter a custom name.
Table Groups
Select the created table group.
HBase Connection
Select the created source HBase connection.
OBS Bucket Check
Determine whether you need to select I confirm that I only need to view logs and data verification results on MgC Agent and do not need to upload them to OBS as required.
- Create a task for the destination by referring to 9.b to 9.c. Select the created destination HBase connection for HBase Connection.
- In the task list, locate the rows that contain the tasks created for the source and destination and click Execute in the Operation column.
- Return to the Big Data Verification page. In the Features area, click Verification Results. Check the verification results on the displayed page.
You can also click View Details in the Operation column to view the verification results of a table.
Feedback
Was this page helpful?
Provide feedbackThank you very much for your feedback. We will continue working to improve the documentation.See the reply and handling status in My Cloud VOC.
For any further questions, feel free to contact us through the chatbot.
Chatbot


