Creating a Storage Migration Workflow
This section describes how to create a storage migration workflow using the predefined template.
Prerequisites
- You have completed operations in Making Preparations.
- You have created a migration cluster.
- (Optional) The network among SFS 1.0, SFS 3.0, and the migration cluster has been connected. For details, see (Optional) Setting Up Network Connections.
Procedure
- Sign in to the MgC console.
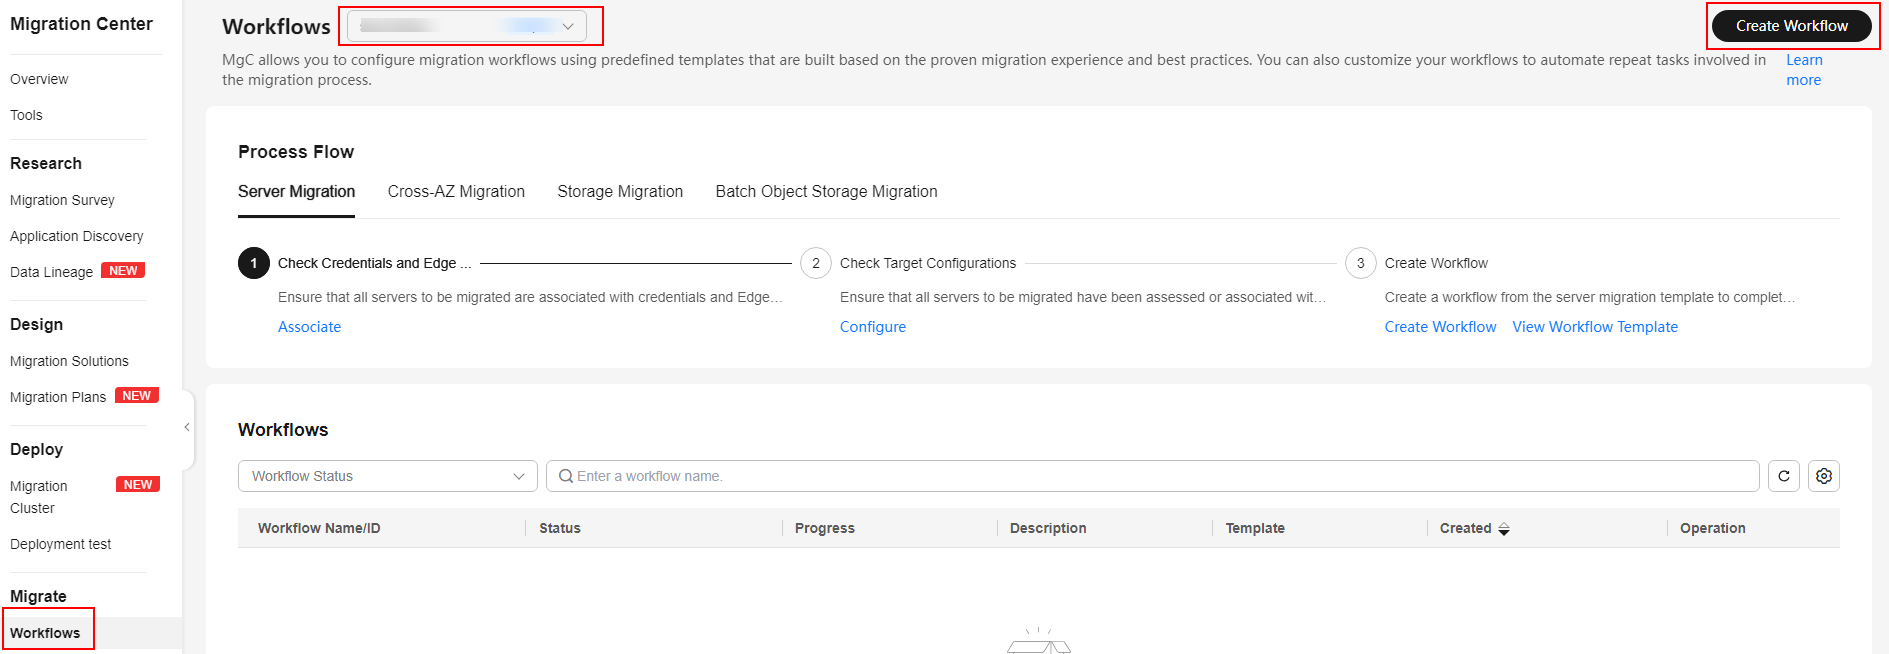
- In the navigation pane on the left, choose Migrate > Workflows. In the upper left corner of the page, select the migration project created in Making Preparations.
- Click Create Workflow in the upper right corner of the page.

- Select Storage Migration and click Configure Workflow.

- Set workflow basics based on Table 1.

Table 1 Basic parameters required for creating a storage migration workflow Parameter
Description
Name
Enter a workflow name.
Region
Select a region you are migrating to.
Description
Describe the workflow.
Cluster
Select the migration cluster created in Creating a Migration Cluster.
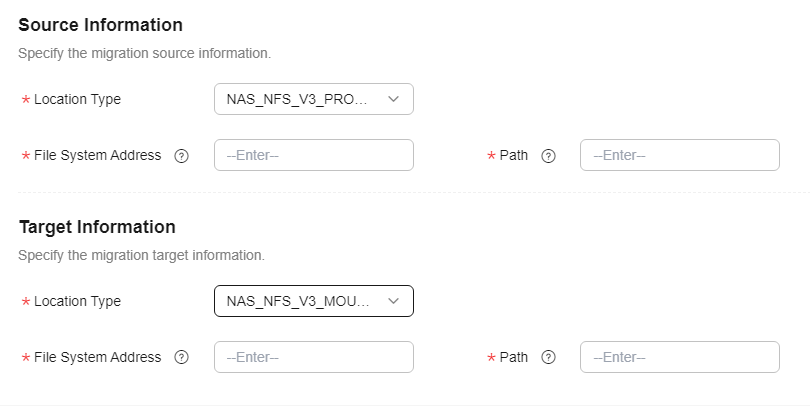
- Configure the migration source and target based on Table 2 and Table 3.

Table 2 Parameters for configuring a migration source Parameter
Description
Remarks
Location Type
Select NAS_NFS_V3_PROTOCOL.
-
File System Address
Enter the mount address of the source file system. The format is IP address:/ or IP address:/xxx, for example, 192.1.1.1:/0001.
-
Path
Enter the directory where files to be migrated are located. The format is /Folder name.
If you enter /, the entire source file system will be migrated.
Table 3 Parameters for configuring a migration target Parameter
Description
Remarks
Location Type
Select NAS_NFS_V3_MOUNT.
-
File System Address
Enter the mount address of the target file system. To obtain the mount address, go to the SFS file system list and click the
 icon next to the address in the Mount Point column.
-
Path
Enter the directory for storing files migrated. The format is /Folder name.
If you enter /, source files will be migrated to the root directory of the target file system.
- Configure the migration settings based on Table 4.

Table 4 Parameters for configuring migration settings Parameter
Option
Description
Task Type
Full migration
Migrates all data in the source bucket or paths specified in Table 2.
List migration
Migrates objects recorded in the list files.
In List Path box, enter the path of the object lists stored in the target bucket. Restrictions on an object list file vary with the target location.- An object list file cannot exceed 30 MB.
- An object list file must be a .txt file.
- An object list file must be in UTF-8 without BOM.
- Each line in an object list file can contain only one object name, and the object name must be URL encoded.
- Each line in an object list file cannot exceed 16 KB, or the migration will fail.
- An object list file can contain a maximum of 10,000 lines.
Concurrent Subtasks
-
This parameter is user-defined. There cannot be more than 10 concurrent subtasks for each online migration node. For example, if there are 2 online migration nodes, the maximum number of subtasks can be 20 or any number below.
Overwrite Existing
Never
Files existing at the migration target are never overwritten.
WARNING:- If you choose Never for the initial migration, the attributes of involved parent folders at the source will not be migrated to the target. As a result, the folder attributes may be incomplete at the target. To avoid this issue, use the Never option with caution for the initial migration.
- If a migration task is paused or interrupted and then restarted or resumed, the Never option will cause the system to skip files that were not completely migrated earlier, but the task may still be marked as successful. This affects data integrity. To avoid this issue, use the Never option with caution.
Always
Files existing at the migration target are always overwritten.
If older or different size
- Files that already exist at the target will be overwritten if they are older than or have different sizes from the paired files at the source.
- Verification will be performed for folders after their contents are migrated. Folders that already exist at the target will be overwritten if they have different last modification times, sizes,or permissions from the paired folders at the source.
NOTE:
For empty folders, the overwrite policy is the same as that for files.
Migrate Metadata
-
Determine whether to migrate metadata.
- If you select this option, object metadata will be migrated.
- If you do not select this option, only the ContentType metadata will be migrated.
Clear Cluster
-
Determine whether to clear the migration cluster after the migration is complete.
- If you select this option, a step for clearing the migration cluster will be created in the workflow. You can also choose whether to clear resources used by the cluster, such as NAT gateways, security groups, and VPCEP resources.
- If you do not select this option, a step for clearing the migration cluster will not be created in the workflow.
- (Optional) Configure advanced options based on Table 5.
Table 5 Advanced settings Parameter
Description
Filter Source Data
Filter files to be migrated by applying filters. For details about filters, see Source Data Filters.
Send SMN Notification
Determine whether to use SMN to get notifications about migration results.
- If you do not select this option, no SMN messages are sent after the migration.
- If you select this option, after the migration, SMN messages are sent to the subscribers of the selected topic. You can select the language and trigger conditions for sending messages.
Limit Traffic
Allocate the maximum bandwidth to be used by the workflow during a specified period.
- If you do not select this option, migration traffic is not limited.
- If you select this option, limit the migration traffic by setting Start Time, End Time, and Bandwidth Limit.
For example, if you set Start Time to 08:00, End Time to 12:00, and Bandwidth Limit to 20 MB/s, the maximum migration speed is limited to 20 MB/s when the migration task is running from 08:00 to 12:00. The migration speed is not limited beyond this period.NOTE:
- The rate limit ranges from 0 MB/s to 1,048,576 MB/s.
- A maximum of five rules can be added.
- The time is the local standard time of the region you are migrating to.
Schedule Migration
Schedule the migration to run during a period.
- If you do not select this option, you need to manually start or stop the migration.
- If you select this option, the migration runs during the specified period and stops beyond that period.
- If you set Start Time to 08:00 and End Time to 12:00, the migration task runs from 08:00 to 12:00 every day. The migration stops beyond that period.
- If you set Start Time to 12:00 and End Time to 08:00, the migration runs from 12:00 of the current day to 08:00 of the next day. The migration stops beyond that period.
- Click Next: Confirm.
- Confirm the workflow settings and click Confirm. In the displayed dialog box, click Confirm to run the workflow immediately.
- In the workflow list, click the workflow name to go to its details page. You can view the configuration information and migration progress of the workflow.
Feedback
Was this page helpful?
Provide feedbackThank you very much for your feedback. We will continue working to improve the documentation.See the reply and handling status in My Cloud VOC.
For any further questions, feel free to contact us through the chatbot.
Chatbot


