
Importing a Meta Model from OBS
Import a model trained using a mainstream AI engine to ModelArts to create a model for centralized management.
Constraints
- The imported model, inference code, and configuration file must comply with ModelArts model package specifications. For details, see Model Package Structure, Specifications for Editing a Model Configuration File, and Specifications for Writing a Model Inference Code File.
- If the meta model is from a container image, ensure the size of the meta model complies with Restrictions on the Size of an Image for Importing a Model.
- If you use custom policies as an IAM user and do not use OBS Administrator policy, add these actions:
- PutObject (uploading using PUT and POST, uploading parts, and initializing and merging uploaded parts)
- GetObject (obtaining object content and metadata)
- GetObjectVersion (obtaining the content and metadata of a specified object version)
- GetObjectAcl (obtaining object ACL)
- PutObjectAcl (configuring the object ACL)
- ListBucket (listing objects in the bucket and obtaining the bucket metadata)
Prerequisites
- The trained model uses an AI engine supported by ModelArts. For details, see Supported AI Engines for ModelArts Inference.
- The model package, inference code, and configuration file have been uploaded to OBS.
- The OBS directory you use and ModelArts are in the same region.
Procedure
- Log in to the ModelArts console. In the navigation pane on the left, choose Model Management.
- Click Create Model.
- Configure parameters.
- Set basic information about the model. For details about the parameters, see Table 1.
Table 1 Basic information Parameter
Description
Name
Model name. The value can contain 1 to 64 visible characters. Only letters, digits, hyphens (-), and underscores (_) are allowed.
Version
Model version. The default value is 0.0.1 for the first import.
NOTE:After a model is created, you can create new versions using different meta models for optimization.
Description
Brief description of the model.
- Set Meta Model Source to OBS. For details, see Table 2.
To import a meta model from OBS, edit the inference code and configuration file by following model package specifications and place the inference code and configuration file in the model folder storing the meta model. If the selected directory does not comply with the model package specifications, the model cannot be created.

Encrypt sensitive data before saving it to your OBS bucket.
Figure 1 Importing a meta model from OBS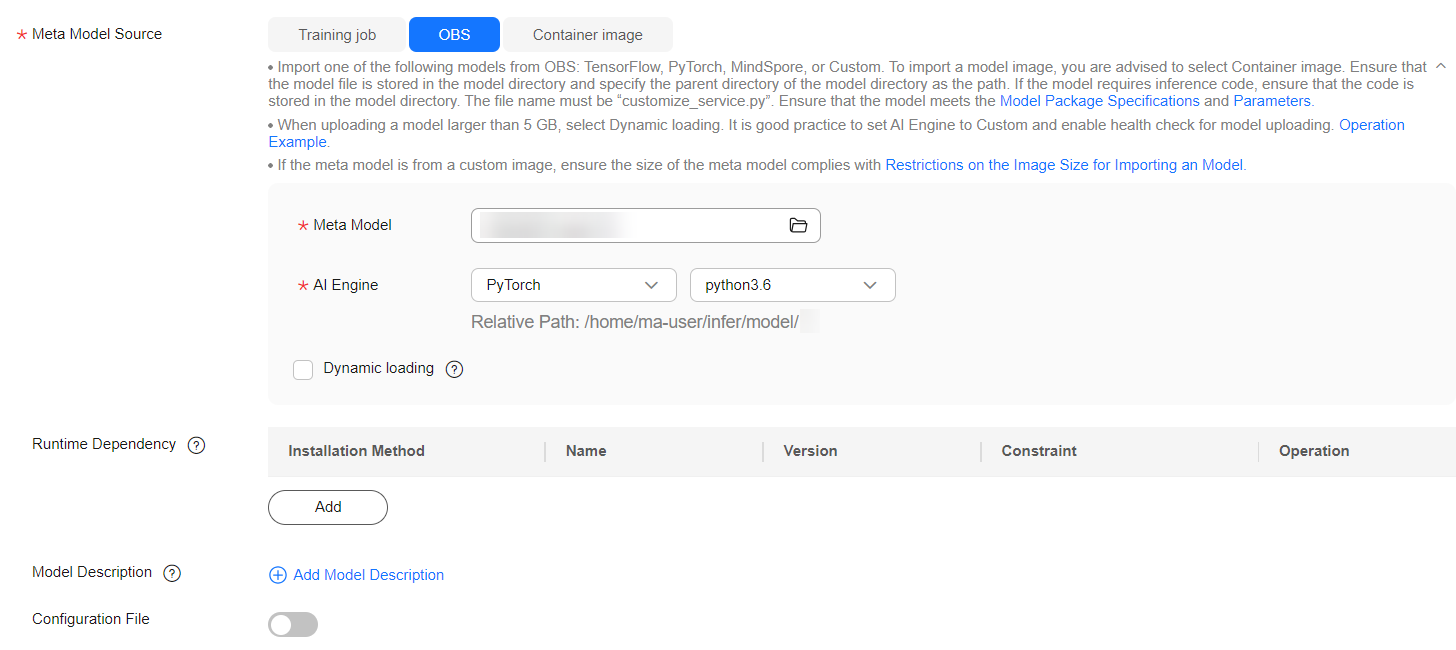
Table 2 Meta model source parameters Parameter
Description
Meta Model Source
Select OBS.
Meta Model
OBS path for storing the meta model.
The OBS path cannot contain spaces. Otherwise, the model creation will fail.
AI Engine
AI engine, which is automatically set according to the model storage path you select, used by the meta model.
Container API
This parameter is displayed when AI Engine is set to Custom.
Set the protocol and port number of the inference API defined by the model. The default values are HTTPS and 8080, respectively.
Health Check
Specifies health check on a model. This parameter is displayed when AI Engine is set to Custom. Once you select a non-custom engine and runtime environment, this parameter is displayed if this engine supports health check.
Once you select a custom engine, you must select a container image for the engine package. The health check can be set up only if the container image includes a health check API. Otherwise, the model creation will fail.
The following probes are supported:
- Startup Probe: This probe checks if the application instance has started. If a startup probe is provided, all other probes are disabled until it succeeds. If the startup probe fails, the instance is restarted. If no startup probe is provided, the default status is Success.
- Readiness Probe: This probe verifies whether the application instance is ready to handle traffic. If the readiness probe fails (meaning the instance is not ready), the instance is taken out of the service load balancing pool. Traffic will not be routed to the instance until the probe succeeds.
- Liveness Probe: This probe monitors the application health status. If the liveness probe fails (indicating the application is unhealthy), the instance is automatically restarted.
The parameters of the three types of probes are as follows:
- Check Mode: Retain the default setting HTTP request.
- Health Check URL: Retain the default setting /health.
- Health Check Period (s): Enter an integer ranging from 1 to 2147483647.
- Delay (s): Set a delay for the health check to occur after the instance has started. The value should be an integer between 0 and 2147483647.
- Timeout (s): Set the timeout interval for each health check. The value should be an integer between 0 and 2147483647.
- Maximum Failures: Enter an integer ranging from 1 to 2147483647. If the service fails the specified number of consecutive health checks during startup, it will enter the abnormal state. If the service fails the specified number of consecutive health checks during operation, it will enter the alarm state.
NOTE:To use a custom engine to create a model, ensure that the custom engine complies with the specifications for custom engines. For details, see Creating an AI Application Using a Custom Engine.
If health check is enabled for a model, the associated services will stop three minutes after receiving the stop instruction.
Dynamic loading
You can enable it for quick model deployment and update. When it is enabled, model files and runtime dependencies are only pulled during an actual deployment. Enable this feature if a single model file is larger than 5 GB.
Runtime Dependency
Dependencies that the selected model has on the environment. For example, if you need to install tensorflow using pip, make sure the version is 1.8.0 or newer.
Model Description
Model descriptions to help other developers better understand and use your model. Click Add Model Description and set the document name and URL. You can add up to three descriptions.
Configuration File
The system associates the configuration file stored in OBS by default. After enabling this feature, you can review and edit the model configuration file.
NOTE:This feature is to be discontinued. After that, you can modify the model configuration by setting AI Engine, Runtime Dependency, and API Configuration.
Deployment Type
Choose the service types for model deployment. The service types you select will be the only options available for deployment. For example, selecting Real-Time Services means the model can only be deployed as real-time services.
Start Command
Customizable start command of the model. This parameter is optional.
When using a preset AI engine, the default start command is used if no start command is entered. For details, see Table 1. If a start command is entered, it replaces the default command.
NOTE:Start commands containing $, |, >, <, `, !, \n, \, ?, -v, --volume, --mount, --tmpfs, --privileged, or --cap-add will be emptied when a model is being published.
API Configuration
After enabling this feature, you can edit RESTful APIs to define the input and output formats of a model. The model APIs must comply with ModelArts specifications. For details, see the apis parameter description in Specifications for Editing a Model Configuration File. For details about the code example, see Code Example of apis Parameters.
- Confirm the configurations and click Create now.
In the model list, you can view the created model and its version. When the status changes to Normal, the model is created. On this page, you can perform such operations as creating new versions and quickly deploying services.
- Set basic information about the model. For details about the parameters, see Table 1.
Follow-Up Operations
Deploying a service: In the model list, click Deploy in the Operation column of the target model. Locate the target version, click Deploy and choose a service type selected during model creation.
Feedback
Was this page helpful?
Provide feedbackThank you very much for your feedback. We will continue working to improve the documentation.See the reply and handling status in My Cloud VOC.
For any further questions, feel free to contact us through the chatbot.
Chatbot


