
Creating a Component by Importing a CCE Workload
ServiceStage supports a maximum of 15,000 components in the same project.
This section describes how to import a workload from CCE to create and deploy a component.
This method is applicable only to the container-based deployment, and the component deployment environment must be bound to a CCE cluster.
Video Tutorial
Prerequisites
- An application has been created because components can be imported only under an application. For details, see Creating an Application.
- An environment supported by container-based deployment has been created and bound with resources such as the CCE cluster of the target workload for deploying and running components in an environment.
- For the environment types supported by container-based deployment, see Component Deployment Modes.
- For details about how to create an environment and manage resources, see Environment Management.
- A namespace has been created to isolate build data. For details, see Managing Namespaces.
- The target stateless or stateful workload has been created on CCE and has not been imported. For details, see Creating a Workload.
To enable multi-container deployment, add and configure multiple containers when creating a workload. You can specify a container as the initialization container to install specific or scripts before the service container is started. At least one container must be specified as the service container (non-initialization container). For details about container initialization, see Init Containers.
When a workload is imported to create a component, the component package parameters are fixed to the settings set during workload creation and cannot be modified.
- A Docker technology stack has been enabled and is in the Enabling state. If the Docker technology stack is not enabled, enable it by referring to Enabling a Technology Stack.
Creating a Component by Importing a CCE Workload
- Log in to ServiceStage.
- Use either of the following methods to open the Select Component dialog box:
- Choose Component Management > Import Component.
- On the Application Management page, click the application for which you want to create a component. On the displayed Overview page, click Import Component.
- In the Select Component dialog box, configure the target workload by referring to the following table and click OK.
Parameter
Description
Select an environment
Component deployment environment.
Select a Kubernetes or VM + Kubernetes environment of the CCE cluster where the workload is located.
If the workload cluster is not bound to any Kubernetes or VM + Kubernetes environment, bind the cluster to an environment by referring to Binding a Cluster.
CCE Cluster
CCE cluster to which the workload to be imported belongs.
Namespace
Namespace to which the workload to be imported belongs.
Workload Type
Type of the workload to be imported.
- Stateless: Deployments do not store any data or status while they are running. Typical scenario: Nginx.
- Stateful: StatefulSets store data and statuses while they are running. Typical scenario: MySQL.
Workload
Name of the workload to be imported.
A workload that has been imported cannot be imported again.
- In the Basic Information area, configure the component by referring to the following table. Parameters marked with an asterisk (*) are mandatory.
Parameter
Description
*Component Name
Name of a component, which cannot be changed after the component is created and deployed.
Enter 2 to 64 characters. Start with a letter and end with a letter or digit. Only use letters, digits, underscores (_), and hyphens (-).
- Components with the same name in different applications can be deployed in the same environment.
- Components with the same name in the same application can be deployed in different CCE clusters in the same HA environment.
- Components with the same name in the same application can be deployed in different environments.
*Component Version
Component version number, which can be automatically generated or customized.
- Automatically-generated: Click Generate. By default, the version number is the time when you click Generate. The format is yyyy.mmdd.hhmms, where s is the ones place of the second in the timestamp. For example, if the timestamp is 2022.0803.104321, the version number is 2022.0803.10431.
- Customized: Enter a value in the format of A.B.C or A.B.C.D. A, B, C, and D are natural numbers. For example, 1.0.0 or 1.0.0.0.
*Application
Application to which the component belongs.
*Environment
Component deployment environment. The value is fixed to the environment selected in 3.
*Deployment Mode
The value is fixed to Container.
This parameter is available when a VM + Kubernetes environment is selected in 3. For details, see Environment Overview.
*Namespace
The value is the namespace to which the workload selected in 3 belongs.
*Workload Type
The value is the workload type selected in 3.
*Workload
The value is the workload name selected in 3.
*Label
ServiceStage allows you to add labels of the key-value pair type to manage and select components, for example, for Configuring a Scheduling Policy of a Component Instance.
Each component can have a maximum of 20 labels.
If your organization has configured tag policies for ServiceStage, add tags to trackers based on the policies. If a tag does not comply with the tag policies, environment creation may fail. Contact your administrator to learn more about tag policies.
- Click Add Label.
- In the Add Label dialog box, click Add Label.
- Enter a key and value.
- The key contains 1 to 63 characters. Start and end with a letter or digit. Only use digits, letters, underscores (_), hyphens (-), and periods (.). The key cannot be the built-in app, casid, or version.
- The value contains 0 to 63 characters. Start and end with a letter or digit. Only use digits, letters, underscores (_), hyphens (-), and periods (.).
If you want to use the same tag to identify multiple resources, that is, all resources can select the same tag from the drop-down list, you are advised to create a predefined tag in TMS by referring to Creating Predefined Tags.
- Click OK.
Description
Component description.
- Click
 and enter up to 128 characters.
 - Click
 to save the component description.
- Click Next.
- In the Access Mode area, enable Public Network Access.
After public network access is enabled for a component, you can use a public network domain name to access the component through an ELB bound with an EIP to use services provided by the component.
- If a component is upgraded and maintained in ELB dark launch mode after being created and deployed, you need to enable public network access for the component. For details about ELB dark launch, see Upgrading a Component in Dark Launch Mode.
- After a component with public network access enabled is created and deployed, you can change the configured component access domain name by referring to Changing the Component Access Domain Name.
- By default, public network access is disabled for a component. After a component is created and deployed, you can also configure the component access mode. For details, see Configuring the Component Access Mode.
Click to enable public access and set the following parameters:
- Set Public Network Load Balancer.
An EIP has been bound to the load balancer and must be in the same VPC and subnet as the compute resources managed in the current component deployment environment. Components must be bound with different load balancers in different deployment environments to avoid route errors.
- Select a load balancer that has been bound to an EIP in the selected environment.
- If no load balancer exists, click Add One. On the Edit Environment page that is displayed, click Add Optional Resource to add created load balancers to the environment.
- To create ELB resources, refer to the following table.
Scenario
Reference
Use the domain name to access an application.
- Set Client Protocol.
- HTTP has security risks. You are advised to select HTTPS.
- If HTTPS is selected, click Use existing to select an existing certificate.
If no certificate exists, click Create new to create a server certificate. For details, see Adding a Certificate.
- Set Domain Name.
- If Automatically generated is selected, the automatically generated domain name is valid only for seven days.
- If Bound is selected, enter a domain name.
- Set Listening Port.
Enter the listening port number of the application process.
Figure 1 Configuring public access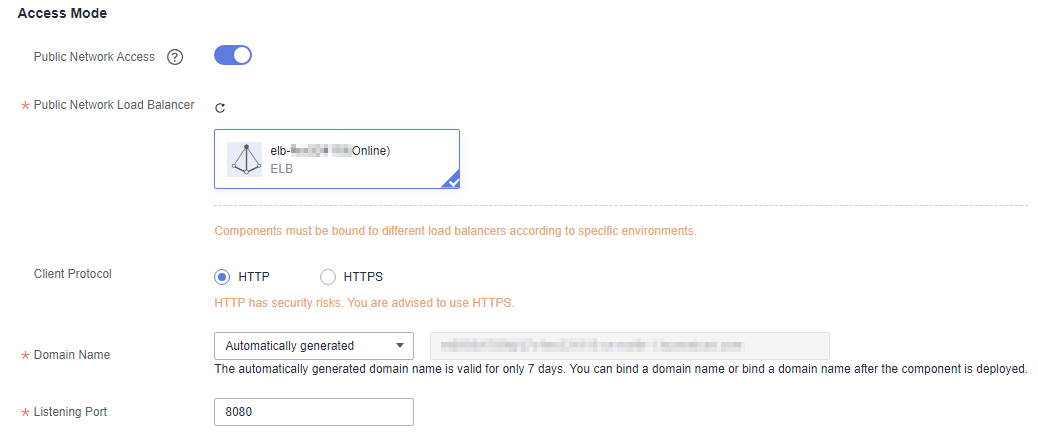
- Set Cloud Service Settings.
Operation Type
Operation
Description
Microservice Engine
Binding a microservice engine
Cloud Service Engine is a one-stop management platform for microservice solutions. After microservice components are connected to CSE, you can use service registry, service governance, and configuration management of CSE. In this way, you can focus on service development and improve product delivery efficiency and quality.
Choose Cloud Service Settings > Microservice Engine and bind a microservice engine. For details, see Binding a Microservice Engine.
- If multi-container deployment is enabled, the microservice engine cannot be bound.
- To upgrade and maintain components in dark launch mode, bind the ServiceComb engine or registry/configuration center. For details, see Upgrading a Component in Dark Launch Mode.
Distributed Cache Service
Binding a distributed cache
In a distributed system, the distributed cache service provides scalable and reliable user session management.
Choose Cloud Service Settings > Distributed Cache Service and bind a distributed cache. For details, see Binding a Distributed Cache.
Relational Database Service
Binding a cloud database
RDS is required for persistent storage of application data.
Choose Cloud Service Settings > Relational Database Service and bind a cloud database. For details, see Binding a Cloud Database.
GaussDB
Binding a GaussDB instance
GaussDB is required for persistent storage of application data.
Choose Cloud Service Settings > GaussDB and bind a GaussDB instance. For details, see Binding a GaussDB Instance.
Distributed Message Service for RocketMQ
Binding a DMS for RocketMQ instance
DMS for RocketMQ is required for application components to store and consume messages.
Choose Cloud Service Settings > Distributed Message Service for RocketMQ and bind a RocketMQ instance. For details, see Binding a DMS for RocketMQ Instance.
Cloud Search Service
Binding a CSS instance
Uses the multi-condition search, statistics, and report capabilities of structured and unstructured text provided by the Elasticsearch cluster of Cloud Search Service (CSS) to analyze component logs in all scenarios.
Choose Cloud Service Settings > Cloud Search Service and bind a CSS instance. For details, see Binding a CSS Instance.
- Click Create Now.
Perform subsequent operations as required by referring to the following table.
Operation
Procedure
Do not enable the component
- Click Back to Component Management. On the component list page, the imported component status is Imported and to be restarted.
- To enable the component, see Starting or Stopping a Component.
Enable the component
- Click Enable Component Now.
- Click Enable in the Operation column.
The component is successfully enabled and is in the Running state.
Follow-up Operations
- Starting or Stopping a Component for Imported and to be restarted components.
- Upgrading a Component in Single-batch Release Mode and Upgrading a Component in Rolling Release Mode for Running, Not ready, Abnormal, and Failed components.
- Upgrading a Component in Dark Launch Mode for Running, Not ready, and Abnormal components.
- Upgrading Components in Batches for Running, Not ready, and Abnormal components.
- Cloning Components in Batches for Running, Not ready, and Abnormal components.
- Configuring a Scaling Policy of a Component Instance for Running and Not ready components.
- Maintain components by referring to Component O&M after the components are started.
- For Running components, you can Configuring the Component Access Mode to access the services provided by the component in a preset mode.
Feedback
Was this page helpful?
Provide feedbackThank you very much for your feedback. We will continue working to improve the documentation.See the reply and handling status in My Cloud VOC.
For any further questions, feel free to contact us through the chatbot.
Chatbot


