
Using DRS to Migrate Data from Oracle Database to GaussDB
Scenarios
This section describes how to use real-time synchronization of DRS to migrate data from an on-premises Oracle database to Huawei Cloud GaussDB in real time. Full+incremental synchronization can ensure that data is always in sync between the source Oracle database and the destination GaussDB instance. Full synchronization is used to synchronize data. Incremental synchronization is used to synchronize data between the source and destination databases in real time.
Step 1: Create a VPC and Security Group
Step 2: Create a GaussDB Instance
Step 3: Construct Data Before Migration
Problems to Resolve
- Enterprise workloads have been growing and evolving fast, and traditional databases lack the scalability needed to keep up. Enterprises need distributed databases.
- Building a traditional database means purchasing and installing servers, systems, databases, and other software. The O&M is expensive and difficult.
- Traditional databases have poor performance when it comes to handling complex queries.
- It is hard for traditional databases to smoothly synchronize data with no downtime.
Prerequisites
- You have registered with Huawei Cloud and completed account authentication.
- Your account balance is greater than or equal to $0 USD.
- In a testing scenario, you have set up an on-premises Oracle database.
- You have obtained the IP address, port number, username, and password of the Oracle database to be migrated.
Service Architecture
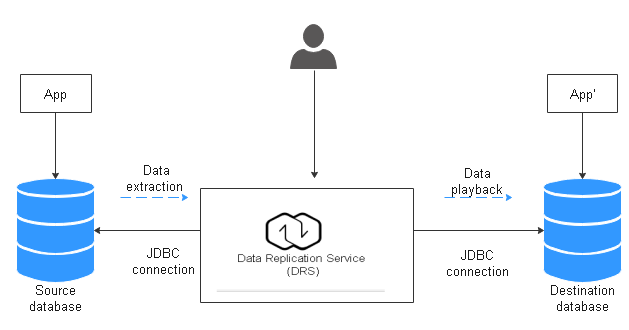
How Data Migration Works
The data migration process is completed using full and incremental synchronization, which includes the following operations:
- In the full synchronization phase, schemas, including tables, primary keys, and unique keys, are synchronized first.
- After schemas are synchronized, incremental data extraction is started to ensure that the incremental data generated during full data synchronization is completely extracted to the DRS instance.
- A full migration task is started.
- An incremental synchronization is automatically started after the full migration is complete. The replay starts from the position where the full synchronization starts.
- A comparison task is started after the incremental replay is complete to check the data consistency. Real-time comparison is supported.
- Workloads synchronization is started if the data is consistent between the source and destination databases.

Resource Planning
The resource planning in this section is just an example. You need to adjust it as needed.
|
Category |
Item |
Planned Value |
Remarks |
|---|---|---|---|
|
VPC |
VPC name |
vpc-src-172 |
Specify a name that is easy to identify. |
|
Region |
Test region |
To achieve lower network latency, select the region nearest to you. |
|
|
AZ |
AZ 3 |
- |
|
|
Subnet CIDR block |
172.16.0.0/16 |
Select a subnet with sufficient network resources. |
|
|
Subnet name |
subnet-src-172 |
Specify a name that is easy to identify. |
|
|
On-premises Oracle database |
Name |
orcl |
Specify a name that is easy to identify. |
|
Specifications |
16 vCPUs | 32 GB |
- |
|
|
Database version |
11.2.0.1 |
- |
|
|
Database user |
test_info |
Specify a username. The user must have the following permissions during migration: CREATE SESSION, SELECT ANY TRANSACTION, SELECT ANY TABLE, SELECT ANY DICTIONARY, and EXECUTE_CATALOG_ROLE. |
|
|
GaussDB |
Instance name |
Auto-drs-gaussdbv5-tar-1 |
Specify a name that is easy to identify. |
|
Database version |
GaussDB V2.0-8.218 Enterprise edition |
- |
|
|
Instance type |
Distributed (3 CNs, 3 DN shards, and 3 replicas) |
In this example, a distributed instance will be created. |
|
|
Deployment model |
Independent |
- |
|
|
Transaction consistency |
Strong consistency |
- |
|
|
Shards |
3 |
- |
|
|
Coordinator nodes |
3 |
- |
|
|
Storage type |
Ultra-high I/O |
- |
|
|
AZ |
AZ 2 |
In this example, a single AZ is selected. You are advised to select multiple AZs to improve instance availability in actual use. |
|
|
Instance Specifications |
Dedicated (1:8); 8 vCPUs | 64 GB |
Small specifications are selected for this test instance. You are advised to configure specifications based on service requirements in actual use. |
|
|
Storage space |
480 GB |
A small storage space is selected for this test instance. You are advised to configure the storage space based on service requirements in actual use. |
|
|
Disk encryption |
Disable |
In this example, disk encryption is disabled. Enabling disk encryption improves the security of data, but may slightly affect the database read/write performance. |
|
|
Logging in to the database through DAS |
Database engine |
GaussDB |
- |
|
Database source |
GaussDB |
Select the GaussDB instance created in this example. |
|
|
Database name |
postgres |
- |
|
|
Username |
root |
- |
|
|
Password |
- |
Enter the password of the root user of the GaussDB instance created in this example. |
|
|
DRS migration task |
Migration task name |
DRS-test-info |
Specify a name that is easy to identify. |
|
Destination database name |
test_database_info |
Specify a name that is easy to identify. The name must be compatible with the Oracle database name. |
|
|
Source database engine |
Oracle |
- |
|
|
Destination database engine |
GaussDB |
- |
|
|
Network type |
Public network |
In this example, a public network is used. |
- Log in to the Huawei Cloud console.
- Click
 in the upper left corner and select a region.
 - Click the service list icon on the left and choose Networking > Virtual Private Cloud. The VPC console is displayed.
- Click Create VPC.
Figure 2 Basic Information
 Figure 3 Subnet Setting
Table 2 VPC parameters Parameter
Description
Region
Region where the VPC will be created. Select the region nearest to you to ensure the lowest latency possible.
Name
VPC name. The name can contain:
- 1 to 64 characters.
- Letters, digits, underscores (_), hyphens (-), and periods (.).
IPv4 CIDR Block
IPv4 CIDR block of the VPC. Consider the following when specifying a CIDR block:
- IP addresses: Reserve sufficient IP addresses for subsequent service expansion.
- IP address ranges: Avoid IP address conflicts if you need to connect a VPC to an on-premises data center or connect two VPCs.
Enterprise Project
Enterprise project that the VPC belongs to.
An enterprise project facilitates project-level management and grouping of cloud resources and users. The name of the default project is default.
Advanced Settings > Tag
Click
 next to Advanced Settings to set this parameter.
Add tags to help you quickly identify, classify, and search for your VPCs.
Advanced Settings > Description
Click
 next to Advanced Settings to set this parameter.
Enter the description about the VPC in the text box as required.
The description can contain a maximum of 255 characters and cannot contain angle brackets (< or >).
Table 3 Subnet parameters Parameter
Description
Subnet Name
Subnet name. The name can contain:
- 1 to 64 characters.
- Letters, digits, underscores (_), hyphens (-), and periods (.).
AZ
A geographic location with independent power supply and network facilities in a region. AZs are physically isolated, and AZs in the same VPC are interconnected through an internal network.
Each region contains multiple AZs. If one AZ is faulty, other AZs in the same region continue to provide services.
IPv4 CIDR Block
This parameter is displayed only in regions where IPv4/IPv6 dual stack is supported.
A subnet is a unique CIDR block with a range of IP addresses in a VPC. Comply with the following principles when planning subnets:
- Planning CIDR block size: After a subnet is created, the CIDR block cannot be changed. You need to plan the CIDR block in advance based on the number of IP addresses required by your service.
- The subnet CIDR block cannot be too small. Ensure that the number of available IP addresses in the subnet meets service requirements. The first and last three addresses in a subnet CIDR block are reserved for system use. For example, in subnet 10.0.0.0/24, 10.0.0.1 is the gateway address, 10.0.0.253 is the system interface address, 10.0.0.254 is used by DHCP, and 10.0.0.255 is the broadcast address.
- The subnet CIDR block cannot be too large, either. If you use a CIDR block that is too large, you may not have enough CIDR blocks available for new subnets, which can be a problem when you want to scale out services.
- Avoiding subnet CIDR block conflicts: If you need to connect two VPCs or connect a VPC to an on-premises data center, there cannot be any CIDR block conflicts.
If the subnet CIDR blocks at both ends of the network conflict, create a subnet. For details, see Creating a Subnet for an Existing VPC.
A subnet mask can be between the netmask of its VPC CIDR block and /29 netmask. If a VPC CIDR block is 10.0.0.0/16, its subnet mask can be between 16 and 29.
For more information about VPC subnet planning, see VPC and Subnet Planning.
IPv6 CIDR Block
This parameter is displayed only in regions where IPv4/IPv6 dual stack is supported.
If you enable this function, the system automatically assigns an IPv6 CIDR block to the subnet. Currently, the IPv6 CIDR block cannot be customized. Once enabled, this function cannot be disabled.
Advanced Settings > Gateway
Click
 next to Advanced Settings to set this parameter.
Retain the default value unless there are special requirements.
Advanced Settings > DNS Server Address
Click
 next to Advanced Settings to set this parameter.
Huawei Cloud private DNS server addresses are entered by default. This allows ECSs in a VPC to communicate with each other. You can also access cloud services directly through private DNS servers.
You can change the default DNS server address if needed. If you delete the default DNS server addresses, you may fail to access other services on the cloud. Exercise caution when performing this operation.
You can click Reset on the right to restore DNS server addresses to the default value.
A maximum of two DNS server IP addresses are allowed. Separate them by a comma (,).
Advanced Settings > Domain Name
Click
 next to Advanced Settings to set this parameter.
Enter domain names separated by spaces. A maximum of 254 characters are allowed. Each label in a domain name can contain a maximum of 63 characters. (For example, test and com are two labels in test.com.)
To access a domain name, simply enter the domain name prefix. ECSs in the subnet automatically match the configured domain name suffix.
If the domain names are changed, ECSs newly added to this subnet will use the new domain names.
If an existing ECS in this subnet needs to use the new domain names, restart the ECS or run a command to restart the DHCP Client service or network service.
NOTE:The command for updating the DHCP configuration depends on the ECS OS. The commands here are only for your reference.
- Restart the DHCP Client service: service dhcpd restart
- Restart the network service: service network restart
Advanced Settings > NTP Server Address
Click
 next to Advanced Settings to set this parameter.
If you want to add NTP server addresses for a subnet, you can specify this parameter. The IP addresses are added in addition to the default NTP server addresses.
- If you add or change the NTP server addresses of a subnet, you need to renew the DHCP lease for or restart all the ECSs in the subnet to make the change take effect immediately.
- If the NTP server addresses have been cleared out, restarting the ECSs will not help. You must renew the DHCP lease for all ECSs to make the change take effect immediately.
Advanced Settings > IPv4 DHCP Lease Time
Click
 next to Advanced Settings to set this parameter.
This parameter is displayed only in regions where IPv4/IPv6 dual stack is supported.
You can set the DHCP lease time of an IPv4 address.
This parameter specifies the period during which a client can use an IP address automatically assigned by the DHCP server. After the lease time expires, a new IP address will be assigned to the client.- Limited: Set the DHCP lease time. The unit can be days or hours.
- Unlimited: The DHCP lease time does not expire.
If the time period is changed, the new lease time takes effect when the instance (such as an ECS) in the subnet is renewed next time. You can wait for the instance to be renewed automatically or manually modify the lease time. If you want the new lease time to take effect immediately, manually renew the lease or restart the instance.
Advanced Settings > IPv6 DHCP Lease Time
Click
 next to Advanced Settings to set this parameter.
This parameter is displayed for regions where IPv4/IPv6 dual stack is supported and IPv6 is enabled.
You can set the DHCP lease time of an IPv6 address in the same way as how you do with an IPv4 address.
Advanced Settings > Tag
Click
 next to Advanced Settings to set this parameter.
You can add tags to help you quickly identify, classify, and search for your subnets.
Advanced Settings > Description
Click
 next to Advanced Settings to set this parameter.
You can enter the subnet description in the text box as required.
The description can contain a maximum of 255 characters and cannot contain angle brackets (< or >).
- Configure parameters as needed and click Create Now.
- Return to the VPC list and check whether the VPC is created.
If the VPC status changes to Available, the VPC has been created.
- Log in to the Huawei Cloud console.
- Click
 in the upper left corner and select a region.
 - Click the service list icon on the left and choose Networking > Virtual Private Cloud. The VPC console is displayed.
- In the navigation pane, choose Access Control > Security Groups.
- Click Create Security Group.
- Specify a security group name and other information.
Figure 4 Basic information

Table 4 Parameter description Parameter
Description
Region
Region where the VPC will be created. Select the region nearest to you to ensure the lowest latency possible.
An instance must be in the same region as its associated security group.
Name
The name of the security group. The name can contain:- 1 to 64 characters.
- Letters, digits, underscores (_), hyphens (-), and periods (.).
You can change the security group name after a security group is created. It is recommended that you give each security group a different name.
Enterprise Project
When creating a security group, you can add the security group to an enabled enterprise project.
An enterprise project facilitates project-level management and grouping of cloud resources and users. The name of the default project is default.
Tag
You can add tags to help you identify, classify, and search for your security groups.
Description
The description of the security group.
The description can contain a maximum of 255 characters and cannot contain angle brackets (< or >).
- Click the Inbound Rules tab and then click Add Rule.
- Configure an inbound rule, add the IP address of the source database, and click OK.
Figure 5 Configuring an inbound rule

- Configure parameters as needed and click Create Now.
Step 2: Create a GaussDB Instance
Create a GaussDB instance as the destination database of the migration task.
- Go to the Buy DB Instance page.
- On the Buy DB Instance page, click the Custom Config tab. On the page shown in Figure 6, configure basic information about the instance, including the instance name, billing mode, edition type, DB engine version, instance type, transaction consistency, number of shards, number of coordinator nodes, and deployment AZ.
Figure 7 Instance Configuration

- Select the instance specifications and storage space.
Figure 8 Instance Specifications

- Select the VPC created in Creating a VPC and security group created in Creating a Security Group for the instance and configure the database port.
Figure 9 Selecting a VPC and security group

- Configure the password and other information.
Figure 10 Configuring the password and other information

- Click Next, confirm the information, and click Submit.
- Go to the instance list.
If status of the instance changes to Available, the instance has been created.

Step 3: Construct Data Before Migration
Before the migration, prepare some data types in the source database for verification after the migration is complete. The end-to-end test data in this section is for reference only.
The following table lists data types supported by DRS.
|
Source Data Type |
Destination Data Type |
Sync (Source Data Type as Primary Key) |
Sync (Source Data Type as Non-Primary Key) |
Comparison (Source Data Type as Primary Key) |
Comparison (Source Data Type as Non-Primary Key) |
Remarks |
|---|---|---|---|---|---|---|
|
CHAR |
character |
Supported |
Supported |
Supported. The spaces before and after a character are ignored. |
Supported. The spaces before and after a character are ignored. |
- |
|
VARCHAR |
character varying |
Supported |
Supported |
Supported |
Supported |
The precision ranges of the source and destination databases are different, causing precision loss. |
|
VARCHAR2 |
character varying |
Supported |
Supported |
Supported |
Supported |
- |
|
NCHAR |
character |
Supported |
Supported |
Supported. The spaces before and after a character are ignored. |
Supported. The spaces before and after a character are ignored. |
- |
|
NVARCHAR2 |
nvarchar2 |
Supported |
Supported |
Supported |
Supported |
- |
|
NUMBER |
numeric |
Supported |
Supported |
Supported |
Supported |
- |
|
NUMBER (6,3) |
numeric(6,3) |
Supported |
Supported |
Supported |
Supported |
- |
|
NUMBER (6,0) |
Integer |
Supported |
Supported |
Supported |
Supported |
- |
|
NUMBER (3) |
smallint |
Supported |
Supported |
Supported |
Supported |
- |
|
NUMBER (6,-2) |
integer |
Supported |
Supported |
Supported |
Supported |
- |
|
BINARY_FLOAT |
real |
Not supported (The destination database does not support creating tables using the primary key.) |
Supported |
Not supported |
Supported |
The precision ranges of the source and destination databases are different, causing precision loss. |
|
BINARY_DOUBLE |
double precision |
Not supported (The destination database does not support creating tables using the primary key.) |
Supported |
Not supported |
Supported |
- |
|
FLOAT |
real |
Not supported (The destination database does not support creating tables using the primary key.) |
Supported |
Not supported |
Supported |
The precision ranges of the source and destination databases are different, causing precision loss. |
|
INT |
numeric |
Supported |
Supported |
Supported |
Supported |
- |
|
INTEGER |
numeric |
Supported |
Supported |
Supported |
Supported |
- |
|
DATE |
date |
Supported |
Supported |
Not supported |
Supported |
If a table with the date type is created in the destination database, the data type precision range in the source database is different from that in the destination database, causing precision loss. Therefore, comparison is not supported. |
|
TIMESTAMP |
timestamp(6) without time zone |
Supported |
Supported |
Not supported |
The value is accurate to six decimal places. |
Restrictions on the source database: The maximum precision supported by the source database is 6. |
|
TIMESTAMP_TZ |
timestamp(6) with time zone |
Not supported (The source database does not support creating tables using the primary key.) |
Supported |
Not supported |
Filter out this column. |
- |
|
TIMESTAMP_LTZ |
timestamp(6) with time zone |
Not supported (The destination database does not support creating tables using the primary key.) |
Supported |
Not supported |
Filter out this column. |
- |
|
INTERVAL_YM |
interval year to month |
Supported |
Supported |
Not supported |
Not supported |
Incremental synchronization does not support this type. |
|
INTERVAL_DS |
interval day to second |
Supported |
Supported |
Not supported |
Not supported |
Incremental synchronization does not support this type. Restrictions on the source database: The maximum precision supported by the source database is 6. |
|
BLOB |
bytea |
Not supported (The source database does not support creating tables using the primary key.) |
Supported |
Not supported |
Filter out this column. |
- |
|
CLOB |
text |
Not supported (The source database does not support creating tables using the primary key.) |
Supported |
Not supported |
Filter out this column. |
- |
|
NCLOB |
text |
Not supported (The source database does not support creating tables using the primary key.) |
Supported |
Not supported |
Filter out this column. |
- |
|
LONG |
text |
Not supported (The source database does not support creating tables using the primary key.) |
Supported |
Not supported |
Filter out this column. |
- |
|
LONG_RAW |
bytea |
Not supported (The source database does not support creating tables using the primary key.) |
Supported |
Not supported |
Filter out this column. |
- |
|
RAW |
bytea |
Not supported (The destination database does not support creating tables using the primary key.) |
Supported |
Not supported |
Supported |
- |
|
RowID |
character varying(18) |
Supported |
Supported |
Supported |
Supported |
- |
|
BFILE |
- |
Not supported |
Not supported |
Not supported |
Not supported |
Restrictions on the source database: The BFILE type is not supported. |
|
XMLTYPE |
- |
Not supported |
Not supported |
Not supported |
Not supported |
Restrictions on the source database: The XMLTYPE type is not supported. |
|
UROWID |
- |
Not supported |
Not supported |
Not supported |
Not supported |
Full and incremental synchronizations are not supported. |
|
sdo_geometry |
- |
Not supported |
Not supported |
Not supported |
Not supported |
Restrictions on the source database: The sdo_geometry type is not supported. |
|
NUMBER(*, 0) |
numeric |
Supported |
Supported |
Supported |
Supported |
- |
Perform the following steps to construct data in the source database:
- Use a database connection tool to connect to the source Oracle database based on its IP address.
- Construct data in the source database based on data types supported by DRS.
- Create a test user.
create user test_info identified by xxx;
test_info indicates the user created for the migration, and xxx indicates the password of the user.
- Assign privileges to the user.
- Create a data table for the user.
CREATE TABLE test_info.DATATYPELIST(
ID INT,
COL_01_CHAR______E CHAR(100),
COL_02_NCHAR_____E NCHAR(100),
COL_03_VARCHAR___E VARCHAR(1000),
COL_04_VARCHAR2__E VARCHAR2(1000),
COL_05_NVARCHAR2_E NVARCHAR2(1000),
COL_06_NUMBER____E NUMBER(38,0),
COL_07_FLOAT_____E FLOAT(126),
COL_08_BFLOAT____E BINARY_FLOAT,
COL_09_BDOUBLE___E BINARY_DOUBLE,
COL_10_DATE______E DATE DEFAULT SYSTIMESTAMP,
COL_11_TS________E TIMESTAMP(6),
COL_12_TSTZ______E TIMESTAMP(6) WITH TIME ZONE,
COL_13_TSLTZ_____E TIMESTAMP(6) WITH LOCAL TIME ZONE,
COL_14_CLOB______E CLOB DEFAULT EMPTY_CLOB(),
COL_15_BLOB______E BLOB DEFAULT EMPTY_BLOB(),
COL_16_NCLOB_____E NCLOB DEFAULT EMPTY_CLOB(),
COL_17_RAW_______E RAW(1000),
COL_19_LONGRAW___E LONG RAW,
COL_24_ROWID_____E ROWID,
PRIMARY KEY(ID)
);
- Insert two rows of data.
insert into test_info.DATATYPELIST values(4,'huawei','xian','shanxi','zhongguo','shijie', 666,12.321,1.123,2.123,sysdate,sysdate,sysdate,sysdate,'hw','cb','df','FF','FF','AAAYEVAAJAAAACrAAA');
insert into test_info.DATATYPELIST values(2,'Migrate-test','test1','test2','test3','test4', 666,12.321,1.123,2.123,sysdate,sysdate,sysdate,sysdate,'hw','cb','df','FF','FF','AAAYEVAAJAAAACrAAA');
- Commit the changes to the database.
- Create a test user.
- Create a database in the destination GaussDB instance.
- Log in to the Huawei Cloud console.
- Click
 in the upper left corner and select a region.
 - Click the service list icon on the left and choose Databases > Data Admin Service.
- In the navigation pane on the left, choose Development Tool to go to the login list page.
- Click Add Login.
- On the displayed page, select the DB engine, source database, and target instance, enter the login username, password, and description (optional), and enable Show Executed SQL Statements.
- Click Test Connection to check whether the connection is successful.
If a message is displayed indicating the connection is successful, continue with the operation. If a message is displayed indicating the connection failed and the failure cause is provided, make modifications according to the error message.
- Click OK.
- Locate the added record and click Log In in the Operation column.
Figure 11 Logging in to an instance

- Choose SQL Operations > SQL Window on the top menu bar.

- Run the following statement to create an Oracle-compatible database:
Step 4: Migrating the Database
Create a DRS instance and migrate data from the test_info database in the on-premises Oracle database to the test_database_info database in the GaussDB instance.
Performing a Pre-migration Check
Before creating a migration task, check the migration conditions to ensure smooth migration.
Before the migration, you need to obtain the notes on migration to the cloud.
Creating a Migration Task
- Log in to the Huawei Cloud console.
- Click
 in the upper left corner and select a region.
Select the region where the destination instance is deployed.
- Click the service list icon on the left and choose Databases > Data Replication Service.
- In the navigation pane on the left, choose Data Synchronization Management. On the displayed page, click Create Synchronization Task.
- Configure synchronization instance information.
- Select a region, billing mode, and project, and enter a task name.
- Configure synchronization instance details. Specifically, specify Data Flow, Source DB Engine, Destination DB Engine, Network Type, DRS Task Type, Destination DB Instance, Synchronization Instance Subnet, Synchronization Mode, Specify EIP (mandatory when Network Type is set to Public Network), Specifications, AZ, Enterprise Project, and Tags (optional).


- Click Create Now.
- Configure the source and destination database information.
- Configure DNS Server as required. Specify connection information about the source database, including the IP address, port, username, and password.
Click Test Connection.

- Enter the username and password of the destination database.

- Click Next. In the displayed box, read the message carefully and click Agree.
- Configure DNS Server as required. Specify connection information about the source database, including the IP address, port, username, and password.
- Configure the synchronization task.
- Select the databases and tables of the source database to be migrated. In this example, select the DATATYPELIST table from the test_info database.

- Locate the database and table, respectively, and click Edit to change the database name and table name as needed.

- On the displayed dialog box, enter a new name, for example, DATATYPELIST_After.
The name cannot include special characters. Otherwise, an error will be reported during SQL statement execution after the migration.

- Confirm the settings and click Next.

- Select the databases and tables of the source database to be migrated. In this example, select the DATATYPELIST table from the test_info database.
- Confirm advanced settings.
The information on the Advanced Settings page is for confirmation only and cannot be modified. After confirming the information, click Next.

- Process data.
On this page, you can process the table to be migrated. For example, you can select the column to be migrated and change its name. In this example, change the column name COL_01_CHAR______E to new-line.
- Click Edit next to the table to be processed.

- Edit the COL_01_CHAR______E column.

- Enter the new name new-line and click Confirm.

- Click Next.
- Click Edit next to the table to be processed.
- Perform a pre-check.
- Confirm the task.
- After the task is submitted, view and manage it.
After the task is created, return to the task list to view the status of the created task.


Step 5: Verify Data After Migration
When the task status changes to Incremental, the full synchronization is complete. You can log in to GaussDB and view the data migration result.
- Wait until the migration task status changes to Incremental.

- Click the task name to go to the Basic Information page.
- On the Synchronization Progress page, view the full synchronization result.
As shown in the following figure, the DATATYPELIST table in the TEST_INFO database has been migrated to shard_0. Two rows of data were migrated successfully.

- Verify data consistency.
- Choose Synchronization Comparison > Object-Level Comparison to view the database and table migration results.

- Choose Synchronization Comparison > Data-Level Comparison, click Create Comparison Task, and view the migration results of the rows in the table.

- Choose Synchronization Comparison > Object-Level Comparison to view the database and table migration results.
- Connect to the test_database_info database in GaussDB using DAS.
- Run the following statement to query the full synchronization result:
SELECT * FROM test_info.datatypelist_after;
After the schema in Oracle is migrated, it will be used as the schema in GaussDB. Therefore, it is required to add the schema in the query statement for exact query.
As shown in the following figure, all data types in the table were successfully migrated and the data is correct.

- Verify incremental synchronization.
In full+incremental synchronization, after the full synchronization is complete, the data that is written to the source database after the task is created can still be synchronized to the destination database until the task is stopped. The following describes how to synchronize incremental data from the source database to the destination database:
- Use a database connection tool to connect to the source Oracle database based on its IP address.
- Run the following statement to insert a data record into the source database:
- Run the following statement in the destination database to query the result:
SELECT * FROM test_info.datatypelist_after;
As shown in the following figure, the new data inserted in the source database has been synchronized to the destination database in real time.

- Stop the migration task.
- After the migration is complete, test the GaussDB performance.
For details about how to test GaussDB performance, see Performance White Paper.


Feedback
Was this page helpful?
Provide feedbackThank you very much for your feedback. We will continue working to improve the documentation.See the reply and handling status in My Cloud VOC.
For any further questions, feel free to contact us through the chatbot.
Chatbot


