Configuração de uma política de backup automático
Cenário
O DDS faz backup dos dados automaticamente com base na política de backup automático que você definiu. Você é aconselhado a fazer backup regularmente dos dados em seu banco de dados. Se o banco de dados ficar com defeito ou os dados estiverem danificados, você poderá restaurá-lo com o backup.
A política de backup automático para DDS está habilitada por padrão. Depois que uma instância é criada, você pode modificar ou desabilitar a política de backup automático conforme necessário.
Uma vez que a política de backup automático é habilitada, um backup completo é ativado imediatamente. Depois disso, backups completos serão criados com base na janela e no ciclo que você especificar. Quando o backup de uma instância é feito, os dados são copiados e, em seguida, compactados e carregados no OBS. O período de tempo em que os dados de backup são mantidos depende do período de retenção de backup configurado. A duração do backup depende da quantidade de dados e a velocidade média de backup é de 60 MB/s. Depois que a política de backup automático é ativada, um backup incremental é executado automaticamente a cada 5 minutos para instâncias de conjunto de réplicas para garantir a confiabilidade dos dados. Se a função de backup incremental for necessária para instâncias de cluster, você precisará ativá-la manualmente.
Descrição do backup automático
- Tipo de backup
- Backup completo: todos os dados são copiados mesmo que nenhum dado tenha sido atualizado desde o último backup.
- Backup incremental: o backup incremental é usado para fazer backup dos dados recém-adicionados ou modificados desde o último backup completo ou incremental. O DDS faz backup automático dos dados atualizados a cada 5-60 minutos desde que o último backup automático ou incremental foi feito.
- Modo de backup
- Physical: os dados são copiados de discos físicos.
- Snapshot
- o status dos dados em um determinado momento é mantido. Comparado com o backup físico, o backup de snapshot é mais rápido. Depois que o CBR é ativado, o espaço livre de backup fica indisponível. Você é cobrado pelos cofres de backup do servidor de banco de dados com base no pagamento por uso. Para obter detalhes, consulte Como o CBR é cobrado?

- O tempo de backup é proporcional à quantidade de dados que sua instância possui. Muitos dados podem diminuir a eficiência do backup. Se você tiver grandes quantidades de dados e quiser acelerar o processo de backup, entre em contato com o atendimento ao cliente para ativar o Cloud Backup and Recovery (CBR).
- Depois que o CBR é ativado, o backup de snapshot é usado. Os backups automatizados e manuais existentes ainda podem ser usados para restaurar dados.
- Quando você exclui uma instância de BD, seus backups automáticos também são excluídos, mas seus backups manuais são mantidos.
- Depois que o CBR é ativado, o próximo backup completo é um backup de snapshot. Você pode usar o backup de snapshots para restaurar dados.
- Se for necessário fazer backup de mais de 2 TB de dados, o método de backup não poderá ser definido de volta para backup físico.
- Não é possível fazer backup de snapshots entre regiões.
- o status dos dados em um determinado momento é mantido. Comparado com o backup físico, o backup de snapshot é mais rápido. Depois que o CBR é ativado, o espaço livre de backup fica indisponível. Você é cobrado pelos cofres de backup do servidor de banco de dados com base no pagamento por uso. Para obter detalhes, consulte Como o CBR é cobrado?
- Logical: uma ferramenta é usada para ler dados e exportar logicamente os dados.
- Tabela 1 lista os métodos de backup automático suportados pelo DDS.
Tabela 1 Métodos de backup Tipo de instância
Modo de backup
Tipo de backup
Cluster
Backup físico/backup de snapshot
NOTA:- Somente usuários na lista de permissões podem usar o backup de snapshots. Você precisa enviar um tíquete de serviço para solicitar essa função. No canto superior direito do console de gerenciamento, escolha Service Tickets > Create Service Ticket para enviar um tíquete de serviço.
- Para obter detalhes sobre como definir o Backup Method para Snapshot, consulte Configuração do método de backup para uma instância de BD.
- Backup completo
- Backup incremental
NOTA:O backup de snapshot se aplica apenas a dados físicos em um backup completo.
Conjunto de réplicas
Backup físico/backup de snapshot
NOTA:- Somente usuários na lista de permissões podem usar o backup de snapshots. Você precisa enviar um tíquete de serviço para solicitar essa função. No canto superior direito do console de gerenciamento, escolha Service Tickets > Create Service Ticket para enviar um tíquete de serviço.
- Para obter detalhes sobre como definir o Backup Method para Snapshot, consulte Configuração do método de backup para uma instância de BD.
- Backup completo
- Backup incremental
NOTA:O backup de snapshot se aplica apenas a dados físicos em um backup completo.
Nó único
NOTA:Instâncias de nó único se aplicam a apenas alguns cenários. É aconselhável usar uma única instância de nó somente para aprendizado.
Backup lógico/backup de snapshot
NOTA:- Somente usuários na lista de permissões podem usar o backup de snapshots. Você precisa enviar um tíquete de serviço para solicitar essa função. No canto superior direito do console de gerenciamento, escolha Service Tickets > Create Service Ticket para enviar um tíquete de serviço.
- Para obter detalhes sobre como definir o Backup Method para Snapshot, consulte Configuração do método de backup para uma instância de BD.
Backup completo
Preços
- Depois de comprar uma instância, o DDS fornecerá armazenamento de backup adicional do mesmo tamanho que você comprou. Por exemplo, se você comprar 100 GB de espaço de armazenamento de instância, obterá 100 GB de espaço de armazenamento de backup. Se o tamanho dos dados de backup não exceder 100 GB, os dados de backup serão armazenados no OBS gratuitamente. Se o tamanho dos dados de backup exceder 100 GB, você será cobrado com base nas regras de cobrança do OBS.
- Você pode verificar seus registros de despesas para taxas de backup do DDS indo para Billing Center > Bills.
Precauções
- O processo de backup não afeta os serviços.
- O DDS verifica os arquivos de backup automático existentes. Se o período de retenção de um arquivo exceder o período de retenção de backup definido, o DDS excluirá o arquivo.
- Depois que a política de backup for modificada, um backup automático será acionado com base na nova política de backup. O período de retenção dos backups automatizados gerados anteriormente permanece inalterado.
- As instâncias de nó único não suportam backup incremental.
- Por padrão, o nome de um backup automático termina com a hora UTC. Para alterar a hora de exibição no nome do backup automático para a hora local, entre em contato com o pessoal de O&M da Huawei.
Habilitar ou modificar uma política de backup automático
- Faça logon no console de gerenciamento.
- Clique em
 no canto superior esquerdo e selecione uma região e um projeto.
 - Clique em
 no canto superior esquerdo da página e escolha Databases > Document Database Service.
 - na página Instances, clique no nome da instância.
- No painel de navegação à esquerda, escolha Backups & Restorations.
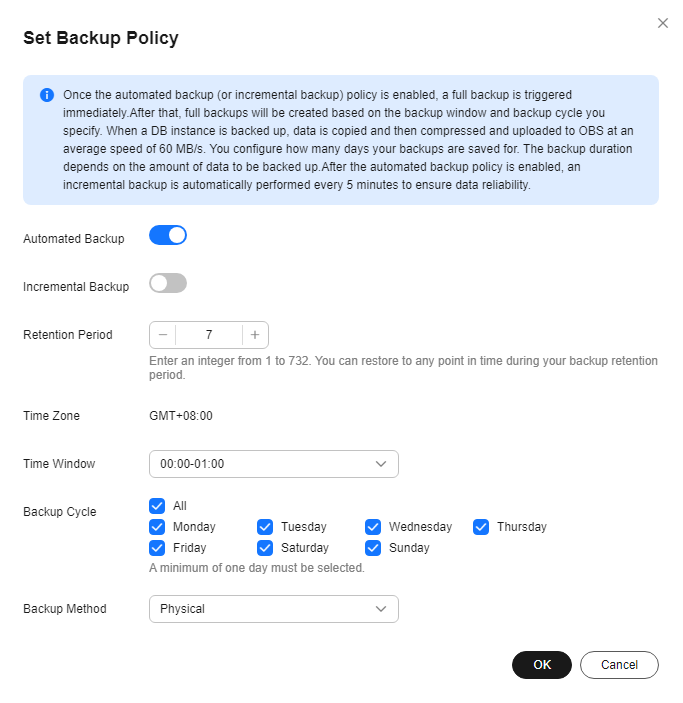
- Na página Backups & Restorations, clique em Set Backup Policy. Se pretender ativar a política de cópia de segurança automática, clique em
 . Uma vez ativada, a política de backup pode ser modificada conforme mostrado em Figura 1.
 Tabela 2 Descrição do parâmetro Parâmetro
Descrição
Retention Period (days)
Número de dias em que seus backups automáticos podem ser mantidos. O período de retenção é de 1 a 732 dias e o valor padrão é 7.
- A extensão do período de retenção melhora a confiabilidade dos dados. Você pode configurar o período de retenção, se necessário.
- Se você reduzir o período de retenção, a nova política de backup entrará em vigor para os backups existentes. Todos os backups automáticos (incluindo backups completos e incrementais) que expiraram serão excluídos automaticamente. Os backups manuais não serão excluídos automaticamente, mas você pode excluí-los manualmente.
Time Zone
O fuso horário de backup padrão é o horário UTC.
Time Window
Um período de uma hora, o backup será agendado dentro de 24 horas, como 01:00-02:00. O tempo de backup está no formato UTC.
Backup Cycle
- Se você definir o período de retenção para 1 a 6 dias, o backup dos dados será feito automaticamente a cada dia da semana e o ciclo de backup não poderá ser alterado.
- Se você definir o período de retenção de 7 a 732 dias, deverá selecionar pelo menos um dia da semana para o ciclo de backup.
Backup Method
- Physical: os dados são copiados de discos físicos.
- Snapshot: o status dos dados em um determinado momento é mantido. Comparado com o backup físico, o backup de snapshot é mais rápido.
- Logical: uma ferramenta é usada para ler dados e exportar logicamente os dados.
Política para excluir automaticamente backups completos:
Para garantir a integridade dos dados, mesmo após a expiração do período de retenção, o backup mais recente será mantido.
Se Backup Cycle foi definido para Monday e Tuesday e o Retention Period foi definido como 2:
- O backup completo gerado na segunda-feira será automaticamente excluído na quinta-feira. As razões são as seguintes:
O backup gerado na segunda-feira expira na quarta-feira, mas é o último backup, portanto, será mantido até que um novo backup expire. O próximo backup será gerado na terça-feira e expirará na quinta-feira. Assim, o backup completo gerado na segunda-feira não será automaticamente excluído até quinta-feira.
- O backup completo gerado na terça-feira será automaticamente excluído na quarta-feira seguinte. As razões são as seguintes:
O backup gerado na terça-feira expirará na quinta-feira, mas como é o último backup, ele será mantido até que um novo backup expire. O próximo backup será gerado na segunda-feira seguinte e expirará na quarta-feira seguinte. Assim, o backup completo gerado na terça-feira não será excluído automaticamente até a quarta-feira seguinte.
- Clique em OK para salvar as alterações.
- Veja os resultados.
- Durante a criação de um backup automático, você pode consultar o status do backup na página Backups ou na guia Backups & Restorations. O status do backup é Backing up.
- No canto superior direito da lista de backups, clique em
 para atualizar a lista. O status do backup é alterado para Complete. O tipo de backup é Automated e o método de backup é Physical.
Desativação de uma política de backup automatizado

Ao desabilitar a política de backup automático:
- Não é possível fazer backup de seus dados.
- As instâncias do conjunto de réplicas não podem ser restauradas para um ponto no tempo especificado.
- Se você optar por excluir todo o backup automático existente ao desabilitar a política de backup automático, as operações de restauração ou download relacionadas falharão.
- Faça logon no console de gerenciamento.
- Clique em
 no canto superior esquerdo e selecione uma região e um projeto.
 - Clique em
 no canto superior esquerdo da página e escolha Databases > Document Database Service.
 - na página Instances, clique no nome da instância.
- No painel de navegação à esquerda, escolha Backups & Restorations.
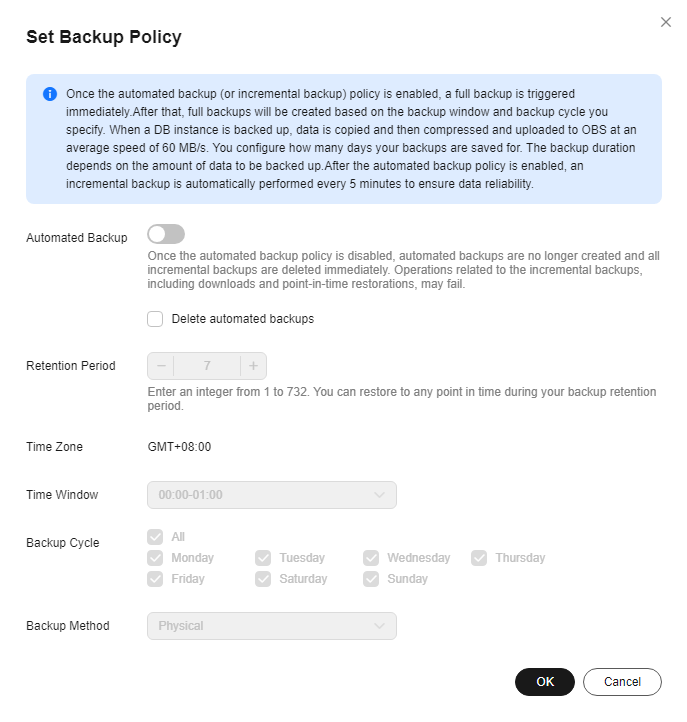
- Na página Backups & Restorations, clique em Set Backup Policy. Na página exibida, clique em
 para desabilitar a política de backup automático. Figura 2 mostra a caixa de diálogo para modificar a política de backup.
 Você pode determinar se deseja excluir todos os arquivos de backup automático:
- Se você não selecionar Delete automated backups, todos os arquivos de backup dentro do período de retenção serão retidos, mas você ainda poderá excluí-los manualmente. Para obter detalhes, consulte a seção Exclusão de um backup automático.
- Se você selecionar Delete automated backups, todos os arquivos de backup dentro do período de retenção serão excluídos.
Se você encurtar o período de retenção, a nova política de backup entrará em vigor para todos os arquivos de backup. Todos os arquivos de backup que tenham expirado, com base em um período de retenção recém-configurado, serão excluídos, mas o último arquivo de backup expirado será mantido.
- Clique em OK.
- Se os backups automáticos forem desativados, quaisquer backups automáticos em andamento serão interrompidos imediatamente.
- Depois que os backups automáticos são desativados, os backups incrementais são desativados por padrão.
- Se você precisar ativar a política de backup automático novamente, consulte Habilitar ou modificar uma política de backup automático.