Este conteúdo foi traduzido por máquina para sua conveniência e a Huawei Cloud não pode garantir que o conteúdo foi traduzido com precisão. Para exibir o conteúdo original, use o link no canto superior direito para mudar para a página em inglês.
Central de ajuda/
Document Database Service/
Guia de usuário/
Modificações de instâncias/
Alteração de nós de instância do conjunto de réplicas/
Alternação manual dos nós primário e secundário de um conjunto de réplicas
Atualizado em 2025-08-07 GMT+08:00
Alternação manual dos nós primário e secundário de um conjunto de réplicas
Um conjunto de réplicas consiste no nó primário, nó secundário e nó oculto. Os nós primários e secundários permitem o acesso de serviços externos fornecendo endereços IP. Os nós ocultos são usados apenas para fazer backup de dados. Quando um nó primário se torna defeituoso, o sistema seleciona automaticamente um novo nó primário para garantir alta disponibilidade. O DDS oferece suporte às alternâncias primária/secundária para cenários como recuperação de desastres.
Precauções
- Para realizar uma alternância, o status da instância precisa ser Available, Changing to yearly/monthly e Changing a security group.
- A conexão com o banco de dados pode ser interrompida durante a alternância. Certifique-se de que o seu cliente suporta a reconexão.
- Se houver quaisquer nós secundários recém-adicionados, eles não poderão participar desta alternância. Quando você adiciona um novo nó secundário, o endereço da conexão de HA precisa ser reconfigurado e o novo nó é congelado por 12 horas.
- Uma alternância primária/secundária pode ser executada somente quando a instância de banco de dados estiver disponível.
- Quanto maior o atraso para a sincronização primária/secundária, mais tempo é necessário para uma alternância primária/secundária. Se o atraso de sincronização primária para secundária exceder 300s, a alternância primária/secundária não é suportada. Para obter detalhes sobre o atraso de sincronização, consulte Qual é o atraso de tempo para a sincronização primária/secundária em um conjunto de réplicas?
Executar uma alternância primária/secundária
- Faça logon no console de gerenciamento.
- Clique em
 no canto superior esquerdo e selecione uma região e um projeto.
 - Clique em
 no canto superior esquerdo da página e escolha Databases > Document Database Service.
 - Na página Instances, clique na instância do conjunto de réplicas.
- Na área Node Information na página Basic Information, clique em Switch.
Figura 1 Alternância primária/secundária

- Na caixa de diálogo exibida, clique em Yes.
- Confira o resultado.
- Durante o processo de alternância, o status da instância de BD muda para Switchover in progress. Depois que a alternância for concluída, o status será restaurado para Available.
- Na área Node Information, você pode exibir o resultado da alternância.
- Após a alternância, o nó primário anterior torna-se o nó secundário. Você precisa se reconectar ao nó primário. Para obter detalhes, consulte Conexão a uma instância de BD.
Promover forçosamente um nó secundário para o primário
- Faça logon no console de gerenciamento.
- Clique em
 no canto superior esquerdo e selecione uma região e um projeto.
 - Clique em
 no canto superior esquerdo da página e escolha Databases > Document Database Service.
 - Na página Instances, localize a instância do conjunto de réplicas de destino e clique em seu nome.
- Na área Node Information da página Basic Information, localize um nó de destino cuja função seja Secondary e clique em Promote to Primary na coluna Operation.
Figura 2 Promover ao primário

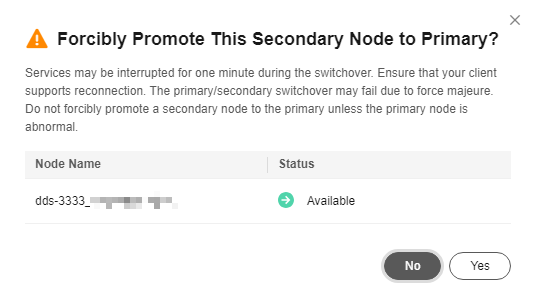
- Na caixa de diálogo exibida, clique em Yes.
Figura 3 Promover forçosamente um nó secundário para o primário

- Confira o resultado.
- Na área Node Information da página Basic Information, você pode exibir o resultado.
Tópico principal: Alteração de nós de instância do conjunto de réplicas
Feedback
Esta página foi útil?
Deixar um comentário
Obrigado por seus comentários. Estamos trabalhando para melhorar a documentação.
O sistema está ocupado. Tente novamente mais tarde.


