Managing Custom Objects
Associating Objects
Associating objects refers to adding associations between objects, that is, enabling one object to know the existence of another object. The platform supports Lookup Relationship and Master-Detail Relationship for objects.
- Log in to the application designer by referring to Logging In to the Application Designer.
- In the navigation pane, choose Data.
- Move the cursor to
 of the target object, and choose Detail to access the object designer.
 - Click
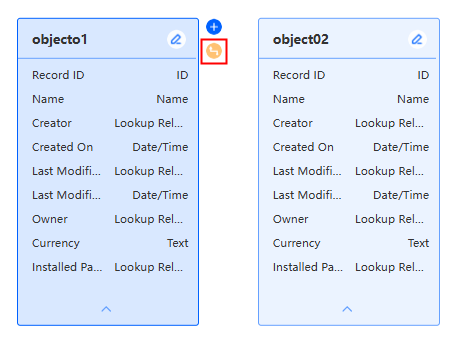
 next to the object. The page for adding an association is displayed.
Figure 1 Adding an association
- Select a relationship and click Next.
Figure 2 Selecting a relationship type
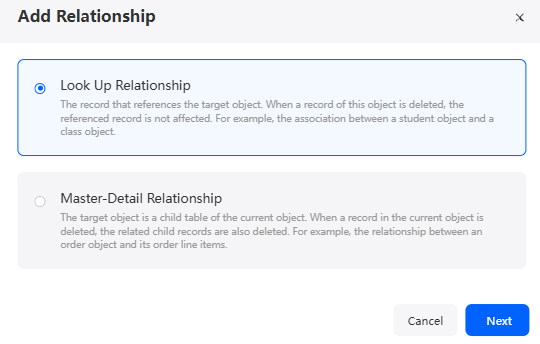
- Lookup Relationship: You can establish a reference relationship between objects by linking the current field to another object's ID. Once a lookup relationship is set, the current field's value is sourced from the associated object. If you delete the associated object's record does not impact the referencing record.
- Master-Detail Relationship: You can establish a master-slave relationship between objects by linking the current field to another object's ID. This makes the current field's value reliant on the master object. In this setup, deleting a master record also deletes the corresponding slave records, as seen in the relationship between an order and its details.
- Complete the configuration and click Confirm.
Table 1 Parameters for adding an object relationship Parameter
Description
Label
Display name on the page, which can be modified after being created.
Value: 1–80 characters.
Unique ID
Unique ID of the association in the system, which cannot be modified after being created. The naming requirements are as follows:
- The value cannot exceed 63 characters, including the prefix namespace and suffix __CST.
To prevent duplicate data names among different tenants, each tenant must define a unique namespace when first creating an application. A tenant can create only one namespace. After being created, the namespace cannot be modified.
- Start with a letter and can contain only letters, digits, and underscores (_). It cannot end with an underscore (_).
Related Object
Select an object from the drop-down list.
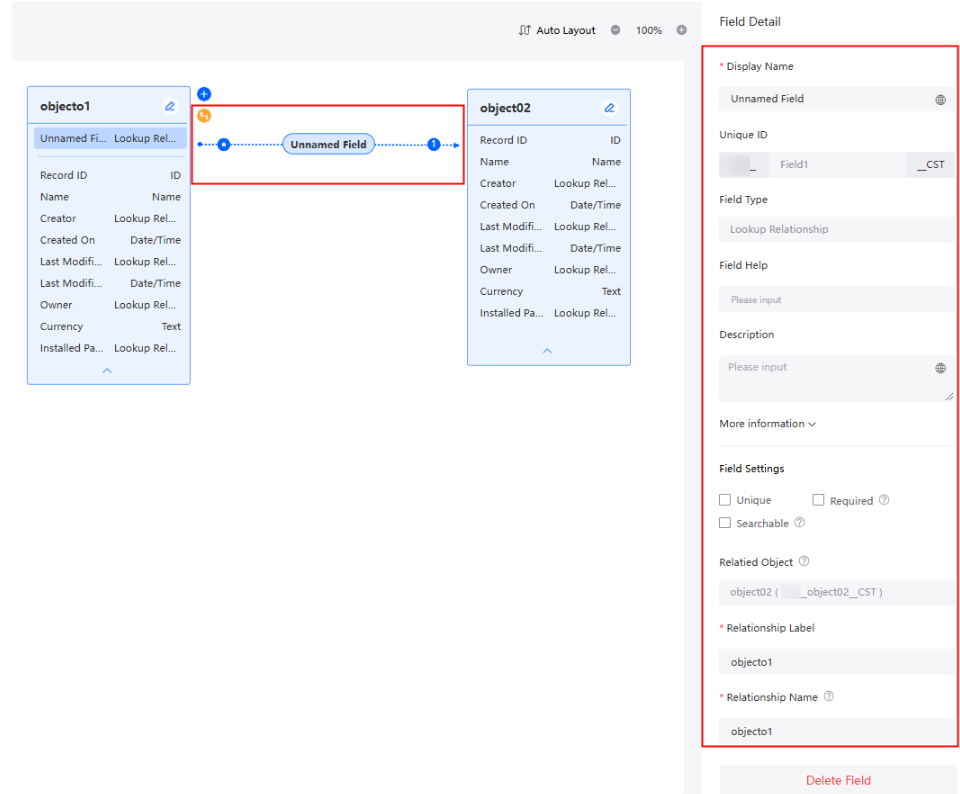
After a relationship is created between the object and the target object, a connection line is generated, as shown in Figure 3.
 and
and  are displayed at both ends of an association relationship, indicating a one-to-many relationship. Currently, both the lookup relationship and the master/slave relationship represent one-to-many relationships. Note that Astro Zero does not support one-to-one relationships.
- The arrow indicates the connection from an object with a relationship field to its related object.
- When a relationship line is selected, the attribute panel is displayed on the right, where you can edit or delete the attributes of the relationship field.
- The value cannot exceed 63 characters, including the prefix namespace and suffix __CST.
Moving an Object
After an object is created, you can move the object to an application with limited development permissions. For example, if a complex object created in application A is needed in application B, you can clone it in application A and move the clone to application B.
- Log in to the application designer by referring to Logging In to the Application Designer.
- In the navigation pane, choose Data.
- Move the cursor to
 of an object and choose Move.
 - Select the object to be moved (multiple elements can be selected at a time) and click Next.
Figure 4 Selecting the object to be moved

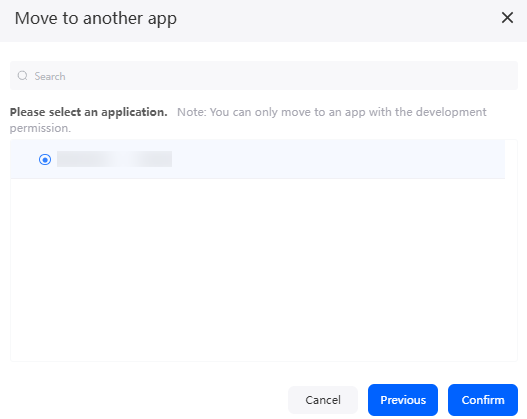
- Select the target application and click the confirm button.
The design page of the target application is displayed. Choose Data > Object to view the moved object.Figure 5 Selecting the target application
Cloning an Object
You can clone an object to an application. For example, if application A contains objects with identical fields and data, you can clone one object to make a new one. This allows you to editing the clone without starting the creation process over.
- Log in to the application designer by referring to Logging In to the Application Designer.
- In the navigation pane, choose Data.
- Move the cursor to
 of an object and choose Clone.
 - Complete the configuration and click Confirm.
After the clone is complete, you can view the cloned object in the object folder.
Figure 6 Cloning an object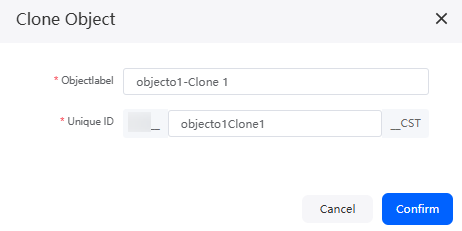
Adding Object Fields in Batches
Manually creating a large number of fields is time-consuming. You can create fields in batches with a template downloaded from the object details page.
- In the navigation pane, choose Data.
- Move the cursor to
 of the target object, and choose Detail to access the object designer.
 - In the object designer, click
 in the object. The object details page is displayed.
 - On the Fields tab page, choose Batch Create > Download Template. A template is downloaded to the local host.
- Open the downloaded template and click Enable Content in the upper left corner to enable macros.
- Enabling macros is required for verifying field attributes. If macros are not enabled, the template does not verify field attributes.
- If this is your first time using the template, read the instructions (including namespace configuration) in the "Note" sheet. The "Example" sheet provides an example of defining fields in batches.
- Create fields with the template.
Perform the following steps to set the fields to be imported. You can also click here to download an object field template.
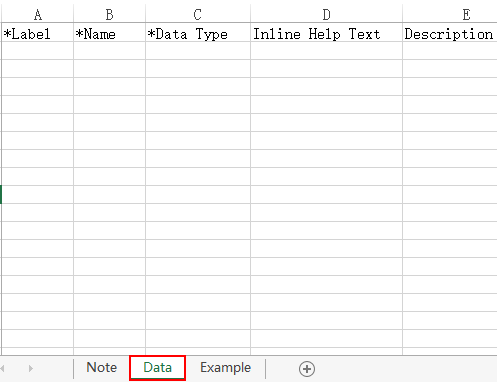
The "Data" sheet includes the type, label, name, data length, and default value of the fields to be created. Columns with an asterisk (*) are mandatory, and columns with a gray background cannot be set.- On the data tab page, set fields as required.
Figure 7 Data sheet
- Click column C (Data Type).
Set the field type. Attribute columns that are not related to this field type are displayed in gray.
Figure 8 Viewing the description about column C
- Click the first row in column C. In the drop-down list box, select Text Area for the first field Namespace__matter__CST.
Figure 9 Setting the field type

- Set Label in column A and set Name in column B.
The value in column B must be unique. Columns A and B correspond to Label and Name of custom fields in the object.
Figure 10 Setting the field label and name
- Click each mandatory column and set the attribute values.
Figure 11 Setting attribute values

- Save the settings.
- On the data tab page, set fields as required.
- Return to the object details page. On the Fields tab page, choose Batch Create > Batch Import Fields.
- Select the field template created in 6 and click OK.
Figure 12 Selecting fields to be imported from the template
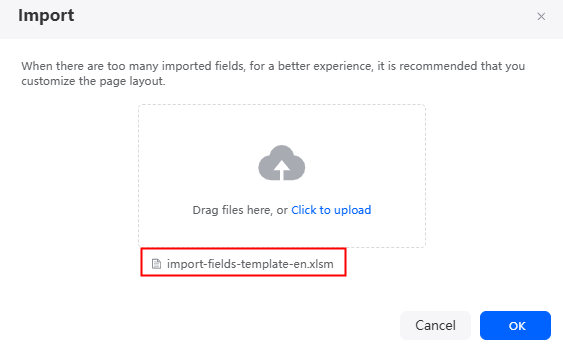
After the import is complete, you can view the imported data in the field list.
Figure 13 Viewing the imported data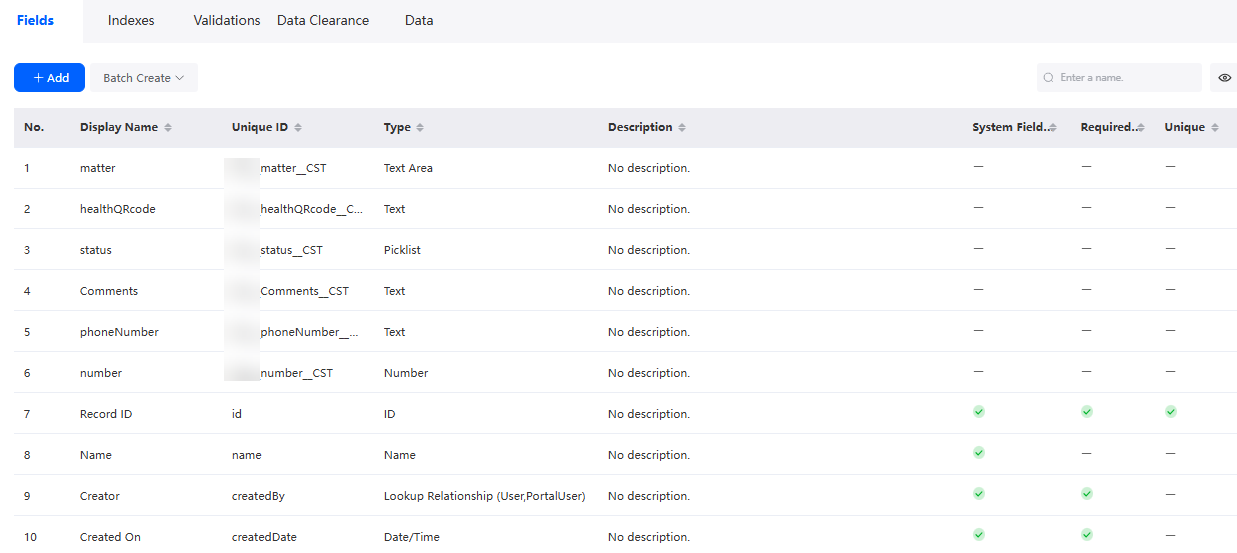
Importing Object Data in Batches
You can import data in batches by importing a file. This imports data of a single table. In the environment configuration page, you can import data from one table or multiple tables at the same time. For details, see Importing and Exporting Object Data in Applications.
- In the navigation pane, choose Data.
- Move the cursor to
 of the target object, and choose Detail to access the object designer.
 - Click
 in an object to go to its details page.
 - On the Data tab page, click Import.
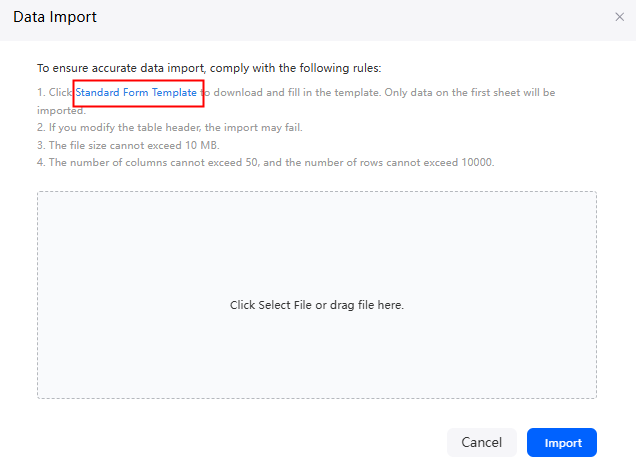
- On the displayed page, click Standard Form Template to download the import template.
Figure 14 Downloading a template
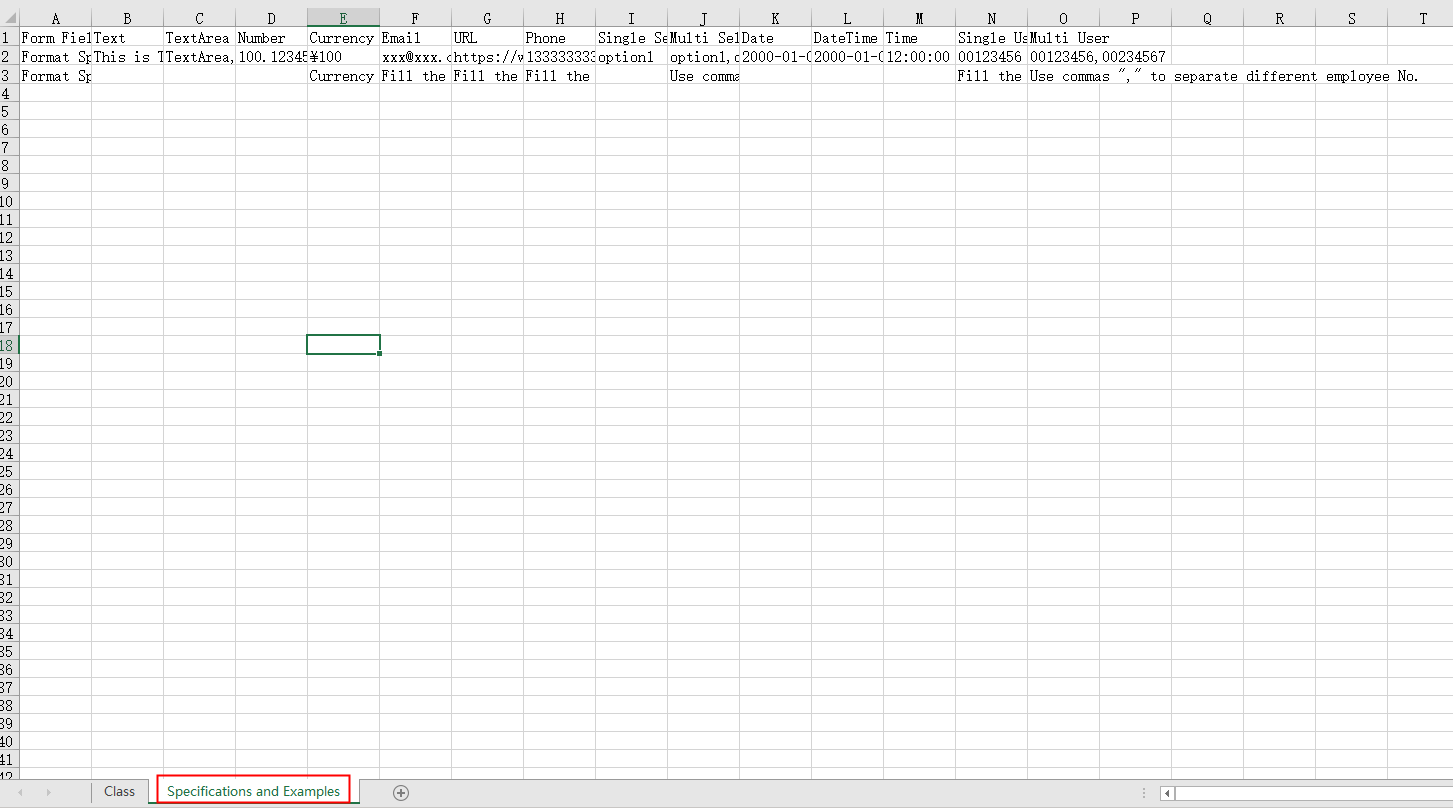
- Open the downloaded template and click the "Specifications and Examples" sheet.
Figure 15 Viewing the specifications and example
- Switch to the object table, fill in the fields of the imported data as required, and save the file.
The first row in the file is the column name. The column name must be the same as the unique ID of the field. Otherwise, the field will be discarded during import.
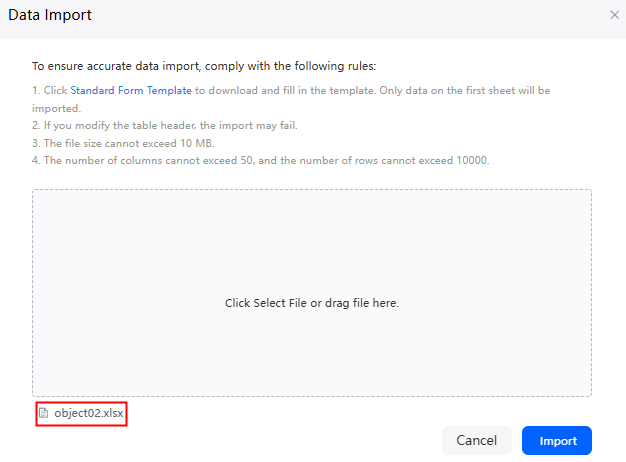
- Return to the data import page, drag the filled template file to the box, and click Import.
Figure 16 Importing data in batches
Exporting Object Data in Batches
You can export object data in batches for use in other objects. Similar to the operations in Importing Object Data in Batches, this exports data from a single table. In the environment configuration page, you can export data from one table or multiple tables at once. For details, see Importing and Exporting Object Data in Applications.
- In the navigation pane, choose Data.
- Move the cursor to
 of the target object, and choose Detail to access the object designer.
 - Click
 in an object to go to its details page.
 - On the Data tab page, select the data to be exported and click Export.
The exported file is in XLSX format, and the file name is in the format of Namespace_Object name_CST.
- After the export, you can import data to other objects by referring to Importing Object Data in Batches.
Importing and Exporting an Object Structure
Importing and exporting an object structure enables you to migrate and back up data. For example, you can migrate old data models to a new environment for object consistency and compatibility. For details, see Importing and Exporting Object Metadata of Applications.
Deleting an Object
If an application object is no longer needed, you can delete it to prevent it from occupying the resource quota of the account. Deleted objects cannot be recovered. Exercise caution when performing this operation.
- Log in to the application designer by referring to Logging In to the Application Designer.
- In the navigation pane, choose Data.
- Move the cursor to
 of an object and choose Delete.
 - In the displayed dialog box, select Delete the records in the resource. Click Confirm. Then the object is deleted.
If you do not select Delete the records in the resource, only the object is deleted. The function modules that use the object are not affected.
Feedback
Was this page helpful?
Provide feedbackThank you very much for your feedback. We will continue working to improve the documentation.See the reply and handling status in My Cloud VOC.
For any further questions, feel free to contact us through the chatbot.
Chatbot

