
Using ELB to Distribute Traffic to Multiple Web Applications Across ECSs
Scenarios
To forward requests based on domain names and paths, you need to create a load balancer, add an HTTP or HTTPS listener, and add forwarding policies to specify the domain names and paths.
If you have two web applications that are deployed on two ECSs (ECS01 and ECS02 in this example) but use the same domain name for access, you can set different paths to process requests.

Procedure
You can follow the process in Figure 2 to use a load balancer to route requests to two web applications.

|
Procedure |
What to Do |
|---|---|
|
Before using cloud services, sign up for a HUAWEI ID, enable Huawei Cloud services, and complete real-name authentication. |
|
|
|
|
Deploy Nginx on the two ECSs. |
|
|
Create a load balancer with elastic specifications to receive requests from clients and distribute the requests to backend servers. |
|
|
Configure security group rules to allow traffic from the backend subnet where the load balancer works to the backend servers. |
|
|
Add an HTTP listener to the load balancer to check requests from clients and route requests to backend servers in the backend server group. |
|
|
Configure two forwarding policies for the HTTP listener to enable the listener to forward requests to different backend server groups based on the configured domain name and path. |
|
|
Access the domain name of the load balancer to check whether it can route requests across the two backend servers. |
Preparations
Before creating resources such as VPCs and ECSs, you need to sign up for a HUAWEI ID and enable Huawei Cloud services.
If you already have a HUAWEI ID, skip this part.
Step 1: Create a VPC and Two ECSs
You need to plan the region for your load balancer, and create a VPC and two ECSs. Ensure that the ECSs and load balancer are in the same AZ and VPC.
- Create a VPC.
Configure the VPC as shown in the below figure. For details, see Creating a VPC.
Figure 3 Configuring a VPC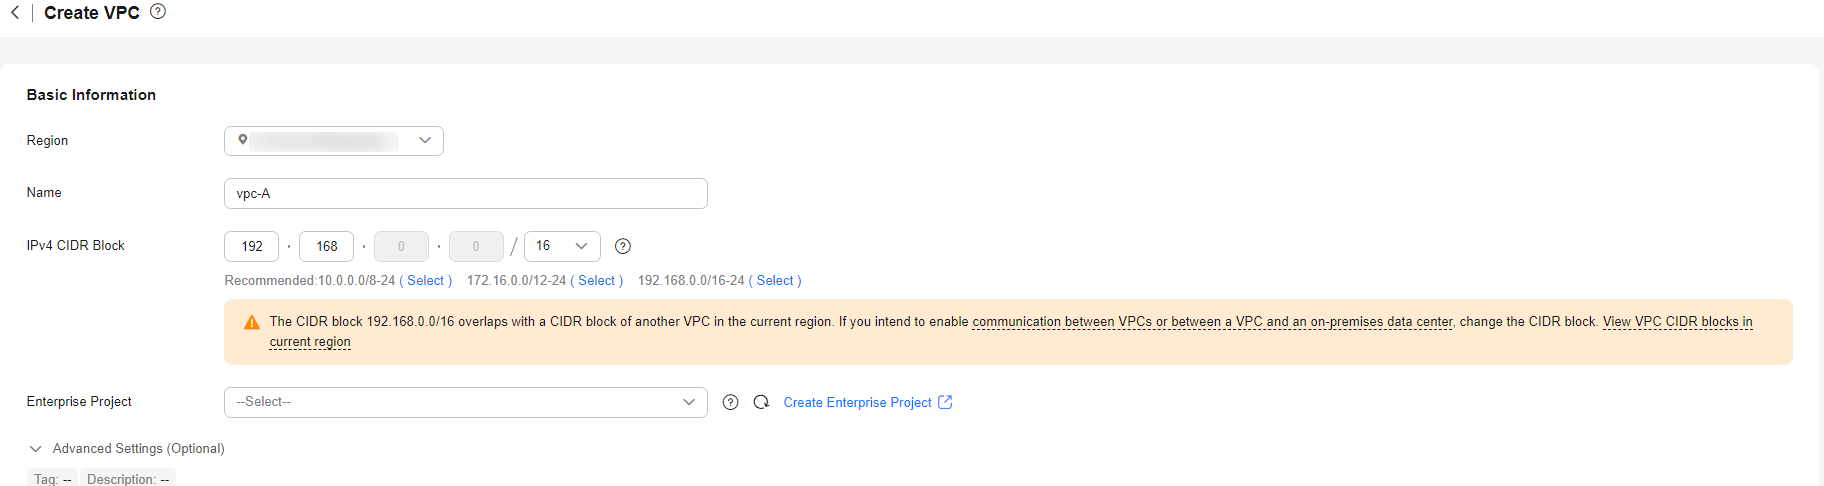 Figure 4 Configuring a VPC subnet
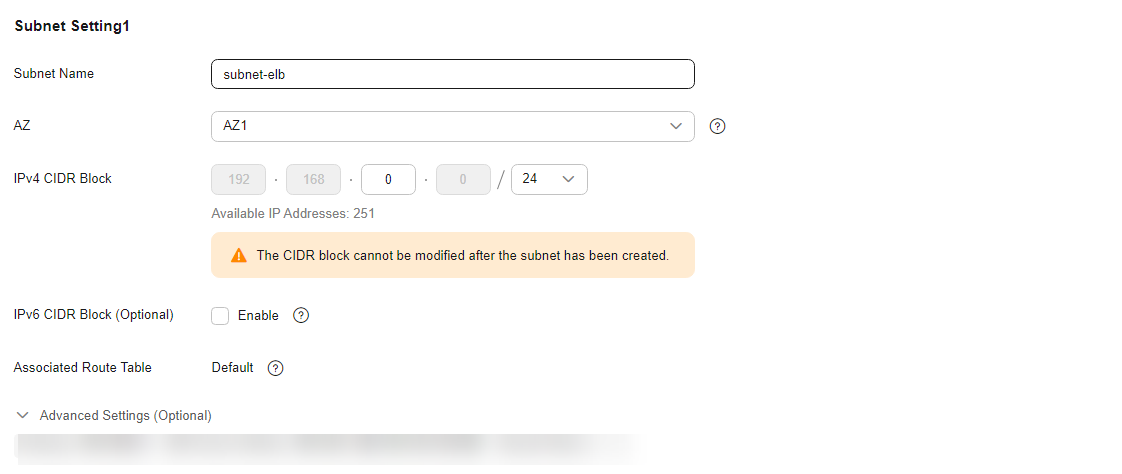
- Create two ECSs.
Configure the ECSs as described in the below table. For details, see Quickly Creating an ECS.
Step 2: Deploy the Applications
Deploy Nginx on the two ECSs and edit two HTML pages so that a page with message "Welcome to ELB test page one!" is returned when ECS01 is accessed, and the other page with message "Welcome to ELB test page two!" is returned when ECS02 is accessed.
- Log in to the ECSs.
- Install and start Nginx.
In this example, the two ECSs use CentOS 7.6 as the operating system.
Deploying Nginx
- Run the wget command to download the Nginx installation package for your operating system in use.
wget http://nginx.org/packages/centos/7/noarch/RPMS/nginx-release-centos-7-0.el7.ngx.noarch.rpm
- Run the following command to create the Nginx yum repository. CentOS 7.6 is used as an example here.
rpm -ivh nginx-release-centos-7-0.el7.ngx.noarch.rpm
- Run the following command to install Nginx:
yum -y install nginx
- Run the following commands to start Nginx and configure automatic Nginx enabling upon ECS startup:
systemctl start nginx
systemctl enable nginx
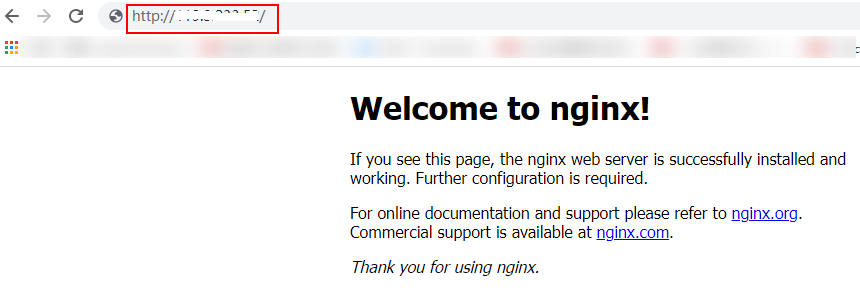
- Enter http://EIP bound to any ECS in the address box of your browser. If the following page is displayed, Nginx has been installed.
Figure 5 Nginx installed successfully
- Run the wget command to download the Nginx installation package for your operating system in use.
- Modify the HTML page of ECS01.
Move the index.html file from the default root directory of Nginx /usr/share/nginx/html to the ELB01 directory and modify the file to identify access to ECS01.
Modifying the HTML Page of ECS01
- Create the ELB01 directory and copy the index.html file to this directory:
mkdir /usr/share/nginx/html/ELB01
cp /usr/share/nginx/html/index.html /usr/share/nginx/html/ELB01/
- Run the following command to open the index.html file:
vim /usr/share/nginx/html/ELB01/index.html
- Press i to enter editing mode.
- Modify the index.html file.
The following is the content to be modified:
... <body> <h1>Welcome to <strong>ELB</strong> test page one!</h1> <div class="content"> <p>This page is used to test the <strong>ELB</strong>!</p> <div class="alert"> <h2>ELB01</h2> <div class="content"> <p><strong>ELB test (page one)!</strong></p> <p><strong>ELB test (page one)!</strong></p> <p><strong>ELB test (page one)!</strong></p> </div> </div> </div> </body> - Press Esc to exit the editing mode. Then, enter :wq to save the settings and exit the file.
- Create the ELB01 directory and copy the index.html file to this directory:
- Modify the HTML page of ECS02 by referring to step 3 to identify the access to ECS02.
- Use your browser to access http://EIP bound to ECS01/ELB01/ and http://EIP bound to ECS02/ELB02/ in sequence to verify that Nginx has been deployed.
If the modified HTML pages are displayed, Nginx has been deployed.
- HTML page of ECS01
Figure 6 Nginx successfully deployed on ECS01

- HTML page of ECS02
Figure 7 Nginx successfully deployed on ECS02

- HTML page of ECS01
Step 3: Create a Load Balancer
In this example, the load balancer needs an EIP to forward Internet requests to the application deployed on the ECSs. You can determine whether to bind an EIP to the load balancer based on service requirements.
- Go to the Buy Elastic Load Balancer page.
- On the displayed page, set the parameters as required.
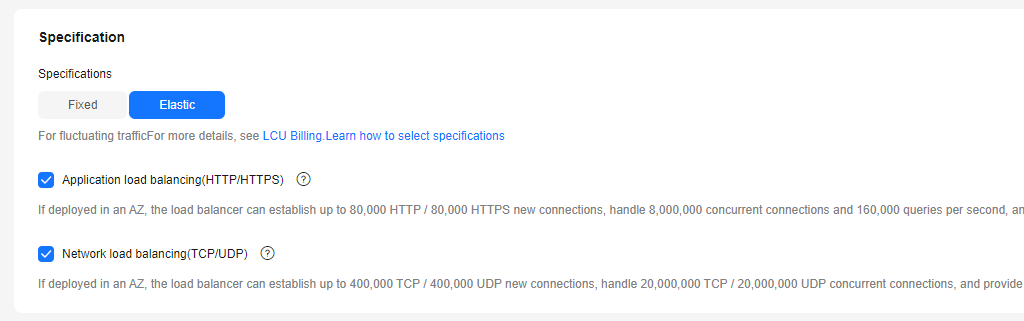
- Set Specification Type to Elastic. Figure 9 shows the details.
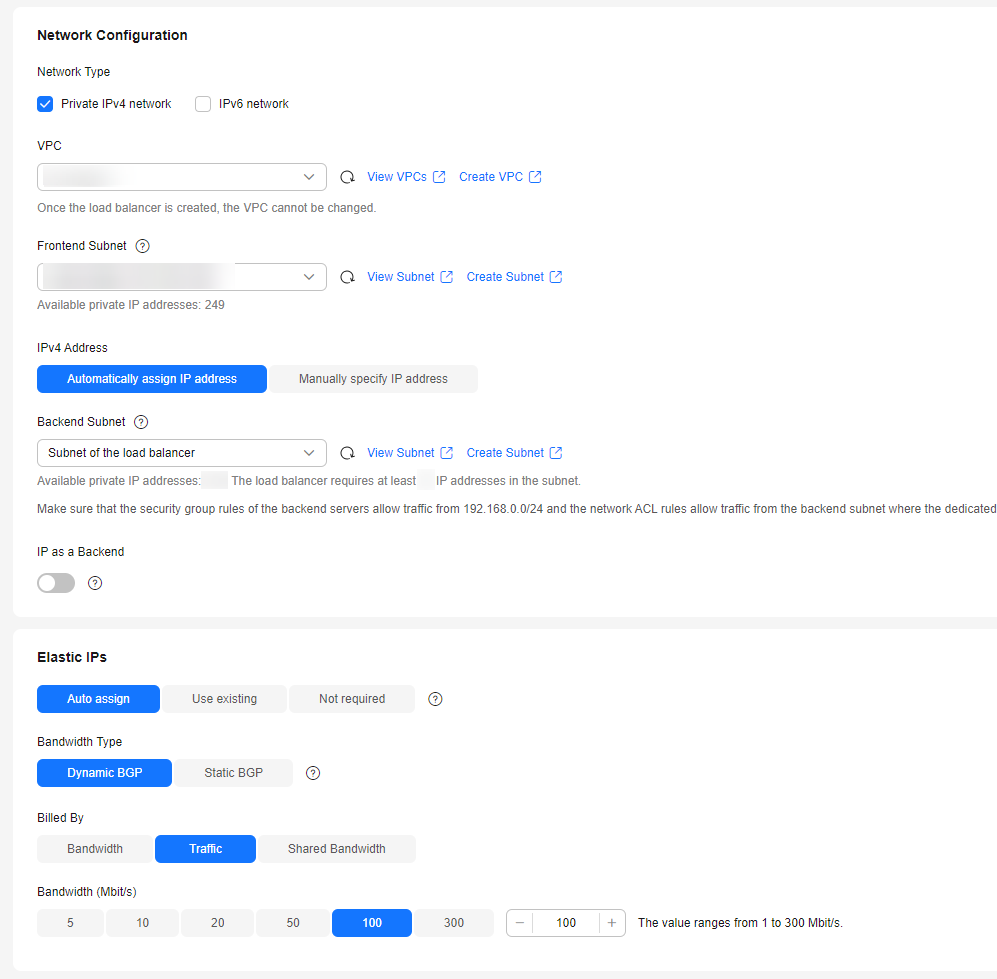
- Configure the network parameters and EIP information. For details about the parameters, see Figure 10.
- Specifies the maximum bandwidth. Click
 to expand the advanced settings and add a description and tags to the load balancer.
 - Click Buy Now.
- Confirm the configuration and submit your request.
- View the newly created load balancer in the load balancer list.

Step 4: Configure Security Group Rules
To ensure normal communications between the load balancer and backend servers, you need to check the security group and network ACL rules.
- The security groups configured for backend servers must have inbound rules to allow health check and service traffic from backend subnet of the load balancer to backend servers. By default, the backend subnet of a load balancer is the same as the subnet where the load balancer works.
- Network ACL rules are optional for subnets. If network ACL rules are configured for the subnet where backend servers are running, the inbound rules must allow traffic from the backend subnet of the load balancer to the subnet of backend servers.
For details about how to configure security group and network ACL rules, see Security Group and Network ACL Rules.
You can configure security group rules based on Table 1.
|
Direction |
Action |
Type |
Protocol & Port |
Source/Destination |
Description |
|---|---|---|---|---|---|
|
Inbound |
Allow |
IPv4 |
TCP: 80 |
Source: 192.168.0.0/24 |
Allows outbound traffic to ECSs in the security group. |
|
Outbound |
Allow |
IPv4 |
All |
Destination: 0.0.0.0/0 |
Allows the ECSs in the security group to access the external networks. |
Step 5: Add a Listener
Add a listener to the created load balancer. When you add the listener, create a backend server group, configure a health check, and add the two ECSs to this backend server group. If a backend server is detected unhealthy, the load balancer will stop routing traffic to it until the backend server recovers.
- On the load balancer list page, locate load balancer elb-test and click its name.
- On the Listeners tab, click Add Listener and configure parameters based on Table 2.
Table 2 Parameters for configuring a listener Parameter
Example Value
Description
Name
listener
Specifies the listener name.
Frontend Protocol
HTTP
Specifies the protocol that will be used by the listener to receive requests from clients.
Frontend Port
80
Specifies the port that will be used by the listener to receive requests from clients.
Redirect
-
Specifies whether to redirect requests from the HTTP listener to an HTTPS listener.
Disable it in this example.
Access Control
All IP addresses
Specifies how access to the listener is controlled. For details, see What Is Access Control?
Transfer Client IP Address
-
Specifies whether to transmit IP addresses of the clients to backend servers.
This feature is enabled for dedicated load balancers by default and cannot be disabled.
Advanced Forwarding
-
Specifies whether to enable advanced forwarding. Once it is enabled, more forwarding rules and actions are supported.
Enable it in this example.
- Retain the default values for Advanced Settings (Optional). Click Next: Configure Request Routing Policy. On the displayed page, select Create new for Backend Server Group.
Set Load Balancing Algorithm to Weighted round robin and retain the default values for other parameters.
- Click Next: Add Backend Server.
- Backend servers: Click Add Cloud Server and select ECS01 and ECS02 from the server list.
- Backend ports: Set them to 80. ECS01 and ECS02 will use this port to communicate with the load balancer.
- Configure health check parameters. In this example, retain the default settings.
- Click Next: Confirm, confirm the settings, and click Submit.
Step 6: Add Two Forwarding Policies
The following describes how to configure forwarding policies to forward HTTP requests to the two ECSs, for example, requests from www.example.com/ELB01/ to ECS01 and www.example.com/ELB02/ to ECS02.
- On the listener list page, locate the listener you have added in the previous step and click Add/Edit Forwarding Policy in the Forwarding Policies column. In the displayed page, click Add Forwarding Policy.
Configure the forwarding policy as shown in Figure 11. For details about the parameters, see Table 3.
Table 3 An example forwarding policy Forwarding Policy Item
Setting
Forwarding policy name
Enter a forwarding policy name, for example, forwarding_policy-ELB01.
Forwarding rule
Domain name: Enter a domain name that will be used to forward requests, for example, www.example.com.
Path: Specify a path (Exact match) to forward the requests, for example, /ELB01/.
Action
Select Forward to a backend server group.
- Create a backend server group for forwarding policy forwarding_policy-ELB01.
- Select Create Backend Server Group from the drop-down list to the right of Forward to a backend server group.
- In the Configure Routing Policy step, set the backend server group name to server_group-ELB01.
Use default settings for other parameters.
- Click Next. In the Add Backend Server step, click Add Cloud Server.
- On the displayed page, select cloud server ECS01, set the backend port to 80, and click Finish.
- Repeat 1 to 3 to add another forwarding policy, create a backend server group, and add ECS02 to its backend server group.

Step 7: Verify Load Balancing
After the load balancer is configured, you can access it using the domain name or specified path to check whether the load balancer can route requests across the two backend servers.
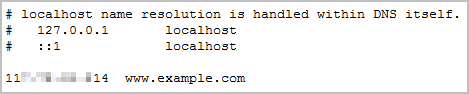
- Modify the C:\Windows\System32\drivers\etc\hosts file on your PC to map the domain name to the EIP bound to the load balancer.
View the EIP on the Summary tab of the load balancer.Figure 12 hosts file on your PC
- Choose Start and enter cmd to open the CLI.
- Run the following command to check whether the domain name is mapped to the load balancer EIP:
ping www.example.com
If data packets are returned, the domain name has been mapped to the load balancer EIP.
- Use your browser to access http://www.example.com/ELB01/.
If the following page is displayed, the load balancer has routed the request to ECS01.Figure 13 Accessing ECS01
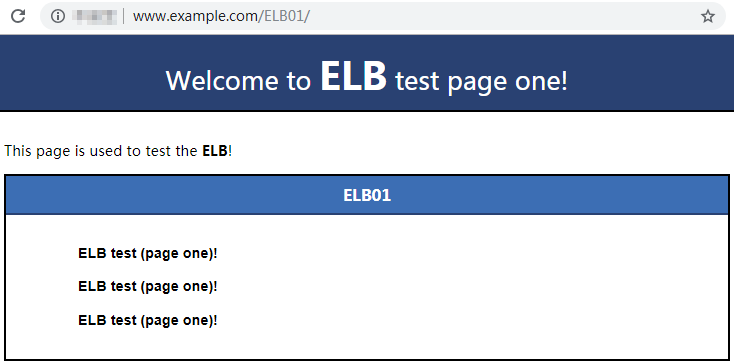

ELB01/ indicates that the default directory named ECS01 is accessed, while ELB01 indicates the file name. This means the slash (/) following ELB01 must be retained.
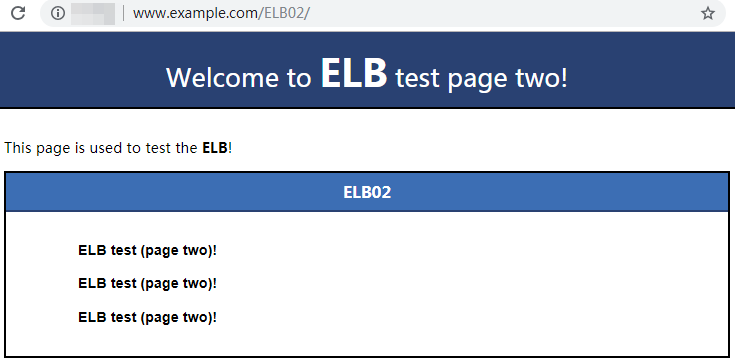
- Use your browser to access http://www.example.com/ELB02/.
If the following page is displayed, the load balancer has routed the request to ECS02.Figure 14 Accessing ECS02
Feedback
Was this page helpful?
Provide feedbackThank you very much for your feedback. We will continue working to improve the documentation.See the reply and handling status in My Cloud VOC.
For any further questions, feel free to contact us through the chatbot.
Chatbot


