
Using a Private NAT Gateway to Enable an ECS in a VPC to Access a Load Balancer in Another VPC
Scenarios
There are two applications (A and B) deployed in different VPCs. VPCs are isolated from each other by default, so the two applications cannot communicate with each other. To enable an application to access another, you can create a private NAT gateway and add a DNAT rule to it.
Solution Architecture
The following describes how to use a private NAT gateway to access a load balancer from a different VPC.
- Applications A and B are deployed in VPC-A and VPC-B, respectively. The two applications are isolated from each other.
- You can add a DNAT rule to a private NAT gateway to enable the application A on the ECS in VPC-A to use the transit IP address in the same VPC to access the load balancer in VPC-B.
- No route is required in this practice.

Advantages
- Applications A and B are deployed in different VPCs, keeping their networks isolated and enhancing security.
- A DNAT rule allows only specific instances in VPC-B to provide services accessible from VPC-A, hiding other services in VPC-B from VPC-A. This enables refined network control.
Constraints
A load balancer can only be configured for one DNAT rule of a private NAT gateway in the same VPC. You cannot configure multiple transit IP addresses in different VPCs to access this load balancer.
Resource Planning
In this example, you need to create VPCs, ECSs, a private NAT gateway, and a load balancer. For details about the resource planning, see Table 1.
|
Resource |
Quantity |
Description |
|---|---|---|
|
VPC and subnet |
Two VPCs, each with a subnet |
|
|
||
|
Private NAT gateway |
1 |
In this example, the name of the private NAT gateway is private_nat_gateway. It is used to connect VPC-A and VPC-B through a DNAT rule. |
|
Load balancer |
1 |
The load balancer in VPC-B to be accessed by the ECS in VPC-A |
|
ECS |
2 |
|
Preparations
- Create two ECSs (ECS-A in VPC-A and ECS-B in VPC-B) and configure an application on each ECS. For details about how to purchase an ECS, see Purchasing and Using a Linux ECS (New Edition).
- Create an HTTP backend server group (backend server group-B) and add ECS-B in VPC-B to it. Do not associate a load balancer with the backend server group. For details about how to create a backend server group, see Creating a Backend Server Group.
Step 1: Create a Load Balancer
- Go to the Buy Elastic Load Balancer page.
- Complete the basic configurations based on Table 2.
Table 2 Parameters for configuring the basic information Parameter
Example Value
Description
Type
Dedicated load balancer
Specifies the type of the load balancer. The type cannot be changed after the load balancer is created.
Region
CN North-Beijing4
Specifies the desired region. Resources in different regions cannot communicate with each other over internal networks.
AZ
- AZ1
- AZ2
Specifies the AZs where the load balancer works. An AZ is a part of a region and has its own independent power supplies and networks. AZs are physically isolated but interconnected through internal networks.
Name
ELB01
Specifies the load balancer name.
- Select specifications for the dedicated load balancer based on Table 3.
- Complete the network configurations based on Table 4.
Table 4 Configuring network parameters Parameter
Example Value
Description
Network Type
Private IPv4 network
Specifies the network type of the load balancer.
VPC
VPC-B
Specifies the VPC where the dedicated load balancer works. You cannot change the VPC after the load balancer is created. Plan the VPC as required.
Frontend Subnet
subnet-B01
Specifies the frontend subnet from which an IP address will be assigned to the dedicated load balancer to communicate with resources over the private network.
After the load balancer is created, you can unbind the existing IP address and bind IPv4 and IPv6 addresses in a different subnet to the load balancer. Unbinding an IP address may affect service running.
IPv4 Address
Automatically assign IP address
Specifies how you want the IPv4 address to be assigned if Network Type is set to Private IPv4 network.
Backend Subnet
Subnet of the load balancer
Specifies the backend subnet from which IP addresses will be assigned to the dedicated load balancer to forward requests to and perform health checks on backend servers.
- Retain the default values for other parameters and click Buy Now.
Step 2: Add an HTTP Listener and Associate It with a Backend Server Group
Add an HTTP listener for ELB01 and associate the listener with backend server group-B you have created. Set Access Control to All IP addresses. For details, see Adding an HTTP Listener.
Step 3: Assign a Transit IP Address
- Go to the private NAT gateway list page.
- On the Private NAT Gateways page, click Transit IP Addresses > Assign Transit IP Address.
Figure 2 Assigning a transit IP address

- Configure required parameters based on Table 5.
Figure 3 Assigning a transit IP address
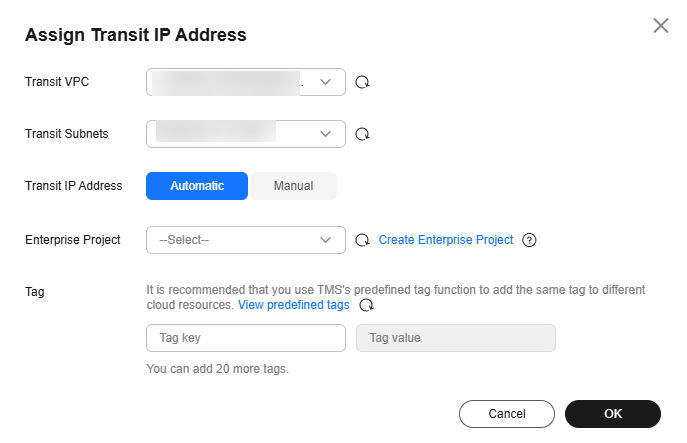
Table 5 Parameter for configuring a transit IP address Parameter
Example Value
Description
Transit VPC
VPC-A
The VPC where the transit IP address is located.
Transit Subnets
subnet-A01
The subnet from which the transit IP address is assigned. A transit subnet is a transit network.
Transit IP Address
Automatic
How you want the transit IP address to be assigned.
- Click OK.
Step 4: Create a Private NAT Gateway
- Go to the Buy Private NAT Gateway page.
- Configure the basic information about the private NAT gateway. For details about the key parameters, see Table 6. Use the default values for other parameters.
Table 6 Parameter descriptions Parameter
Example Value
Description
Name
private_nat_gateway
The name of the private NAT gateway.
VPC
VPC-B
The VPC where the private NAT gateway is created.
Subnet
subnet-B01
The subnet where the private NAT gateway is created.
Specifications
Small
The specifications of the private NAT gateway.
- Click Next.
Step 5: Add a DNAT Rule
- Go to the private NAT gateway list page.
- On the Private NAT Gateways page, click the name of the private NAT gateway on which you need to add a DNAT rule.
- On the private NAT gateway details page, click the DNAT Rules tab.
- Click Add DNAT Rule.
- Configure required parameters based on Table 7.
Table 7 Parameter descriptions Parameter
Example Value
Description
Local Network
Port Type
Specific port
Specific port: The private NAT gateway only forwards requests with a specific protocol and port on the transit IP address to the specified port of the target server.
Protocol
TCP
The protocol can be TCP or UDP.
Instance Type
Load balancer
Select the instance that provides services accessible from the external private network. In this example, select ELB01 created in Step 1.
Internal Port
80
The port used by the instance to provide services accessible from the external private network.
Transit Network
Transit IP Address
192.168.0.144
Select the transit IP address that will be used to access on-premises data centers or other VPCs. In this example, select the transit IP address assigned in Step 3.
Transit IP Address Port
80
The transit IP address port that will be used to access the load balancer.
- Click OK. Once the DNAT rule is created, its status changes to Running.
Step 6: Verify the Network Connectivity
- Remotely log in to ECS-B and start the backend application of ELB01.
Multiple methods are available for logging in to an ECS. For details, see Logging In to an ECS.
Example command:python3 -m http.server 80
Figure 4 Starting backend application of ELB01
- Remotely log in to ECS-A.
- Run the following command to check the network connectivity:
curl http://${transit-IP-address}If information similar to the following is displayed, ECS-A can access ELB01 in another VPC.
Figure 5 Verifying cross-VPC access to the load balancer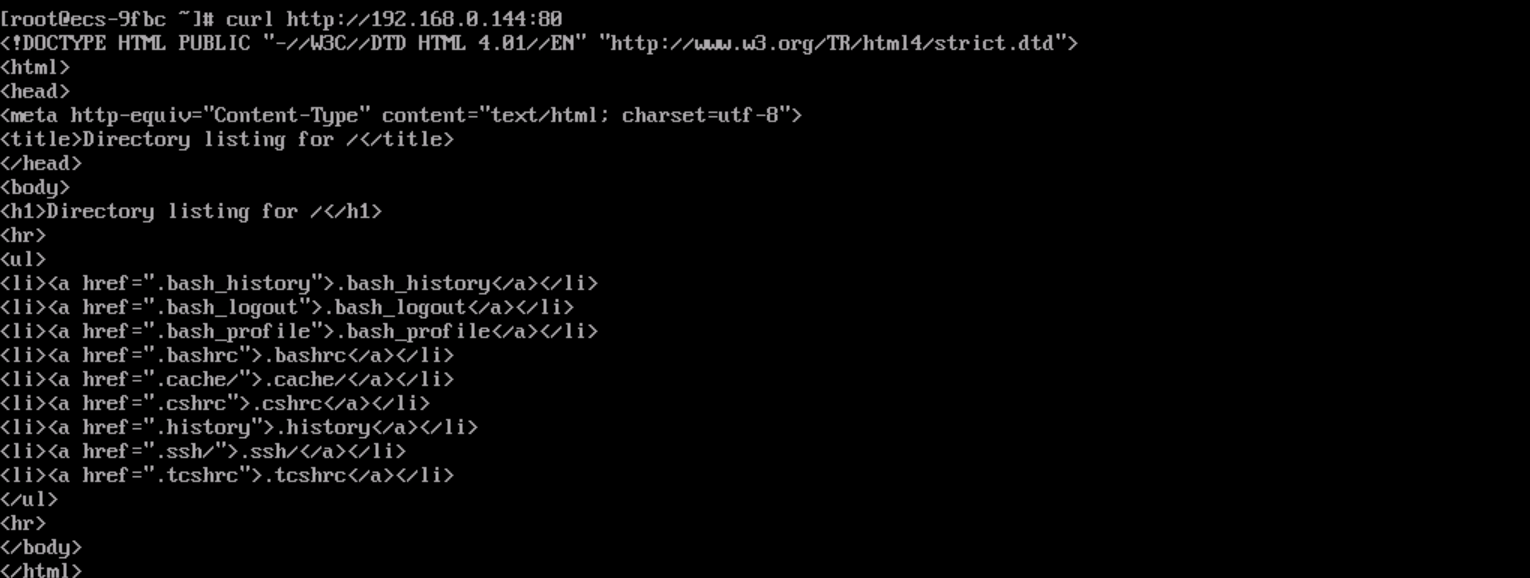
Feedback
Was this page helpful?
Provide feedbackThank you very much for your feedback. We will continue working to improve the documentation.See the reply and handling status in My Cloud VOC.
For any further questions, feel free to contact us through the chatbot.
Chatbot


