
Implementation Procedure
Creating a VPC
- Log in to the network console.
- In the navigation pane, choose Virtual Private Cloud > My VPCs.
- On the Virtual Private Cloud page, click Create VPC, and configure the parameters by referring to Table 1 and Table 2. For details, see sections "Creating a VPC" and "Creating a Subnet for the VPC" in the Virtual Private Cloud User Guide.

- Click Create Now.
- Repeat 3 to 4 to create VPC2 for running your backend service.
Creating a Gateway
- Log in to the APIG console.
- In the navigation pane, choose Gateways.
- Click Buy Gateway.

Table 3 Gateway information Parameter
Description
Region
Select the region where the gateway is located. It must be the same as the region of VPC 1.
AZ
The AZ where the gateway is located. Select AZ1.
Gateway Name
Enter a name that conforms to specific rules to facilitate search.
Edition
Select Professional. The edition cannot be changed after the gateway is created.
Scheduled Maintenance
Select a time period when the gateway can be maintained by technical support engineers. A period with low service traffic is recommended. For this example, retain the default value 22:00:00---02:00:00.
Enterprise Project
Select the enterprise project to which the gateway belongs. For this example, retain the default value default.
Network
Select VPC 1 and a subnet.
Security Group
Click Manage Security Groups and create a security group. Ensure that you have selected default for Enterprise Project.
Description
Description of the gateway.
- Click Next.
- If the gateway configurations are correct, and click Pay Now.
Creating a Load Balancer
- Log in to the network console.
- In the navigation pane, choose Elastic Load Balance > Load Balancers.
- Click Create Elastic Load Balancer.
- Configure the load balancer information. For details, see section Load Balancer in the Elastic Load Balance User Guide.
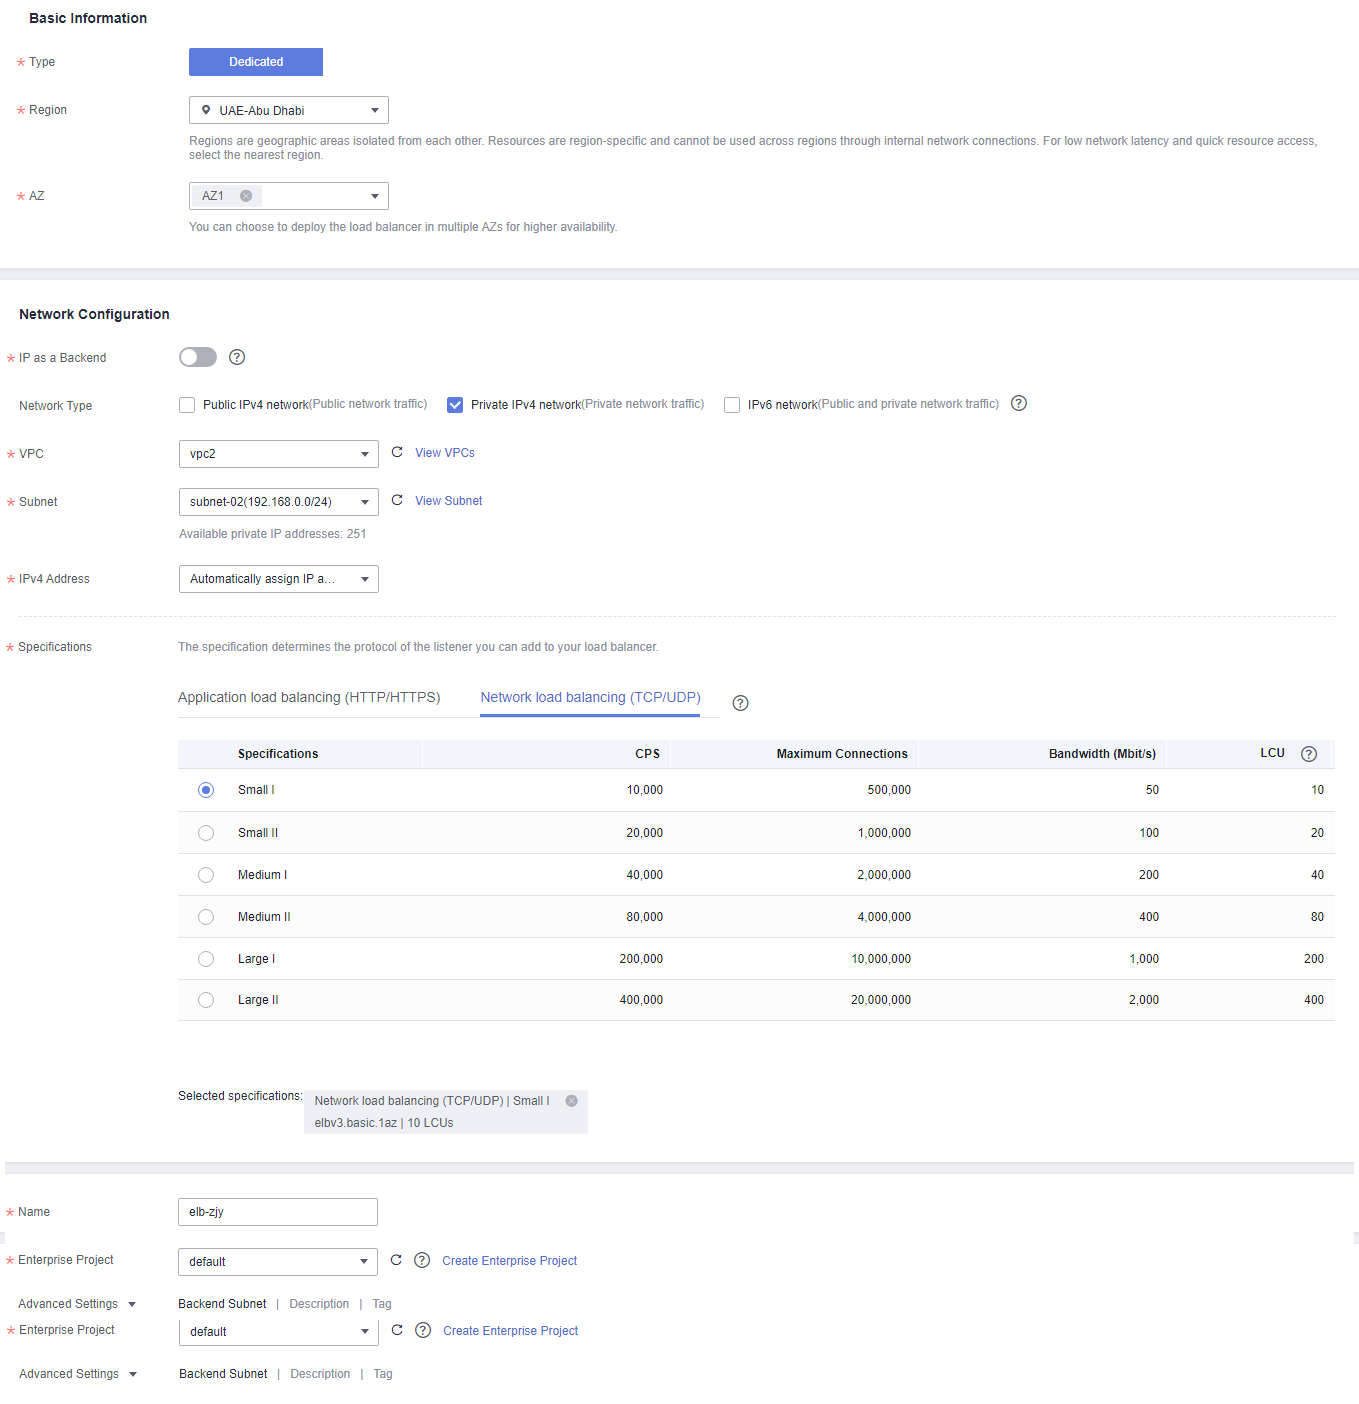
Table 4 Load balancer parameters Parameter
Description
Type
Type of the load balancer.
Region
Select the region where the load balancer is located. It must be the same as the region of VPC 2.
AZ
The AZ where the load balancer is located. Select AZ1.
Network Type
Select Private Network.
VPC
Select VPC 2.
Subnet
Select a subnet.
Specification
Select Network load balancing.
Name
Enter a load balancer name that conforms to specific rules to facilitate search.
Enterprise Project
Select default.
- Click Create Now.
- Confirm the configuration and click Submit.
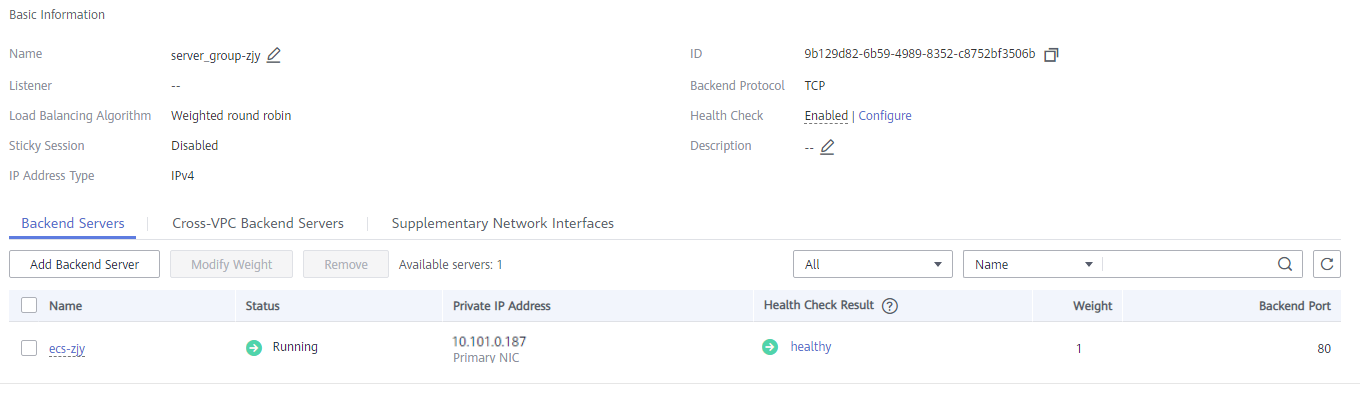
- Add a listener.
- Click the name of the load balancer. On the Listeners tab page, click Add Listener.
- Configure the listener name, frontend protocol, and port, and click Next.
- Configure the backend server group name, backend protocol, and load balancing algorithm. Then click Next.
- Add backend servers and click Next.
- Click Submit. The following figure shows the configuration.
Figure 1 Listener information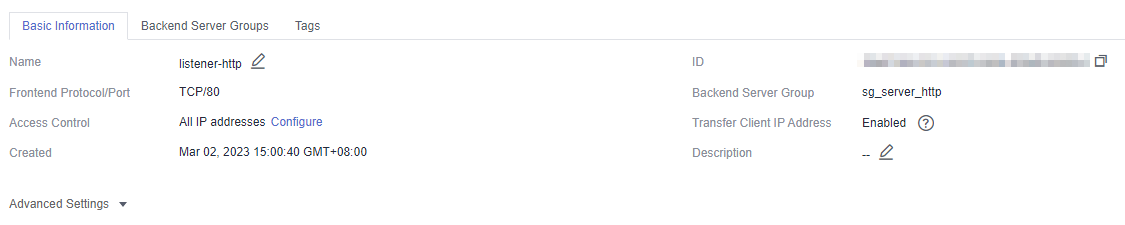 Figure 2 Backend server group information
Creating a VPC Peering Connection
- Log in to the network console.
- In the navigation pane, choose Virtual Private Cloud > VPC Peering Connections.
- Click Create VPC Peering Connection and configure the parameters.
- Click OK.
- In the displayed dialog box, click Add Route to go to the VPC peering connection details page.
- On the Local Routes tab page, click Route Tables.
- Under Routes, click Add Route.
- In the displayed dialog box, enter the route information.
- Destination: Enter the service address displayed on the details page of the load balancer.
- Next Hop Type: Select VPC peering connection.
- Click OK.
Figure 3 Local routes
- Go to the Peer Routes tab page, and click Route Tables.
- Under Routes, click Add Route.
- In the displayed dialog box, enter the route information.
- Destination: Enter the private outbound address displayed on the details page of the dedicated gateway.
- Next Hop Type: Select VPC peering connection.
- Click OK.
Figure 4 Peer routes
Configuring a Route
- Log in to the APIG console.
- In the navigation pane, choose Gateways.
- Click the name of the created dedicated gateway or click Access Console.
- Click Change in the Routes area, enter the IPv4 CIDR block of VPC 2 where the load balancer you created is located.

- Click Save.
Creating an API
- Log in to the APIG console.
- In the upper part of the navigation pane, select the gateway.
- Choose API Management > APIs, and click Create API.
- Configure the frontend information and click Next.
Table 6 Frontend configuration Parameter
Description
API Name
Enter a name that conforms to specific rules to facilitate search.
Group
The default option is DEFAULT.
URL
Method: Request method of the API. Set this parameter to GET.
Protocol: Request protocol of the API. Set this parameter to HTTPS.
Subdomain Name: The system automatically allocates a subdomain name to each API group for internal testing. The subdomain name can be accessed 1000 times a day.
Path: Path for requesting the API.
Gateway Response
Select a response to be displayed if the gateway fails to process an API request.
The default gateway response is default.
Authentication Mode
API authentication mode. Select None.
- Configure the backend information and click Next.
Table 7 Parameters for defining an HTTP/HTTPS backend service Parameter
Description
Load Balance Channel
Determine whether the backend service will be accessed using a load balance channel. For this example, select Skip.
URL
Method: Request method of the API. Set this parameter to GET.
Protocol: Set this parameter to HTTP.
Backend Address: Enter the service address of the load balancer you created.
Path: Path of the backend service.
- Define the response and click Finish.
Creating an ECS
- Log in to the cloud server console.
- Click Create ECS.
- Configure the basic settings and click Next: Configure Network.
Table 8 Basic settings Parameter
Description
Region
Select the region where the ECS is located. It must be the same as the region of VPC 2.
AZ
Select the AZ where the ECS is located.
CPU Architecture
The default option is x86.
Specifications
Select specifications that match your service planning.
Image
Select an image that matches your service planning.
- Configure the network settings and click Next: Configure Advanced Settings.
Table 9 Network settings Parameter
Description
Network
Select VPC 2 and a subnet.
Security Group
Select the security group created for the dedicated gateway.
EIP
Select Not required.
- Configure advanced settings and click Next: Confirm.
Table 10 Advanced settings Parameter
Description
ECS Name
Enter a name that conforms to specific rules to facilitate search.
Login Mode
Credential for logging in to the ECS. The default option is Password.
Username
The default user is root.
Password
Set a password for logging in to the ECS.
Confirm Password
Enter the password again.
- Confirm the configuration and select enterprise project default.
- Read and confirm your acceptance of the agreement. Then click Create Now.
Debugging the API
- On the Backend Server Groups tab page of the load balancer, add the ECS.
- Start the ECS.
- Go to the API Management > APIs page of the dedicated gateway, and choose More > Debug in the row that contains the API you created.
- Enter the request parameters and click Debug.
If the status code is 200, the debugging is successful.
Feedback
Was this page helpful?
Provide feedbackThank you very much for your feedback. We will continue working to improve the documentation.See the reply and handling status in My Cloud VOC.
For any further questions, feel free to contact us through the chatbot.
Chatbot


