Connecting to a Kafka Data Source
Overview
ROMA Connect can use the Kafka data source for data integration tasks. Before using the Kafka data source, you need to connect it to ROMA Connect.
Prerequisites
Each connected data source must belong to an integration application. Ensure that an integration application is available before connecting a data source, or create one first.
Procedure
- Log in to the ROMA Connect console. On the Instances page, click View Console of an instance.
- In the navigation pane on the left, choose Data Sources. In the upper right corner of the page, click Access Data Source.
- On the Default tab page, select Kafka and click Next.
- Configure the data source connection information.
Table 1 Data source connection information Parameter
Description
Name
Enter a data source name. Using naming rules facilitates future search.
Encoding Format
Default: utf-8
Integration Application
Select the integration application to which the data source belongs.
Description
Enter a brief description of the data source.
Connection Address
Enter the IP address and port number for connecting Kafka.
If Kafka has multiple brokers, click Add Address to enter the connection addresses.
Enable SASL_SSL
Whether to use SASL_SSL authentication for the connection between ROMA Connect and Kafka.
Username/Application Key
Mandatory for Enable SASL_SSL set to Yes.
Enter the username used for SASL_SSL authentication. If ROMA Connect MQS is used as the Kafka data source, the username is the key of the integration application.
Password/Application Secret
Mandatory for Enable SASL_SSL set to Yes.
Enter the password used for SASL_SSL authentication. If ROMA Connect MQS is used as the Kafka data source, the username is the secret of the integration application.
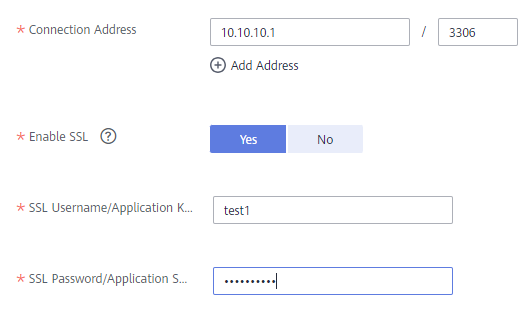
The following figure shows an example of data source connection configuration when SASL_SSL is enabled.
Figure 1 Kafka data source configuration example
- Click Check Connectivity to check the connectivity between ROMA Connect and the data source.
- If the test result is Data source connected successfully, go to the next step.
- If the test result is Failed to connect to the data source, check the data source status and connection parameters, and click Recheck until the connection is successful.
- Click Create.
Feedback
Was this page helpful?
Provide feedbackThank you very much for your feedback. We will continue working to improve the documentation.See the reply and handling status in My Cloud VOC.
For any further questions, feel free to contact us through the chatbot.
Chatbot


