
Using Device SDKs to Send and Receive Messages
Overview
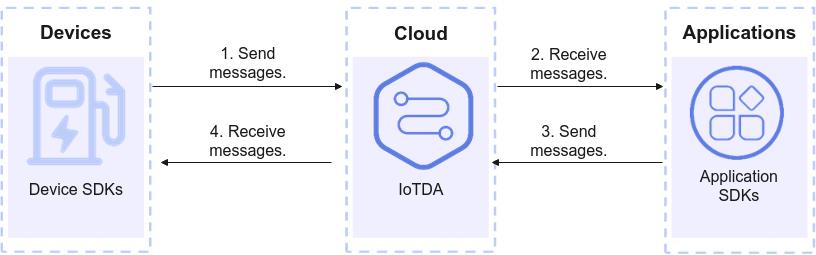
Devices can use SDKs in multiple languages to quickly connect to IoTDA for upstream and downstream message communications. This section uses Java sample code to demonstrate how a device accesses IoTDA using MQTTS/MQTT and publishes and subscribes to messages using topics.
Prerequisites
- You have registered a Huawei Cloud account.
- You have enabled IoTDA. For details, see Subscribing to IoTDA.
- You have created a product and a device. For details, see Registering a Device.
Device-side SDK Sending Messages
- Configure the Maven dependency of the SDK on the device.
<dependency>
	<groupId>com.huaweicloud</groupId>
	<artifactId>iot-device-sdk-java</artifactId>
	<version>[1.2.1,)</version>
</dependency>
- Connect the device to Huawei Cloud IoTDA.
- Modify the device connection parameters before establishing a connection by referring to the sample code.
// Replace xxx.st1.iotda-device.cn-north-4.myhuaweicloud.com with the actual access address. // To obtain the domain name, log in to the Huawei Cloud IoTDA console. In the navigation pane, choose Overview and click Access Details in the Instance Information area. Select the access address corresponding to port 8883. IoTDevice device = new IoTDevice("ssl://xxx.st1.iotda-device.cn-north-4.myhuaweicloud.com:8883", "your device id", "your device secret", tmpCAFile); device.getClient().setConnectListener(new MessageSample(device)); if (device.init() != 0) { return; } - Connect the device to the platform, and use it to subscribe to messages delivered by the platform.
@Override public void connectComplete(boolean reconnect, String serverURI) { // Subscribe to downstream messages. device.getClient().subscribeTopic("/test/cloudToDevice", new ActionListener() { @Override public void onSuccess(Object context) { System.out.println("subscribeTopic success"); } @Override public void onFailure(Object context, Throwable var2) { System.out.println("subscribeTopic failure"); } } , rawMessage -> { System.out.println(" on receive message topic : " + rawMessage.getTopic() + " , payload : " + new String( rawMessage.getPayload(), StandardCharsets.UTF_8)); }, 1); } - Run the program. The device is displayed as online on the platform.
Figure 2 Device list - Device online status

- Modify the device connection parameters before establishing a connection by referring to the sample code.
- Specify a topic to report device messages.
device.getClient().publishRawMessage(new RawMessage("/test/deviceToCloud", "hello", 1), new ActionListener() {
    @Override
    public void onSuccess(Object context) {
        System.out.println("reportDeviceMessage success: ");
    }
    @Override
    public void onFailure(Object context, Throwable var2) {
        System.out.println("reportDeviceMessage fail: " + var2);
    }
});
- Access the IoTDA service page and click Access Console. In the navigation pane, choose IoTDA Instances and click the target instance card. In the navigation pane, choose Devices > All Devices and click View. On the Message Trace tab page, check whether the IoT platform receives the message.
Figure 3 Message tracing - Viewing results

Application-side SDK Receiving Messages
After a device sends messages to the platform through the SDK, you can configure data forwarding rules to forward the messages to the message middleware, storage, data analysis, or service applications. This section uses Java SDK as an example to describe how to receive messages reported by devices and process services.
Application-side SDK Delivering Messages
Configure the SDK on the application side to deliver messages.
- Configure the Maven dependency. In this example, the development environment is JDK 1.8 or later. Download an SDK.
<dependency> <groupId>com.huaweicloud.sdk</groupId> <artifactId>huaweicloud-sdk-core</artifactId> <version>[3.0.40-rc, 3.2.0)</version> </dependency> <dependency> <groupId>com.huaweicloud.sdk</groupId> <artifactId>huaweicloud-sdk-iotda</artifactId> <version>[3.0.40-rc, 3.2.0)</version> </dependency> - The following is an example of a message sent by the application to a specific device:
public class MessageDistributionSolution {
    // REGION_ID: If CN East-Shanghai1 is used, enter cn-east-3. If CN North-Beijing4 is used, enter cn-north-4. If CN South-Guangzhou is used, enter cn-south-4.
    private static final String REGION_ID = "<YOUR REGION ID>";
    // ENDPOINT: On the console, choose Overview and click Access Addresses to view the HTTPS application access address.
    private static final String ENDPOINT = "<YOUR ENDPOINT>";
    // For the standard or enterprise edition, create a region object.
    public static final Region REGION_CN_NORTH_4 = new Region(REGION_ID, ENDPOINT);
    public static void main(String[] args) {
        String ak = "<YOUR AK>";
        String sk = "<YOUR SK>";
        String projectId = "<YOUR PROJECTID>";
        // Create a credential.
        ICredential auth = new BasicCredentials().withDerivedPredicate(AbstractCredentials.DEFAULT_DERIVED_PREDICATE)
            .withAk(ak)
            .withSk(sk)
            .withProjectId(projectId);
        // Create and initialize an IoTDAClient instance.
        IoTDAClient client = IoTDAClient.newBuilder().withCredential(auth)
            // For the basic edition, select the region object in IoTDARegion.
            //.withRegion(IoTDARegion.CN_NORTH_4)
            // For the standard or enterprise edition, create a region object.
            .withRegion(REGION_CN_NORTH_4).build();
        // Instantiate a request object.
        CreateMessageRequest request = new CreateMessageRequest();
        request.withDeviceId("<YOUR DEVICE_ID>");
        DeviceMessageRequest body = new DeviceMessageRequest();
        body.withPayloadFormat("raw");
        body.withTopicFullName("/test/cloudToDevice");
        body.withMessage("hello");
        request.withBody(body);
        try {
            CreateMessageResponse response = client.createMessage(request);
            System.out.println(response.toString());
        } catch (ConnectionException e) {
            e.printStackTrace();
        } catch (RequestTimeoutException e) {
            e.printStackTrace();
        } catch (ServiceResponseException e) {
            e.printStackTrace();
            System.out.println(e.getHttpStatusCode());
            System.out.println(e.getRequestId());
            System.out.println(e.getErrorCode());
            System.out.println(e.getErrorMsg());
        }
    }
}
- Check the device logs. The message sent by the application to the device is displayed as follows:
on receive message topic : /test/cloudToDevice , payload : hello
Feedback
Was this page helpful?
Provide feedbackThank you very much for your feedback. We will continue working to improve the documentation.See the reply and handling status in My Cloud VOC.
For any further questions, feel free to contact us through the chatbot.
Chatbot


