
Getting Started
This section describes the basic usage of Slurm. For the detailed usage, see Slurm Documentation.
By default, all service ports involved in this solution are accessible within the same subnet. You can modify the security group rules if needed. The following Slurm service ports are involved:
- 6817: port on the service plane for communicating with Slurm on the scheduling node
- 6818: port on the service plane for communicating with Slurm on compute nodes

- By default, the Slurm version 22.05.3 and the Java version jdk1.8.0_202 are used in this solution.
- By default, a cluster named cluster has been created in Slurm.
(Optional) Modifying Security Groups
A security group is a collection of access control rules to control traffic to and from cloud resources, such as cloud servers, containers, and databases. Cloud resources associated with the same security group have the same security requirements and are mutually trusted within a VPC.
You can modify security group rules, for example, by adding, modifying, or deleting a TCP port, as follows:
- Adding a security group rule: Add an inbound rule and enable a TCP port if needed.
- Modifying a security group rule: Inappropriate security group settings may cause serious security risks. You can modify a security group rule to ensure network security of your ECSs.
- Deleting a security group rule: If the source or destination IP address of an inbound or outbound security group rule changes, or a port does not need to be enabled, you can delete the security group rule.
Checking Node Status
- Check the Slurm status on the scheduling node. Specifically, run the systemctl status munge and systemctl status slurmctld commands to check whether Munge and Slurmctld are running properly.
Figure 1 Munge running properly
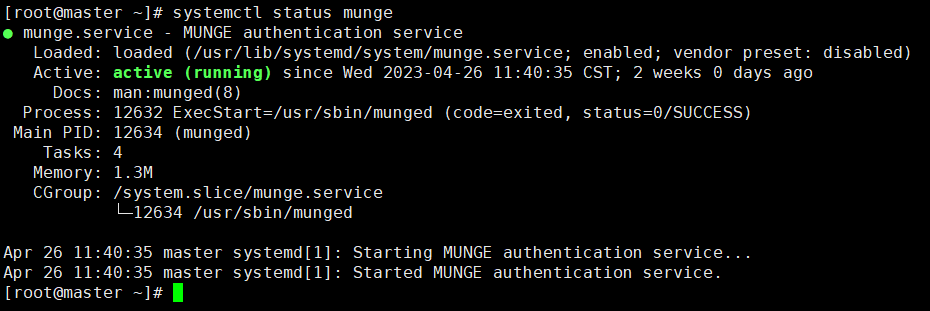 Figure 2 Slurmctld running properly
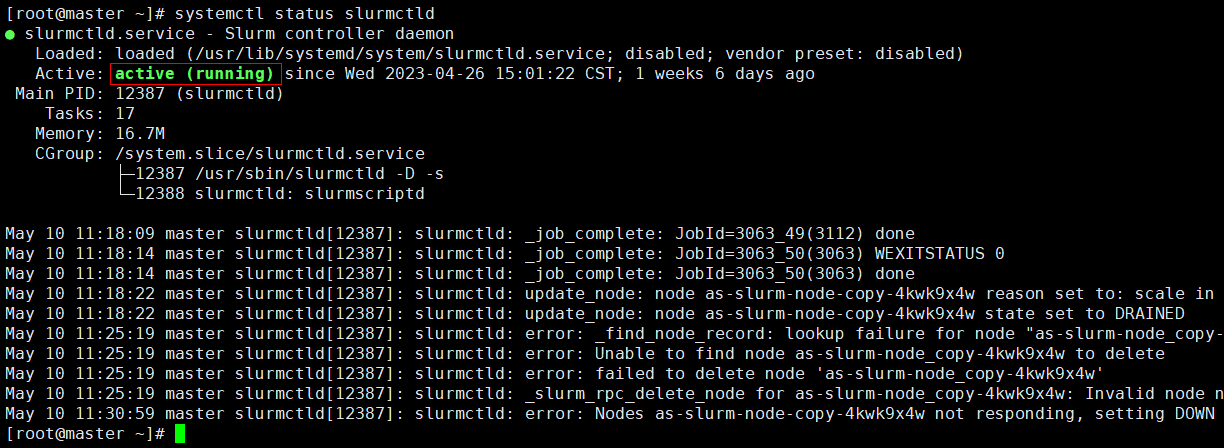 If Munge is not started, run the following command to enable it:
systemctl start munge
If Slurmctld is not started, run the following command to enable it:systemctl start slurmctld #Check the node status in the cluster sinfo
- Each time the cloud server that functions as the scheduling node restarts, enter the username root and its password to log in to the cloud server and run the preceding commands to start the services. Run the sinfo command to view the cluster node information.
Figure 3 Slurm successfully configured
 If there are no nodes under NODELIST, log in to the compute node to enable Slurmd by running the following command:
# Enable Slurmd on node1
ssh 192.168.0.2
systemctl start slurmd
exit
- Check the operating status of Slurm and Gearbox on the scheduling node.
Go to the directory where the Gearbox program package is located (/usr/local/ by default) and start Gearbox.
cd /usr/local/
nohup java -jar gearbox-0.0.1-SNAPSHOT.jar --spring.config.name=gearboxConfig > /dev/null 2>&1 &
- Check the Gearbox status on the scheduling node by running the ps aux|grep gearbox command.
ps aux|grep gearbox
Figure 4 Gearbox running properly
- Set the quota for the Slurm root user. This quota is related to the number of ECSs for auto scaling.
#Modify the quota
sacctmgr modify user root set GrpTRES="node={required quota}"
#List the quota
sacctmgr list ass
Note: After Gearbox is started, the nodes that do not have computing tasks will be set to the drain state. If you want to use the nodes, activate them again by running the following command:
scontrol update NodeName={Node name under NODELIST} State=idleFigure 5 Node in the drain state
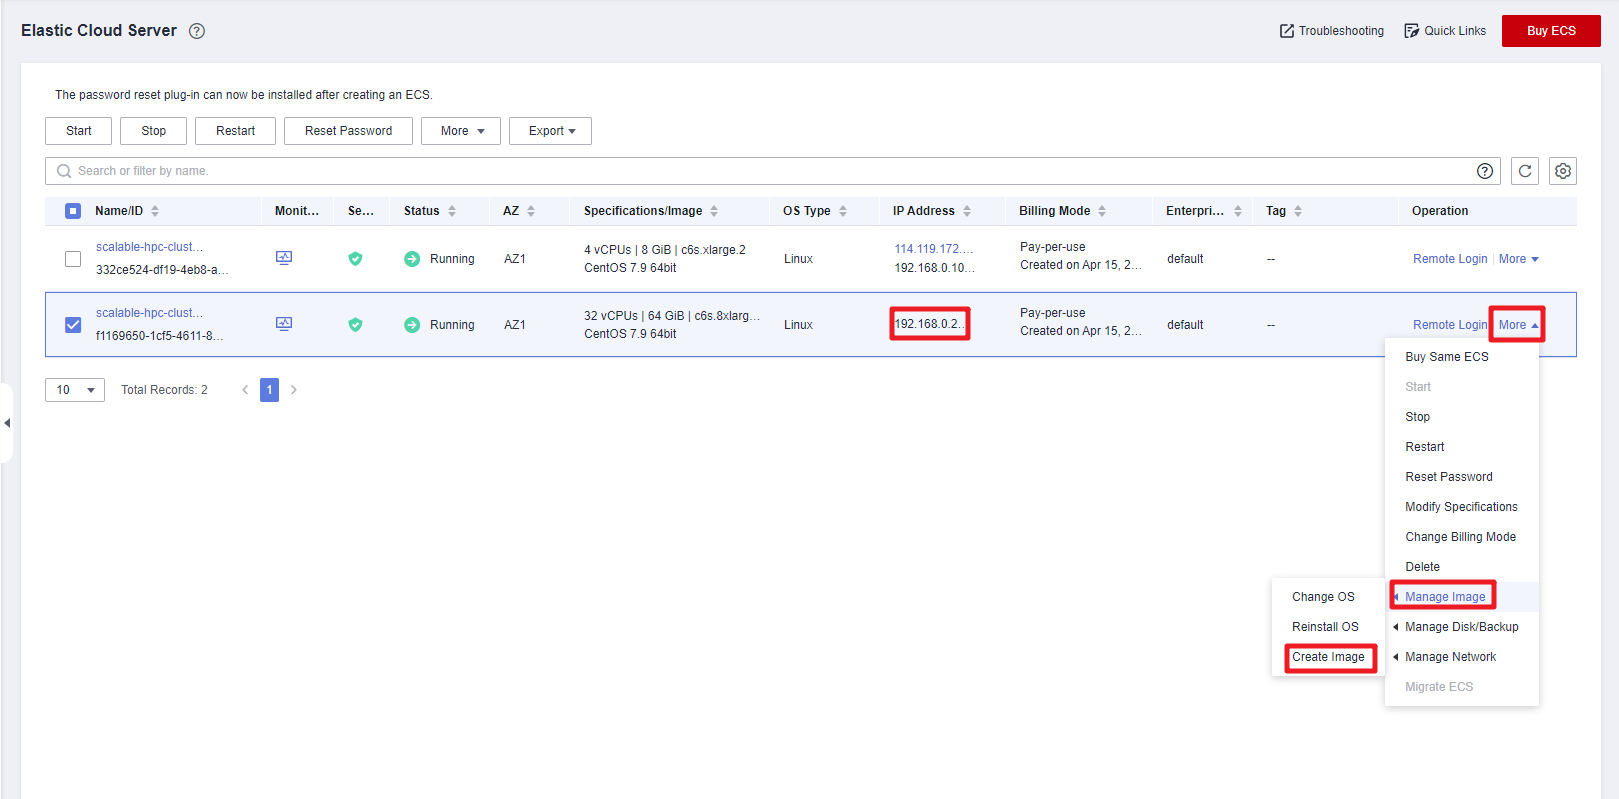
- Confirm that the cluster is normal. Then, log in to the ECS console.
- Locate the compute node whose private IP address is 192.168.0.2 and choose More > Manage Image > Create Image in the Operation column.
Figure 6 Creating an image
- Set Image Type to System disk image and set the name to hpc-image (an example name).
Figure 7 Selecting the system disk image
 Figure 8 Configuring details
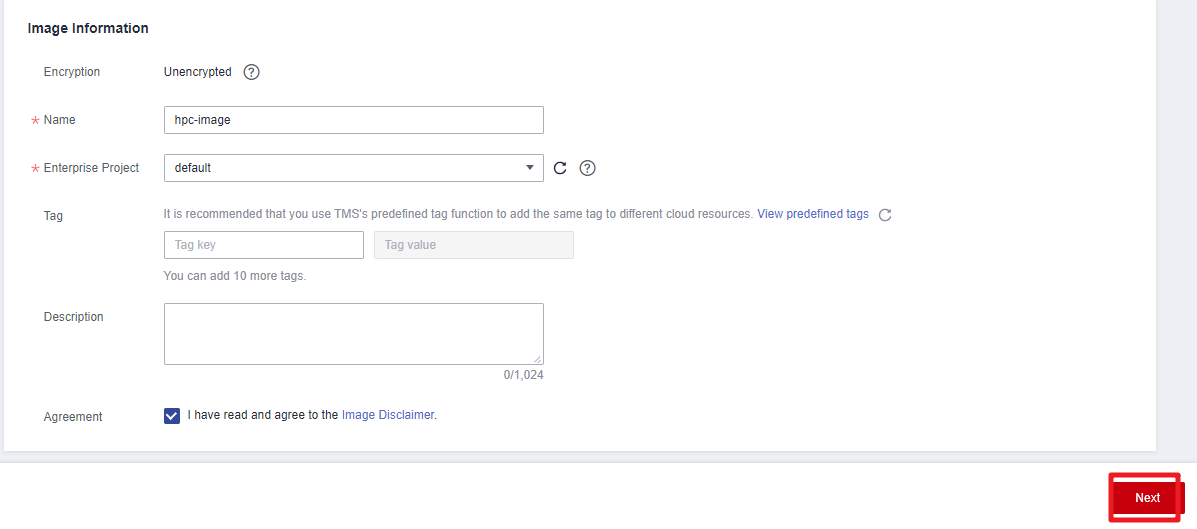
- Click Next. You will be navigated to the IMS console and can view the image creation progress.
Figure 9 An image being created
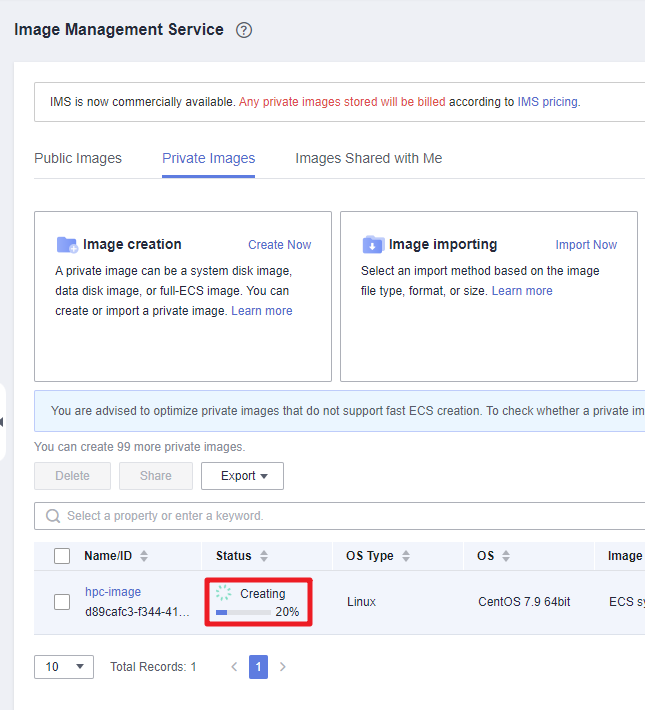 Figure 10 An image created
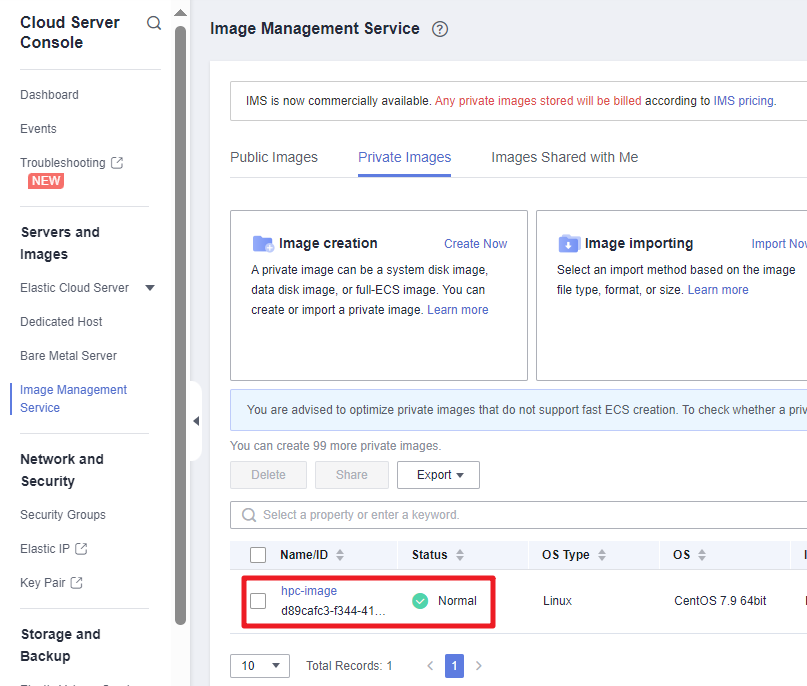
Configuring Auto Scaling
- Access the IMS console to check that your image is successfully created.
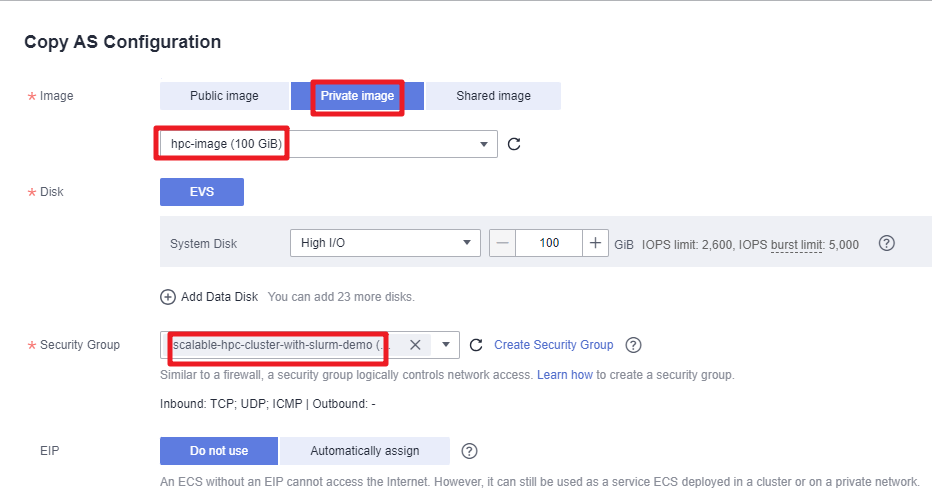
- Access the Auto Scaling console. Then, locate the auto scaling configuration for this solution and click Copy in the Operation column. In the displayed dialog box, select the private image you created in Creating an Image and rename it. Do not include underscores (_) in the name. If underscores are included, instances will not be automatically deleted. Then, click OK to create an auto scaling configuration.
Figure 11 Creating an auto scaling configuration
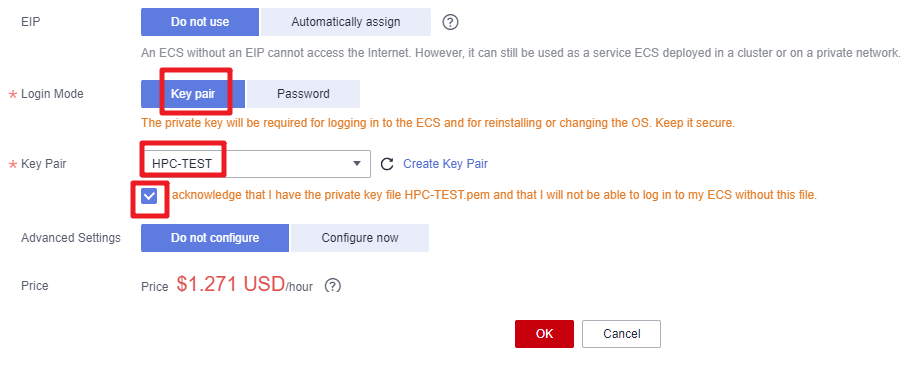
- Select Key pair as the login mode. In this example, set the key pair name to the one (HPC-TEST as an example) you specified when you make preparations, and select the check box below.
Figure 12 Setting the login mode
- In the auto scaling group list, locate the group for this solution and choose More > Change AS Configuration in the Operation column. In the displayed dialog box, select the auto scaling c configuration you created and click OK.
Figure 13 Changing auto scaling configurations

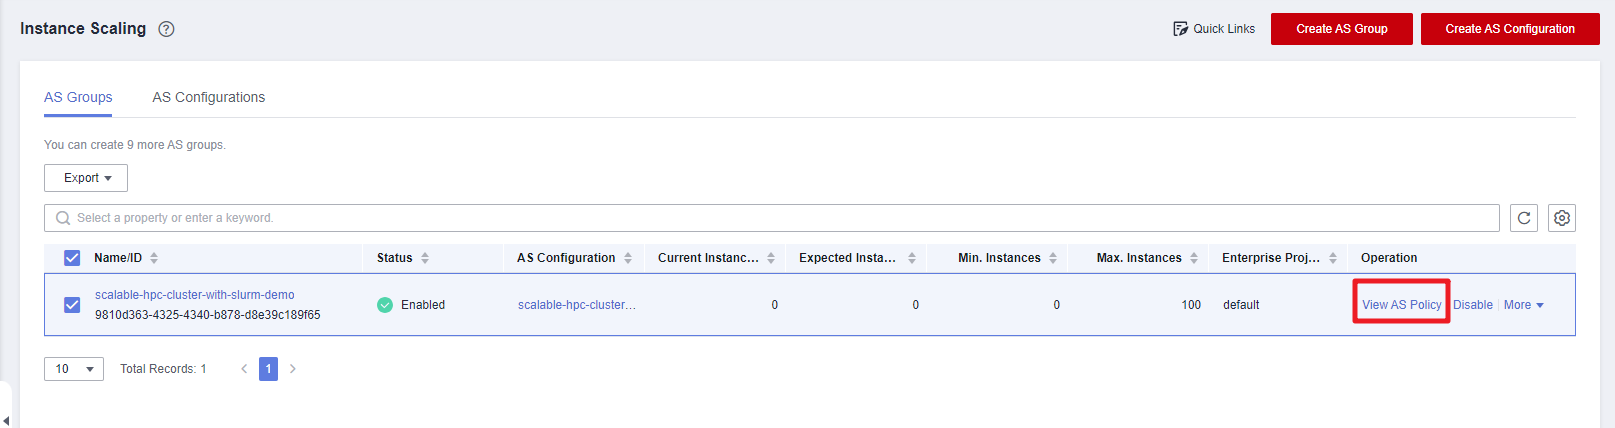
- On the Huawei Cloud Auto Scaling console, locate the auto scaling group created for this solution and click View AS Policy in the Operation column.
Figure 14 Auto scaling instances
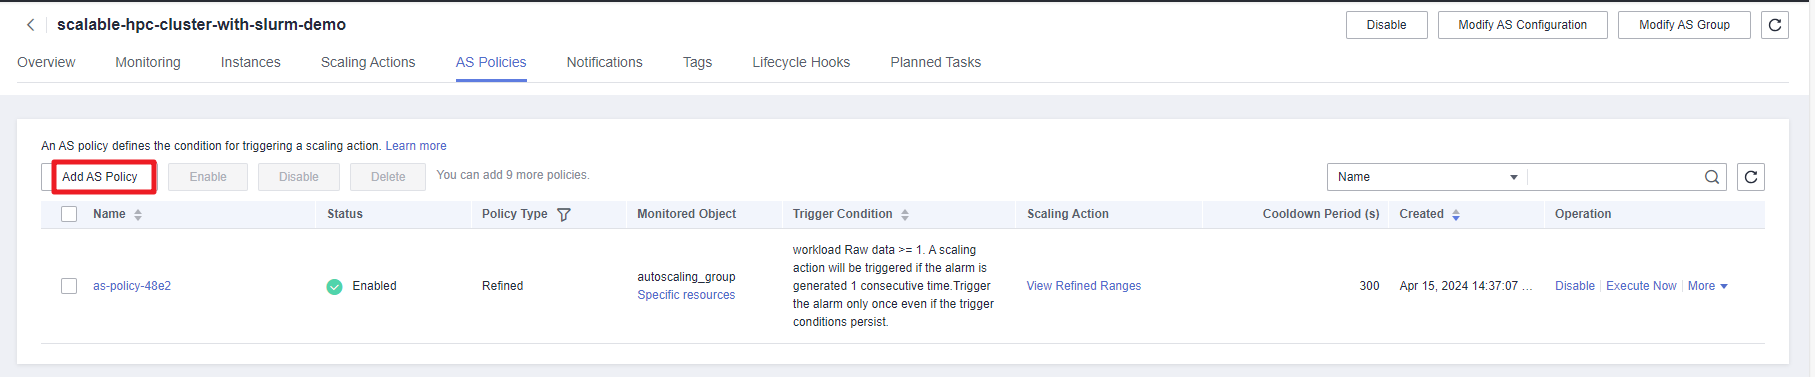
- Specifically, click Add AS Policy and set Policy Type to Alarm. You can configure up to 10 refined policies for each auto scaling policy if needed. After the configuration is complete, click OK.
Figure 15 Adding an auto scaling policy

- Click Add AS Policy to add more policies if the number of servers you added for refined policies is less than required.
Figure 16 Adding more policies
- Log in to the ECS and install the required software in the shared file directory /data.
Slurm management systems:
- Log file directory for Slurmd, Slurmdbd, and Slurmctld: /var/log
- Configuration file for Slurmdbd: /etc/slurm/slurmdbd.conf
- Configuration file for Slurmctld and Slurmd: /etc/slurm/slurm.conf
For details, see Slurm Documentation. The common commands are as follows:
Table 1 Common commands Command
Function
Example
sinfo
Shows the system resource usage.
sinfo
squeue
Shows the job status.
squeue
srun
Submits an interactive job.
srun -N 2 -n 48 -p debug A.exe
sbatch
Submits batch jobs.
sbacth -n -2 -n 48 job.sh
salloc
Submits a non-interactive job.
salloc -p debug
scancel
Cancels a job that has been submitted.
scancel JOBID
scontrol
Queries nodes or running jobs.
scontrol show job JOBID
sacct
Queries historical jobs.
sacct -u pp100 -S 03/01/17 -E 03/31/17 --field=joid,partitionjobname,user,nnodes,start,end,elapsed,state
Gearbox Working Process
This section uses batch jobs as an example to describe how Gearbox automatically scales a Slurm cluster.
- Start Gearbox and set the quota for the Slurm root user.
#Modify the quota
sacctmgr modify user root set GrpTRES="node={required quota}"
#List the quota
sacctmgr list ass
Figure 17 Listing the user quota
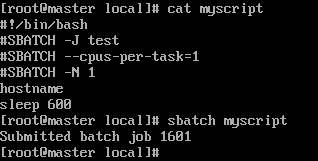
- Submit batch jobs (for reference only).
Figure 18 Submitting batch slurm jobs
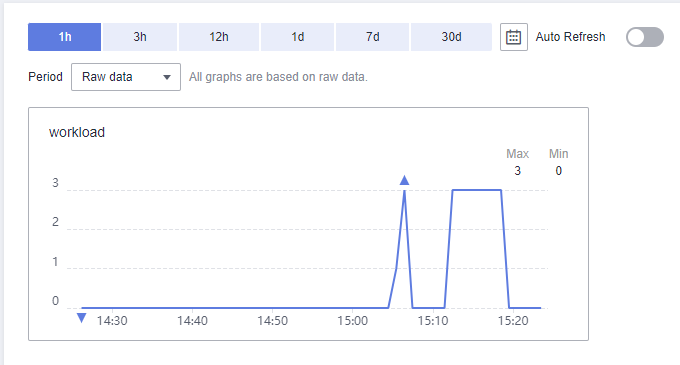
- View alarm status on the Cloud Eye console. If the job status is queued, the job is in queue, indicating that the compute node resources in the current cluster are insufficient. If the workload value of custom metrics is greater than or equal to 1, auto scaling instances will be notified to perform auto scale-out.
Figure 19 Changes in the workload value
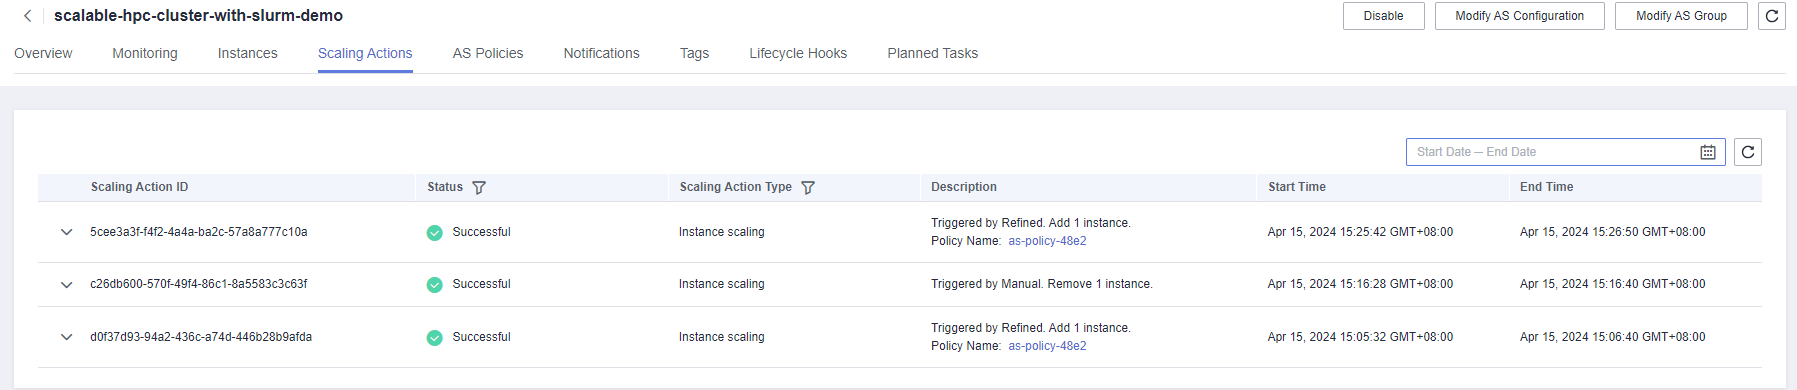
- Access the Auto Scaling console, and click the auto scaling group created for this solution. You will see the instance is being added.
Figure 20 Triggering auto scaling

- Use the image of a compute node for the newly added ECS, log in to the ECS by using the key pair created in 2, and run the Slurmd program. The ECS will be managed by the Slurm cluster and participate in cluster jobs.
Figure 21 ECS successfully added
 The Slurm scheduling node distributes job tasks to the compute node added to the Slurm cluster.Figure 22 Executing jobs (added ECSs)
- Gearbox periodically checks the status of compute nodes in the Slurm cluster. If there are idle compute nodes, their states will be set to drain. Gearbox then checks whether there are jobs running on these compute nodes. If there are not, the compute nodes will be deleted and their states will be set to down. Gearbox then identifies all the computes nodes in the down or drain state and delete them from the Slurm cluster.
Note: drain indicates that the node is faulty, alloc indicates that the node is in use, idle indicates that the node is available, down indicates that the node is taken offline, and mix indicates that the node is partially occupied with remaining resources available.Figure 23 Changing the state of an idle instance to drain

- Access the Auto Scaling console and click the auto scaling group created for this solution. You will see the instance is being deleted.
Figure 24 An idle instance being deleted
Example Gearbox Configuration File
The following is an example Gearbox configuration file. Store it in the Gearbox installation directory. When configuring the gearboxconfig.yaml file, delete all comments marked by the number sign (#) in the example.
 user:
  # AK for the login account
  ak:
  # SK for the login account
  sk:
  # Project ID of the region where the user is located
  project-id:
  # Proxy address, port, username, and password. This parameter is not required if no proxy is needed.
  proxy-address:
  proxy-port:
  proxy-user-name:
  proxy-password:
as:
  # Endpoint domain name of the onsite Auto Scaling
  endpoint: as.ap-southeast-3.myhuaweicloud.com
  # Scaling group ID of the preset scaling group resource
  group:
  # Maximum number of instances displayed on a page. The default value is 100 and cannot be changed.
  list-instance-limit: 100
  # Maximum number of instances to be deleted. The Auto Scaling service supports a maximum of 50 instances. You do not need to change the value.
  delete-instance-limit: 50
ecs:
  # Endpoint domain name of the onsite ECS
  endpoint: ecs.ap-southeast-3.myhuaweicloud.com
metric:
  # Namespace of a custom metric. You do not need to change the value.
  namespace: test.HPC
  # Name of a custom metric
  name: workload
  # Dimension name of a custom metric. You do not need to change the value.
  dimension-name: autoscaling_group
  # Dimension ID of the custom metric. It can be set to the scaling group ID. This value does not affect functions.
  dimension-id:
  #TTL reported by the metric. You do not need to change the value.
  report-ttl: 172800
  # Endpoint domain name of the onsite Cloud Eye
  metric-report-endpoint: ces.ap-southeast-3.myhuaweicloud.com
task:
  # Period for checking the node status, in seconds
  health-audit-period: 30
  # Period for reporting custom metrics, in seconds
  metric-report-period: 60
  # Period for checking whether scale-in is required, in seconds
  scale-in-period: 5
  # Period for automatically deleting nodes to be scaled in, in seconds
  delete-instance-period: 5
  # Auto-discovery period for newly added nodes, in seconds
  discover-instance-period: 20
  # Period for comparing the number of nodes in the scaling group with that of nodes in the slurm cluster, in seconds
  diff-instance-and-node-period: 60
  # Period for refreshing the internal cache, in seconds
  refresh-cache-period: 100
system:
  # deadline/slurm
  type: slurm
  # Names of stable nodes. Separate multiple names with commas (,).
  stable-nodes: master
  # Partition where stable nodes are located
  stable-partition: p1
  # Partition where variable nodes are located
  variable-partition: p1
  # Period of idle time after which idle nodes will be scaled in, in seconds
  scale-in-time: 1
  # Job waiting time. If the waiting time of a job is longer than this value, the job is considered to be in a queue and will be counted in related metrics. The recommended value is 0.
  job-wait-time: 1
  # Timeout interval for registering a new node, in minutes. If a new node fails to be registered after the timeout interval expires, the node will be deleted in Auto Scaling. The recommended value is 10.
  register-timeout-minutes: 10
  # Number of CPU cores of the elastic node
  cpu: 4
  # Memory size of the elastic node. This is a reserved field. It can be set to any value greater than 0.
  memory: 12600
  # This parameter is valid only for the slurm cluster. The default value is true, indicating that the CPU requirements of jobs with GPU requirements are ignored during workload calculation.
  ignore-cpu-request-of-gpu-job: true
  # Whether to use PowerShell to execute commands. This parameter takes effect only in Windows environments.
  use-powershell-executor: true
Feedback
Was this page helpful?
Provide feedbackThank you very much for your feedback. We will continue working to improve the documentation.See the reply and handling status in My Cloud VOC.
For any further questions, feel free to contact us through the chatbot.
Chatbot


