Importing Table Data from MRS Hive to a DWS Cluster
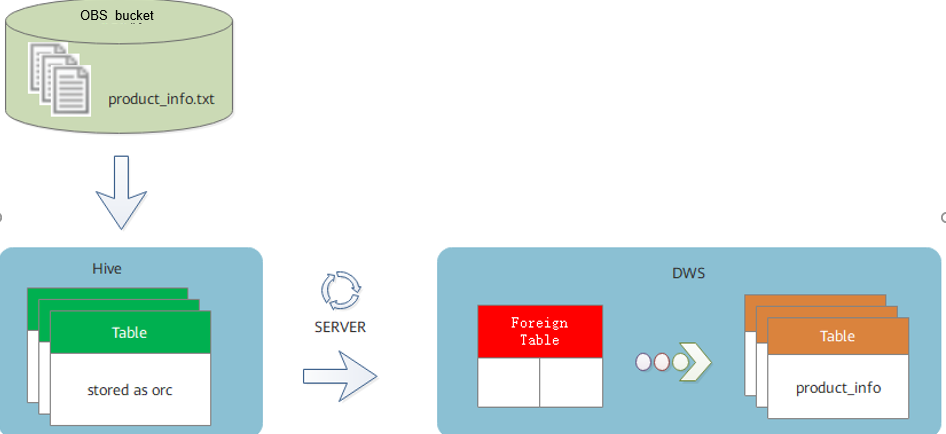
An HDFS foreign table is created to enable DWS to remotely access or read MRS data sources. DWS transmits data through foreign servers and foreign tables. The practice simulates the process of writing data from ORC table data stored in MRS Hive to DWS by creating a cross-source foreign server and foreign table.
A foreign server is a virtual object configured in a database. It is used to define parameters (such as the address, protocol, and authentication information) for connecting to an external data source. Through the foreign servers, the local database can directly query and insert external data, just like operating local tables. (The syntax is similar, but may be restricted by performance or functions.)
A foreign table is a virtual table in a database. Data is stored outside the database system (such as file systems, other databases, and cloud storage). However, through the definition and access interface of the table schema (metadata), users can query the external data using standard SQL statements without importing the data to the database.
Based on the type of the interconnected data source, there are HDFS foreign tables and OBS foreign tables. The former reads data from the HDFS distributed file system and the latter reads data from the OBS object storage service.

- For details about MRS, see MRS Documentation.
- For details about the foreign server syntax, see CREATE SERVER
- For details about the foreign table syntax, see CREATE FOREIGN TABLE (SQL on OBS or Hadoop).
This practice takes approximately 1 hour. The basic procedure is as follows:
- Step 1: Buy an MRS Cluster and Prepare the ORC Table Data Source of MRS: Create an MRS analysis cluster, upload the local TXT data files to an OBS bucket, and import the files to a Hive storage table, and then to an ORC storage table.
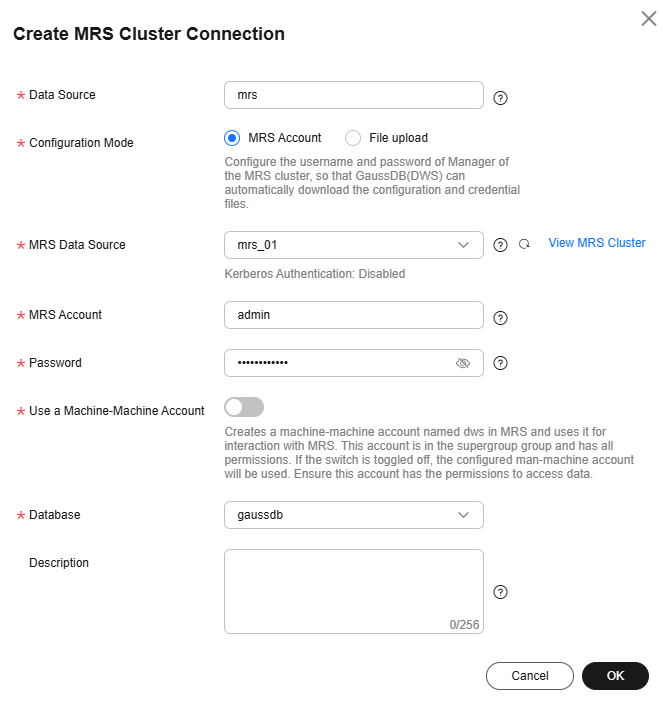
- Step 2: Create an MRS Data Source Connection: Create an MRS data source on the DWS console. By default, a foreign server named mrs is generated.
- Step 3: Create a Foreign Table: Create an HDFS foreign table to access data on MRS.
- Step 4: Import Data: Import data to a local DWS table through an HDFS foreign table.
Video Tutorial
Preparing the Environment
Create a DWS cluster. Ensure that the MRS and DWS clusters are in the same region, AZ, and VPC subnet and that the clusters can communicate with each other.
Step 1: Buy an MRS Cluster and Prepare the ORC Table Data Source of MRS
- Buy an MRS analysis cluster. Set the key parameters as described in Table 1 and retain default values of other parameters. For details, see Buying MRS Clusters.
It takes about 15 minutes to create a cluster. You can continue with the following operations during the cluster creation.
Table 1 Parameters Parameter
Value
Region
CN-Hong Kong
Billing Mode
Pay-per-use
Cluster Type
Analysis cluster
Version Type
Normal
Cluster Version
MRS 1.9.2 (recommended)
CAUTION:- DWS clusters of version 8.1.1.300 or later support MRS 1.6.*, 1.7.*, 1.8.*, 1.9.*, 2.0.*, 3.0.*, 3.1.*, and later (* indicates a number).
- DWS clusters of earlier than version 8.1.1.300 support MRS 1.6.*, 1.7.*, 1.8.*, 1.9.*, and 2.0.* (* indicates a number).
Metadata
Local
AZ
AZ 1
CPU Architecture
x86
Kerberos Authentication
Disabled
Login Mode
Password
- Create a product_info.txt file on the local PC, copy the following data to the file, and save the file to the local PC.
 1
 2
 3
 4
 5
 6
 7
 8
 9
10
11
12
13
14
15
16
17
18
19
20
100,XHDK-A-1293-#fJ3,2017-09-01,A,2017 Autumn New Shirt Women,red,M,328,2017-09-04,715,good
205,KDKE-B-9947-#kL5,2017-09-01,A,2017 Autumn New Knitwear Women,pink,L,584,2017-09-05,406,very good!
300,JODL-X-1937-#pV7,2017-09-01,A,2017 autumn new T-shirt men,red,XL,1245,2017-09-03,502,Bad.
310,QQPX-R-3956-#aD8,2017-09-02,B,2017 autumn new jacket women,red,L,411,2017-09-05,436,It's really super nice
150,ABEF-C-1820-#mC6,2017-09-03,B,2017 Autumn New Jeans Women,blue,M,1223,2017-09-06,1200,The seller's packaging is exquisite
200,BCQP-E-2365-#qE4,2017-09-04,B,2017 autumn new casual pants men,black,L,997,2017-09-10,301,The clothes are of good quality.
250,EABE-D-1476-#oB1,2017-09-10,A,2017 autumn new dress women,black,S,841,2017-09-15,299,Follow the store for a long time.
108,CDXK-F-1527-#pL2,2017-09-11,A,2017 autumn new dress women,red,M,85,2017-09-14,22,It's really amazing to buy
450,MMCE-H-4728-#nP9,2017-09-11,A,2017 autumn new jacket women,white,M,114,2017-09-14,22,Open the package and the clothes have no odor
260,OCDA-G-2817-#bD3,2017-09-12,B,2017 autumn new woolen coat women,red,L,2004,2017-09-15,826,Very favorite clothes
980,ZKDS-J-5490-#cW4,2017-09-13,B,2017 Autumn New Women's Cotton Clothing,red,M,112,2017-09-16,219,The clothes are small
98,FKQB-I-2564-#dA5,2017-09-15,B,2017 autumn new shoes men,green,M,4345,2017-09-18,5473,The clothes are thick and it's better this winter.
150,DMQY-K-6579-#eS6,2017-09-21,A,2017 autumn new underwear men,yellow,37,2840,2017-09-25,5831,This price is very cost effective
200,GKLW-l-2897-#wQ7,2017-09-22,A,2017 Autumn New Jeans Men,blue,39,5879,2017-09-25,7200,The clothes are very comfortable to wear
300,HWEC-L-2531-#xP8,2017-09-23,A,2017 autumn new shoes women,brown,M,403,2017-09-26,607,good
100,IQPD-M-3214-#yQ1,2017-09-24,B,2017 Autumn New Wide Leg Pants Women,black,M,3045,2017-09-27,5021,very good.
350,LPEC-N-4572-#zX2,2017-09-25,B,2017 Autumn New Underwear Women,red,M,239,2017-09-28,407,The seller's service is very good
110,NQAB-O-3768-#sM3,2017-09-26,B,2017 autumn new underwear women,red,S,6089,2017-09-29,7021,The color is very good
210,HWNB-P-7879-#tN4,2017-09-27,B,2017 autumn new underwear women,red,L,3201,2017-09-30,4059,I like it very much and the quality is good.
230,JKHU-Q-8865-#uO5,2017-09-29,C,2017 Autumn New Clothes with Chiffon Shirt,black,M,2056,2017-10-02,3842,very good
- Log in to the OBS console, click Create Bucket, set the key parameters in the following table, retain the default values for other parameters, and click Create Now.
Table 2 Bucket parameters Parameter
Value
Region
CN-Hong Kong
Data Redundancy Policy
Single-AZ storage
Bucket Name
mrs-datasource
Default Storage Class
Standard
Bucket Policy
Private
Default Encryption
Disabled
Direct Reading
Disabled
Tags
N/A
- After the bucket is created, click the bucket name and choose Object > Upload Object to upload the product_info.txt file to the OBS bucket.
- Go back to the MRS console and click the name of the created MRS cluster. On the Dashboard page, click Synchronize next to IAM User Sync. The synchronization takes about one minute.
- Click Nodes and click a master node. On the displayed page, switch to the EIPs tab, click Bind EIP, select an existing EIP, and click OK. If no EIP is available, create one. Record the EIP.
- Determine the active master node.
- Log out and then log in to the primary node as the root user, and switch to the omm user.
su - omm
- G to the directory where the Hive client is located.
cd /opt/client
- Create the product_info table whose storage format is TEXTFILE on Hive.
- Import environment variables to the /opt/client directory.
source bigdata_env
- Log in to the Hive client.
- Run the following SQL commands in sequence to create a demo database and the product_info table:
1CREATE DATABASE demo;
1USE demo;
 1
 2
 3
 4
 5
 6
 7
 8
 9
10
11
12
13
14
15
16
17
18
DROP TABLE product_info;

CREATE TABLE product_info
(
    product_price                int            ,
    product_id                   char(30)       ,
    product_time                 date           ,
    product_level                char(10)       ,
    product_name                 varchar(200)   ,
    product_type1                varchar(20)    ,
    product_type2                char(10)       ,
    product_monthly_sales_cnt    int            ,
    product_comment_time         date           ,
    product_comment_num          int        ,
    product_comment_content      varchar(200)
)
row format delimited fields terminated by ','
stored as TEXTFILE;
- Import environment variables to the /opt/client directory.
- Import the product_info.txt file to Hive.
- Switch back to the MRS cluster, click Files > Import Data.
- OBS Path: Find the product_info.txt file in the created OBS bucket and click Yes.
- HDFS Path: Select /user/hive/warehouse/demo.db/product_info/ and click Yes.
- Click OK to import the product_info table data.
- Switch back to the MRS cluster, click Files > Import Data.
- Create an ORC table and import data to the table.
- Go back to the SQL window that is connected to the Hive client and run the following SQL statement to create an ORC table:
 1
 2
 3
 4
 5
 6
 7
 8
 9
10
11
12
13
14
15
16
17
18
DROP TABLE product_info_orc;

CREATE TABLE product_info_orc
(
    product_price                int            ,
    product_id                   char(30)       ,
    product_time                 date           ,
    product_level                char(10)       ,
    product_name                 varchar(200)   ,
    product_type1                varchar(20)    ,
    product_type2                char(10)       ,
    product_monthly_sales_cnt    int            ,
    product_comment_time         date           ,
    product_comment_num          int            ,
    product_comment_content      varchar(200)
)
row format delimited fields terminated by ','
stored as orc;
- Insert data in the product_info table into the Hive ORC table product_info_orc.
1INSERT INTO product_info_orc select * from product_info;
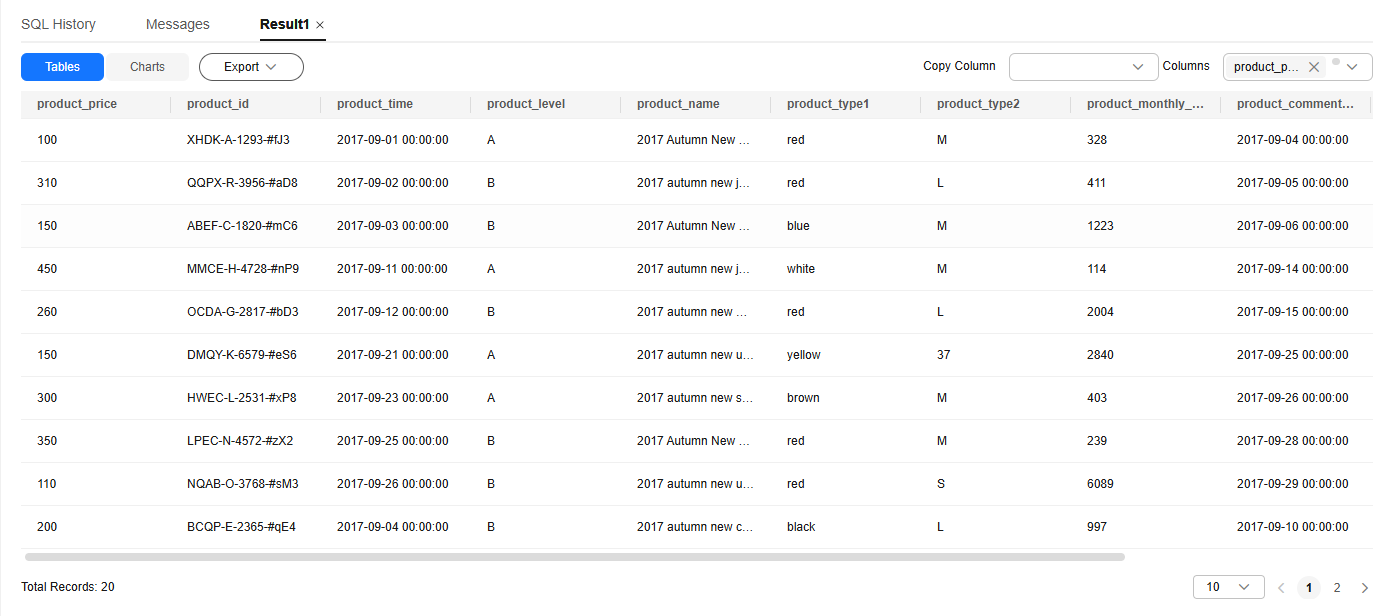
- Query whether the data import is successful.
1SELECT * FROM product_info_orc;
- Go back to the SQL window that is connected to the Hive client and run the following SQL statement to create an ORC table:
Step 2: Create an MRS Data Source Connection
- Log in to the DWS console. In the navigation pane, choose Dedicated Clusters > Clusters. Click the created DWS cluster. Ensure that the DWS cluster and MRS are in the same region, AZ, and VPC subnet.
- In the navigation pane, choose Data Source > MRS Data Source and click Create MRS Cluster Connection.
- Configure the parameters listed in the following table, retain the default values for other parameters, and click OK.
Table 3 Parameters Parameter
Value
Data Source
mrs
Configuration Mode
MRS Account
MRS Data Source
mrs_01 created in the previous step
MRS Account
admin
Password
User-defined password
Database
gaussdb

Step 3: Create a Foreign Table
- Connect to the created DWS cluster.
- View the external servers in the system.
1SELECT * FROM pg_foreign_server;
The query result shows that after the MRS data source is created, the system automatically generates an external server named mrs.

- Obtain the product_info_orc file path of Hive.
- Log in to the MRS console.
- Choose Cluster > Active Cluster and click the name of the cluster to be queried to enter the page displaying the cluster's basic information.
- Click the Files and click HDFS File List.
- Go to the storage directory of the data to be imported to the DWS cluster and record the path.
Figure 1 Checking the data storage path on MRS

- Create a foreign table. Set SERVER to the name of the MRS data source created in Step 2: Create an MRS Data Source Connection, for example, mrs, and set foldername to the path queried in 3.
 1
 2
 3
 4
 5
 6
 7
 8
 9
10
11
12
13
14
15
16
17
18
19
20
21
22
DROP FOREIGN TABLE IF EXISTS foreign_product_info;

CREATE FOREIGN TABLE foreign_product_info
(
    product_price                integer        ,
    product_id                   char(30)       ,
    product_time                 date           ,
    product_level                char(10)       ,
    product_name                 varchar(200)   ,
    product_type1                varchar(20)    ,
    product_type2                char(10)       ,
    product_monthly_sales_cnt    integer        ,
    product_comment_time         date           ,
    product_comment_num          integer        ,
    product_comment_content      varchar(200)
) SERVER mrs
OPTIONS (
format 'orc',
encoding 'utf8',
foldername '/user/hive/warehouse/demo.db/product_info_orc/'
)
DISTRIBUTE BY ROUNDROBIN;
Step 4: Import Data
- Create a local table for data import.
 1
 2
 3
 4
 5
 6
 7
 8
 9
10
11
12
13
14
15
16
17
18
19
20
DROP TABLE IF EXISTS product_info;
CREATE TABLE product_info
(
    product_price                integer        ,
    product_id                   char(30)       ,
    product_time                 date           ,
    product_level                char(10)       ,
    product_name                 varchar(200)   ,
    product_type1                varchar(20)    ,
    product_type2                char(10)       ,
    product_monthly_sales_cnt    integer        ,
    product_comment_time         date           ,
    product_comment_num          integer        ,
    product_comment_content      varchar(200)
)
with (
orientation = column,
compression=middle
)
DISTRIBUTE BY HASH (product_id);
- Import data to the target table from the foreign table.
1INSERT INTO product_info SELECT * FROM foreign_product_info;
- Query the import result.
1SELECT * FROM product_info;

Feedback
Was this page helpful?
Provide feedbackThank you very much for your feedback. We will continue working to improve the documentation.See the reply and handling status in My Cloud VOC.
For any further questions, feel free to contact us through the chatbot.
Chatbot


