
Using AD-Integrated DNS for DNS Resolution in a Hybrid Cloud
Scenarios
The customer has deployed its own DNS server in their IDC and wants VMs in the local environment to access Huawei Cloud services (such as OBS, SMN, and Cloud Eye) through the DNS server. However, the cloud environment is completely isolated from the local environment. As a result, the customer cannot use the local DNS server to forward requests to Huawei Cloud DNS to resolve Huawei Cloud service domain names. Therefore, advanced configurations are required to resolve domain names of cloud services.
To solve this problem, you need to enable a conditional forwarder for the DNS server deployed in AD-integrated DNS in Windows. The conditional forwarder forwards DNS queries for domain names of Huawei Cloud services from the on-premises DNS server (DC01) or the self-built DNS server (DC02) on the cloud to Huawei Cloud integrated DNS server for further resolution and response.
In this practice, we will:
- Use VPC peering connections and VPN connections for resource communication in a multi-account environment.
- Deploy an integrated DNS server in the local environment and replicate it to the cloud.
- Configure a conditional forwarder on the local and cloud DNS servers for forwarding DNS queries to Huawei Cloud integrated DNS server for resolving domain names of Huawei Cloud services.
Solution

- Users can fully utilize Linux BIND to resolve domain names in a hybrid cloud.
- DNS conditional forwarders are configured for both domain controllers (DC01 and DC02) in the local and Huawei Cloud environments.
- All ECSs in the cloud will be mapped to DC01 and DC02 (preferred) as DNS servers.
- All VMs in the local environment will be mapped to DC01 (preferred) and DC02 as DNS servers.
- If ECS01 in account 1 wants to access the domain name of ECS02 in account 2, it sends DNS queries to the preferred DNS server DC02 in account 2 for responses. ECSs in other accounts in Huawei Cloud regions also use the same query process.
- If ECS02 wants to access Huawei Cloud endpoint services such as OBS and SMN, it sends queries to DC02 (preferred DNS). The conditional forwarder in DC02 identifies that the domain name is hosted by another DNS name server and forwards the queries to Huawei integrated DNS for further resolution and response.
- If a local VM (for example, VM01) wants to access Huawei Cloud endpoint services (for example, OBS), it sends requests to DC02 (preferred DNS). The conditional forwarder in DC02 identifies that the domain name is hosted by another DNS name server, and then forwards DNS queries to Huawei integrated DNS for further resolution and response.

In this practice, the IP addresses in the local network and Huawei Cloud are for reference only. In actual applications, deploy the solution based on the actual network plan.
Preparations
Step 1: Configure the Local DNS Server (DC01)
- Remotely log in to the ECS where DC01 is to be installed.
- Set the static IP address.
- Choose Control Panel > Network and Internet > Network and Sharing Center.
- In the navigation tree on the left, click Change adapter settings.
Figure 2 Network and sharing center

- Select an Ethernet adapter or Wi-Fi. In the dialog box that is displayed, click Properties.
Figure 3 Ethernet adapter

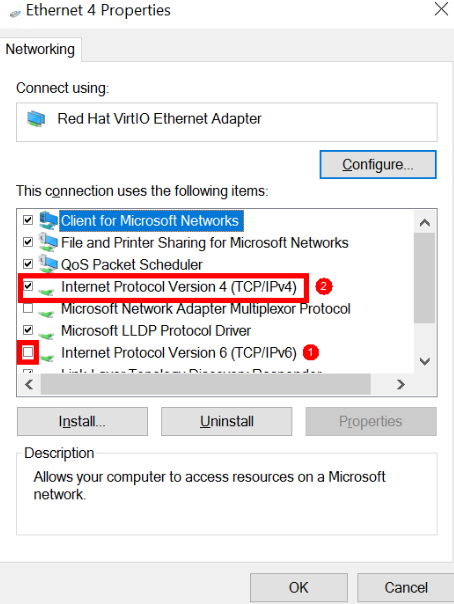
- Disable Internet Protocol Version 6 (TCP/IPv6) and enable Internet Protocol Version 4 (TCP/IPv4).
Figure 4 Network properties
- Open the command prompt and run ipconfig to obtain the IP configuration.
Figure 5 Windows IP configuration

- Enter the IP address, subnet mask, and default gateway obtained in the previous step and set the preferred DNS server.
Figure 6 Internet Protocol Version 4 (TCP/IPv4) Properties

- Add ADDS and DNS to the server.
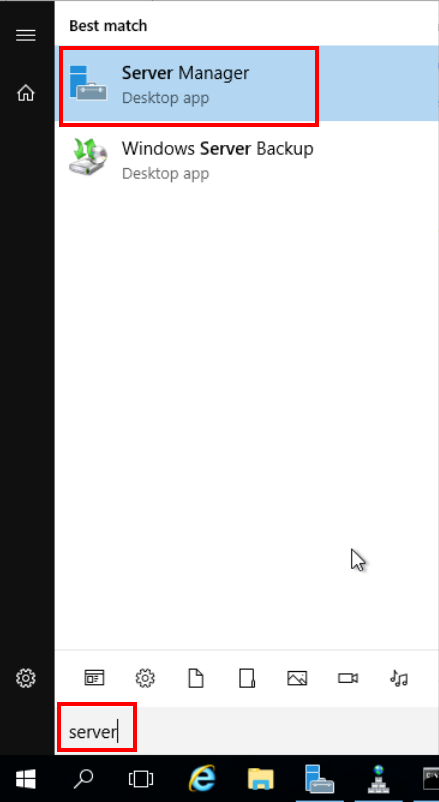
- Open Server Manager.
Figure 7 Searching for Server Manager
- In the upper right corner of the Server Manager dashboard, choose Manage > Add Roles and Features.
Figure 8 Adding roles and features in Server Manager

- On the Add Roles and Features Wizard page, click Next.
Figure 9 Add Roles and Features Wizard: Before You Begin

- Click Next.
Figure 10 Add Roles and Features Wizard: Installation Type

- Select Active Directory Domain Services and DNS Server, click Next repeatedly, and click Install.
Figure 11 Add Roles and Features Wizard: Server Roles

- Open Server Manager.
- Promote the DNS server to a domain controller.
- After the installation is complete, click the alarm icon in the upper right corner, as shown in the following figure, and click Promote this server to a domain controller.
Figure 12 Promoting the server to a domain controller

- Select Add a new forest, enter the root domain name (for example, estdemo.local), and click Next.
Figure 13 Active Directory Domain Services Configuration Wizard: Deployment Configuration

- Set Type the Directory Services Restore Mode (DSRM) password and click Next.
Figure 14 Active Directory Domain Services Configuration Wizard: Domain Controller Options

- Click Next until all steps are complete. Then, click Install.
- Your computer will restart automatically after the installation.
- After the installation is complete, click the alarm icon in the upper right corner, as shown in the following figure, and click Promote this server to a domain controller.
Step 2: Configure the Cloud DNS Server (DC02)
- Remotely log in to the ECS where DC02 is to be installed.
- Set a static IP address by referring to 2.
- Add Active Directory Domain Services (ADDS).
- Open Server Manager.
Figure 15 Searching for Server Manager

- On the Server Manager dashboard, choose Manage > Add Roles and Features from the upper right corner.
Figure 16 Adding roles and features in Server Manager

- In Add Roles and Features Wizard, click Next until the Server Roles step.
- In Server Roles, select Active Directory Domain Services.
Figure 17 Selecting Active Directory Domain Services

- Click Next until all steps are complete. Then, click Install.
- Open Server Manager.
- Promote the DNS server to domain controller DC02.
- After the installation is complete, click the warning icon in the upper right corner and click Promote this server to a domain controller.
Figure 18 Promoting the server to a domain controller

- In the Active Directory Domain Services Configuration Wizard: Deployment Configuration window, select Add a domain controller to an existing domain.
- Click Change.
Figure 19 Active Directory Domain Services Configuration Wizard: Deployment Configuration

- Enter the credentials to log in to DC01, click OK, and then click Next.
Figure 20 Logging in to DC01

- Set Type the Directory Services Restore Mode (DSRM) password and click Next.
Figure 21 Active Directory Domain Services Configuration Wizard: Domain Controller Options

- Click Next.
- In the Additional Options step, select the DC01 domain controller from the Replicate From drop-down menu.
Figure 22 Active Directory Domain Services Configuration Wizard: Additional Options

- Click Next until all steps are complete. Then, click Install.
- Your computer will restart automatically after the installation.
- After the installation is complete, click the warning icon in the upper right corner and click Promote this server to a domain controller.
Step 3: (Optional) Fix an Identical SID While Joining the Active Directory Domain
- If the SID of the domain you attempted to join is the same as the SID of your computer, you cannot join the computer to the domain.
Figure 23 Active Directory Domain Services Configuration Wizard: Results

- To solve this problem, run the following commands in the command prompt:
cd c:\windows\system32\sysprep
Sysprep /generalize /shutdown / oobe
Step 4: Replicate DC01 to DC02
- On the Server Manager dashboard, choose Tools > Active Directory Sites and Services.
Figure 24 Server Manager: Active Directory Sites and Services

- Choose Sites > Default-First-Site-Name > Servers > CLOUD-DC02 > NTDS Settings. Right-click NTDS Settings and choose Replicate Now from the shortcut menu.
Figure 25 Replicating DC01 to DC02

- Choose Sites > Default-First-Site-Name > Servers > PREM-DC01 > NTDS Settings. Right-click NTDS Settings and choose Replicate Now from the shortcut menu.
Figure 26 Replicating DC02 to DC01

- On the DNS Manager page of DC02, refresh the page and check the replication status. The following information indicates that the replication is successful:
Figure 27 Replication succeeded

Step 5: Configure Conditional Forwarders
To access Huawei service endpoints (such as OBS, SMN, and Cloud Eye) from the local environment, you need to configure conditional forwarders on DNS servers.
- Configure conditional forwarders on DC01 and DC02.
- On DC01, open DNS Manager, right-click Conditional Forwarders, and choose New Conditional Forwarder from the shortcut menu.
Figure 28 Creating a conditional forwarder on DC01

- Enter myhuaweicloud.com for DNS Domain.
- Enter the IP addresses of DNS servers provided by Huawei Cloud DNS.
In this practice, use the IP addresses of the private DNS servers in the AP-Singapore region.
Obtain the DNS server addresses in your region by referring to What Are Huawei Cloud Private DNS Server Addresses?
Figure 29 Adding a DNS domain and the DNS servers in the AP-Singapore region Figure 30 Conditional forwarder added to DC01
- On DC01, open DNS Manager, right-click Conditional Forwarders, and choose New Conditional Forwarder from the shortcut menu.
- Add a conditional forwarder for DC02. The procedure is the same as that for DC01.
Figure 31 Conditional forwarder added to DC02

Verification
In this section, we will test network connectivity in the multi-account environment configured with IP addresses and domain names. The resources of multiple accounts communicate with each other through VPN connections, VPC peering connections, and configured routes. We will also use the nslookup command to test the access to the endpoints of Huawei Cloud services (such as OBS, SMN, and Cloud Eye).
You can refer to the test scenarios and results below.
- Run the ping command to test the connectivity between ECS01 and VM01 and between ECS01 and ECS02.
- Ping the IP addresses of VM01 and ECS02 from ECS01.
Figure 32 Pinging the IP addresses of VM01 and ECS02 from ECS01

- Ping the domain names of VM01 and ECS02 from ECS01.
Figure 33 Pinging the domain names of VM01 and ECS02 from ECS01

- Test the connectivity between ECS01 and Huawei Cloud services.
Figure 34 Accessing the endpoints of Huawei Cloud services from ECS01

- Ping the IP addresses of VM01 and ECS02 from ECS01.
- Run the ping command to verify the connectivity between VM01 and ECS01, between VM01 and ECS02, and between VM01 and Huawei Cloud services. The procedure is the same as above.
- Run the ping command to verify the connectivity between ECS02 and VM01, between ECS02 and ECS01, and between ECS02 and Huawei Cloud services. The procedure is the same as above.
Summary
In this practice, we learned how to deploy DNS servers in a multi-account environment and use AD-integrated DNS servers for DNS resolution. In addition, we have configured the DNS server as a forwarder for Huawei Cloud integrated DNS to resolve endpoints of Huawei Cloud services such as SMN, OBS, and Cloud Eye. This makes it easier to access resources used in any environment.
Feedback
Was this page helpful?
Provide feedbackThank you very much for your feedback. We will continue working to improve the documentation.See the reply and handling status in My Cloud VOC.
For any further questions, feel free to contact us through the chatbot.
Chatbot


