
Enabling Lite Servers (New UI)
Description
This section describes how to purchase Lite Servers on the ModelArts console and outlines the necessary preparations.
Before purchasing a Lite Server, ensure that you have completed the required preparations, including requesting a quota increase, configuring basic permissions, and setting up ModelArts agency authorization. When purchasing resources, you will create an instance and pay for the order. Provisioning typically takes 20 to 60 minutes. Once the resources are created, you can configure an EIP for access and begin your AI development tasks.
Constraints
Lite Server supernodes only support the yearly/monthly billing mode.
All resource specifications for Lite Server common nodes (ECS or BMS) support the yearly/monthly billing mode.
Enabling Resources
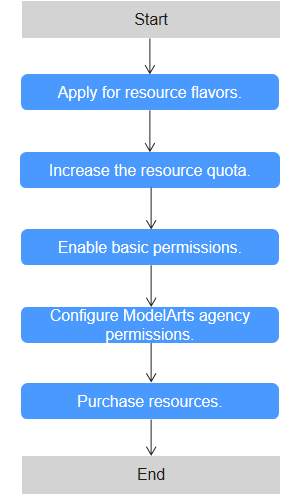
| Phase | Task |
|---|---|
| Making preparations | 1. Apply for resource specifications. |
| 2. Increase your resource quota. | |
| 3. Enable basic permissions. | |
| 4. Configure an agency authorization for ModelArts. | |
| Purchasing Lite Server resources | 5. Purchase Lite Server resources on the ModelArts console. |
Step 1: Applying for Resource Specifications
Contact your account manager to confirm the resource plan and request access to the required specifications. If you do not have an account manager, you can submit a service ticket.
Step 2: Increasing Your Resource Quota
The resources required by Lite Servers may exceed the default resources (such as ECS, EIP, SFS, memory, and CPUs) provided by cloud services. In this case, you need to increase the resource quota.
- Log in to the Huawei Cloud console.
- Hover over Resources from the top menu bar and choose My Quotas.
- Click Increase Quota in the upper right corner, fill in the materials, and submit a service ticket.

The resource quota must exceed the amount you intend to provision and must be increased before you start the purchase; otherwise, resource provisioning will fail.
Step 3: Enabling Basic Permissions
Log in to the administrator account and grant the target IAM user the required basic permissions, including ModelArts FullAccess, BMS FullAccess, ECS FullAccess, VPC FullAccess, VPC Administrator, and VPCEndpoint Administrator. This allows the IAM user to use these cloud services.
- Log in to the IAM console.
- In the navigation pane on the left, choose User Groups and click Create User Group in the upper right corner.
- Enter a group name and click OK.
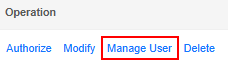
- On the User Groups page, locate the target user group and click Manage User in the Operation column, and add the user to the user group. Figure 2 User group management
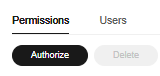
- Click the user group name to access its details page.
- In the Permissions Assigned tab, click Assign. Figure 3 Assigning permissions
- Search for ModelArts FullAccess in the search box and select it. Figure 4 ModelArts FullAccess

Use the same method to select BMS FullAccess, ECS FullAccess, VPC FullAccess, VPC Administrator, VPCEndpoint Administrator, and CloudMatrixFullAccessPolicy (supernode). Server Administrator and DNS Administrator are dependency policies and are automatically selected.
- Click Next and set Scope to All resources.
- Click OK.
Step 4: Creating an Agency Authorization on ModelArts
During task execution, ModelArts Lite Servers must access other services. This includes pulling images from SWR when using containers. In such cases, ModelArts accesses other cloud services on behalf of you. To ensure security, ModelArts requires your authorization before accessing any cloud services, which is the agency process. Once authorized, you can run AI computing tasks on ModelArts.
- Creating an agency
Create an agency on ModelArts to authorize access to other cloud services. To do so, log in to the ModelArts console. In the navigation pane on the left, choose Permission Management under System Management. On the displayed page, click Add Authorization.
- Updating an agency
Update the permissions for your existing ModelArts agency.
- Log in to the ModelArts console. In the navigation pane on the left, choose Resource Management > Lite Servers. Check whether a message is displayed indicating that the authorization is missing.
- New console: In the navigation pane, choose Resource Management > Lite Compute Resources > Lite Servers.
- Old console: In the navigation pane, choose Resource Management > Lite Servers.
- Click View missing permissions to update the agency if needed. Set Added To to Existing authorization and click OK. Figure 5 Adding an authorization

- Log in to the ModelArts console. In the navigation pane on the left, choose Resource Management > Lite Servers. Check whether a message is displayed indicating that the authorization is missing.
Step 5: Purchasing Lite Server Resources
When you purchase Lite Servers, resources are created.
- Log in to the ModelArts console. In the navigation pane, choose Resource Management > Lite Servers.
- New console: In the navigation pane, choose Resource Management > Lite Compute Resources > Lite Servers.
- Old console: In the navigation pane, choose Resource Management > Lite Servers.
- Click Buy Lite Server in the upper right corner. Configure the parameters on the displayed page.
The purchase page offers two versions: New Version and Old Version. The parameter order shown below matches the layout on the New Version's purchase page. While the Old Version's purchase page displays parameters in a different order, their descriptions remain the same.
Figure 6 Basic configurations
Table 2 Basic configurations Parameter
Description
Node Type
- Common node: A single physical or virtual host providing basic independent compute, storage, and network resources. These include both Bare Metal Servers (BMSs) and Elastic Cloud Servers (ECSs).
- Supernode: A converged node that provides a large-scale compute resource pool and supports flexible allocation and high-density deployment Supernodes are specifically designed for large-scale model training and inference tasks. These servers are typically equipped with multiple accelerators (such as Ascend NPUs) to provide robust compute for high-load requirements. Supernode resources use Snt9b23 specifications and are currently available only in the CN Southwest-Guiyang1, CN North3, and CN East2 regions.
Resource Type
This parameter appears when Node Type is set to Common node. Select BMS or ECS as required.
- BMS: A BMS combines the scalability of ECSs with the high performance of physical servers, delivering dedicated cloud servers for you and your enterprise.
- ECS: ECS provides secure, scalable, on–demand compute resources, enabling you to flexibly deploy applications and workloads.
Billing Mode
- Yearly/Monthly is a prepaid billing mode in which your subscription is billed based on the required duration. This mode is more cost–effective when the usage duration is predictable.
-
Lite Server supernodes only support the yearly/monthly billing mode.
All resource specifications for Lite Server common nodes (ECS or BMS) support the yearly/monthly billing mode.
Region
Resources in different regions cannot communicate with each other over an internal network. For low network latency and quick resource access, select the nearest region to your services.
AZ
A physically isolated zone where resources have their own independent power supply and internal networks. When deploying resources, consider your application requirements for disaster recovery (DR) and network latency.
- To get higher DR capability, deploy resources in different AZs in the same region.
- For lower network latency, deploy resources in the same AZ.
When Node Type is set to Supernodes or Common node > ECS, Random AZ is supported, which displays available resources across all AZs in the current region. Common node > BMS does not support Random AZ.
For details about how to provision edge station resources, see Managing CloudPond NPU Resources Using Lite Servers.
Table 3 Specification configurations Parameter
Description
CPU Architecture
CPU architecture of the resource type, which can be x86 or Arm.
- x86: Select this if GPU resources are used.
- Arm: Select this if NPU resources are used.
Select a CPU architecture and then select instance specifications as required. The flavors vary by region. The actual flavors are displayed on the console. Sold-out resources are displayed in gray and cannot be purchased.
When you select Snt9b23 supernode specifications, the hyperplane networks are only available for single-instance VXpods. To ensure all compute resources can use the hyperplane, choose a single-instance VXpod with a larger node size.
NOTE:If no specifications are available, contact Huawei technical support.
Table 4 OS configurations Parameter
Description
Image
OS image of the Lite Server.
- Public image
Public images are available for all users. All users can read the image by image ID.
ModelArts allows you to perform development and training directly without additional configuration as it provides multiple public OS images, supports multiple OSs, and has built–in AI drivers and software in the images.
For details about the supported public images, see Mappings Between Lite Compute Nodes and OS Images.
The server needs compatibly drivers to run normally and an OS kernel change may cause some drivers to be incompatible, so you are advised not to change or upgrade the drivers or kernels. For details about how to switch or reset the OS image, see Changing or Resetting the OS of a Lite Server.
- Private image
Only the image creator can use the image. Use a private image to set up the Lite Server OS quickly, avoiding repetitive server configurations. Private images must be created in IMS. For details, see Creating a Private Image.
Table 5 Storage configurations Parameter
Description
Storage
The storage configuration parameters apply to each common node. Actual storage configuration = Storage configuration of a single node x Number of purchased nodes.
Node System Disk Type
This parameter is only displayed when you select an instance flavor that supports attaching.
The node system disk stores the OS of a server, and is automatically created and initialized upon Lite Server creation.
Select a node system disk type and set the disk size. The system disk size ranges from 100 GiB to 1,024 GiB.
You can also expand the system disk capacity after a Lite Server is created. Currently, only the system disk capacity can be expanded. For details, see Expanding the System Disk Capacity of a Lite Server Supernode.
The system disk is automatically attached to each compute node.
(Optional) Node Data Disk Type
Click Add Data Disk to attach an EVS data disk to the Lite Server. Currently, local disks cannot be attached.
You can select Node Data Disk Type and set Size and Quantity.
The data disk size ranges from 100 GiB to 32,768 GiB.
For BMSs and ECSs, there can be a maximum of 59 data disks. For supernodes, there can be a maximum of 8 data disks.
You can also expand the data disk capacity after the Lite Server is created.
The data disk is automatically attached to each compute node.
For details about data disk attaching and detaching, see Using EVS for Storage.
- For supernodes, data disks can be attached and detached on the Lite Server details page, or via APIs of the Lite Server.
- For BMSs or ECSs, data disks can be attached and detached on the Lite Server details page or the BMS/ECS console.
Table 6 Network configurations Parameter
Description
VPC
A VPC ensures the security, isolation, and network flexibility of Lite Server resources.
Choose the VPC associated with your Lite Server from the drop–down list. You are advised to choose the same VPC for all related cloud services to simplify network connections.
If no VPC is available, click Create VPC on the right and create one in the displayed dialog box.
To create a VPC, you need to log in to the management console as the administrator.
Subnet
Select a subnet of the current VPC.
If no subnet is available, click Create Subnet on the right and create one in the displayed dialog box.
You cannot manually assign subnet IP addresses for a Lite Server. Only automatic assignment is supported.
Security Group
A security group is a collection of access control rules for Lite Servers that have the same security requirements and that are mutually trusted within a VPC.
If no security group is available, click Create Security Group on the right and create one in the displayed dialog box.
Ensure that the selected security group allows the access to port 22 (for Linux SSH login), port 3389 (for Windows remote login), and ICMP (Ping). Disable other irrelevant ports or IP addresses.
In the security group inbound rules, you are advised to set sources of high-risk ports to trusted IP addresses, security groups, or IP address groups. This can prevent service interruptions, data breaches, or data ransomware caused by network intrusions.
IPv6
IPv6 is available when it is supported by the subnet, specifications, and image configured for the network.
Ensure that IPv6 has been enabled. To enable IPv6, see Creating a Subnet for an Existing VPC.
This parameter is only displayed for certain specifications and images.
RoCE Network
This parameter is available only when Node Type is set to Common node.
When A/H series GPUs, Snt9, or Snt9b resources are used for distributed training, you need to configure the RoCE network to use the RoCE NICs on the hardware.
The parameter is only displayed if you have selected one specification that supports RoCE networks.
If you have not created a RoCE network, click Create RoCE.
If you have created a RoCE network, select it directly.
Supernode Network
This parameter is displayed only when Node Type is set to Supernodes. You can click Add Super Node Network on the right to create one.
Supernode networks are mandatory for distributed scenarios.
Table 7 Node management configurations Parameter
Description
Server Name
Lite Server name. which can contain 1 to 64 characters. Only digit, letters, underscores (_), and hyphens (-) are allowed.
CAUTION:The server name in the order will not be changed. If you change the name after placing the order, the new name will not be synchronized to the order.
Login Mode
Key pair is recommended as it features higher security than Password. If you select Password, ensure that the password meets complexity requirements to prevent malicious attacks.
- Key pair
Use a key pair to log in to the Lite Server. You can select an existing key pair, or click Create Key Pair to create one.
If you use an existing key pair, ensure that you have saved the key file locally. Otherwise, logging in to the Lite Server will fail.
- Password
A username and its initial password are used for authentication and logging in to the Lite Server.
For Linux, use the initial password of user root. For Windows, use the initial password of user Administrator. The password must:
- Contain 8 to 26 characters.
- Contain at least three types of the following characters: uppercase letters, lowercase letters, digits, and special characters (!@$%^-_=+[{}]:,./?).
- Cannot be the same as the username or the username spelled backwards.
- Cannot contain root, administrator, or their reverse.
Table 8 Advanced configurations Parameter
Description
Cloud Eye host monitoring
Once this function enabled, you can configure Cloud Eye host monitoring agency in one–click mode. Cloud Eye agency allows you to monitor various metrics of the Lite Server, including CPU, memory, network, disk, and process at an interval of 1 minute. For details, see Using Cloud Eye to Monitor NPU Resources of Lite Servers.
NodeTaskHub
The NodeTaskHub plug–in is preset for certain public images. This parameter is displayed when the corresponding image is selected.
Once enabled, the system automatically installs the NodeTaskHub plug–in for the task center to deliver software upgrade, pressure test, and fault diagnosis tasks. For details, see Installing the AI Plugin for a Lite Server.
When this function is enabled, the system calls the AOM agency and installs the NodeTaskHub plugin on the Lite Server. This allows the task center to handle Ascend software upgrades, stress tests, and fault diagnoses.
By calling the AOM agency, ModelArts Lite Server can call AOM APIs to interconnect with the monitoring and alarm systems.
Custom Instance Data Injection
Use this function to configure Lite Servers if you need to:
- Simplify node configuration using scripts.
- Initialize the system via scripts.
- Upload existing scripts to the server during server creation.
- Use scripts for other purposes.
Currently, As text and As file are supported. For details, see Injecting User Data into BMSs or Injecting User Data into ECSs.
Table 9 Purchase configurations Parameter
Description
Required Duration
Set the required duration and select auto–renewal as needed.
Quantity
You can purchase multiple instances simultaneously, with a value between 1 and 10.
Each instance generates a separate order, which must be paid for individually.
When purchasing 48 supernodes, reserve a portion as standby nodes based on your service requirements. These standby nodes will automatically take over if a primary node fails.
- View the configuration fee in the lower left corner of the page and click Buy Now. Then, pay for the order on the payment page. The detailed fees will be displayed. You can click to view discount details if there is any. The configuration fee is the final discounted fee. To view the actual fee deduction, see the bill.
Each instance generates a separate order, which must be paid for individually.
- Once the payment is complete, wait patiently while the Lite Server resources are being provisioned. This process typically takes 20 to 60 minutes. If the resource fails to be created, see Handling Resource Purchase Failures.
Handling Resource Purchase Failures
- Insufficient resources: Switch to the BMS or ECS page and check whether the specifications to be purchased are sold out. If so, there are no resources of this flavor. In this case, contact the customer manager to obtain resources and purchase again.
- Insufficient quota: Check if your account's resource quota (cores and RAM capacity) meets the requirements. If your quota is too low, you will need to increase it before proceeding. Apply for a quota adjustment before purchasing resources.
- Internal supernode, BMS, or ECS error: Check whether there is an internal BMS or ECS error. If yes, submit a service ticket to BMS or ECS to locate and rectify the fault.
Feedback
Was this page helpful?
Provide feedbackThank you very much for your feedback. We will continue working to improve the documentation.See the reply and handling status in My Cloud VOC.
For any further questions, feel free to contact us through the chatbot.
Chatbot


