Configuring ICAgent Structuring Parsing
LTS offers the ICAgent structuring parsing function to structure logs. The ICAgent parsing rules can be defined only when a log ingestion configuration is initially created. Based on your log content, you can choose from the following rules: Single-Line - Full-Text Log, Multi-Line - Full-Text Log, JSON, Delimiter, Single-Line - Completely Regular, Multi-Line - Completely Regular, and Combined Parsing. Once collected, structured logs are sent to your specified log stream for search and analysis.
ICAgent supports only RE2 regular expressions. For details, see Syntax.
Navigation Path
The following uses ECS text log ingestion as an example to describe how to set ICAgent structuring parsing rules.
- Log in to the LTS console.
- In the navigation pane, choose Log Ingestion > Ingestion Center. On the displayed page, select Running environments or Cloud services under Types. Hover the cursor over the Elastic Cloud Server(ECS) card and click Ingest Log (LTS) to access the configuration page.
Figure 1 Accessing the ECS log ingestion configuration page
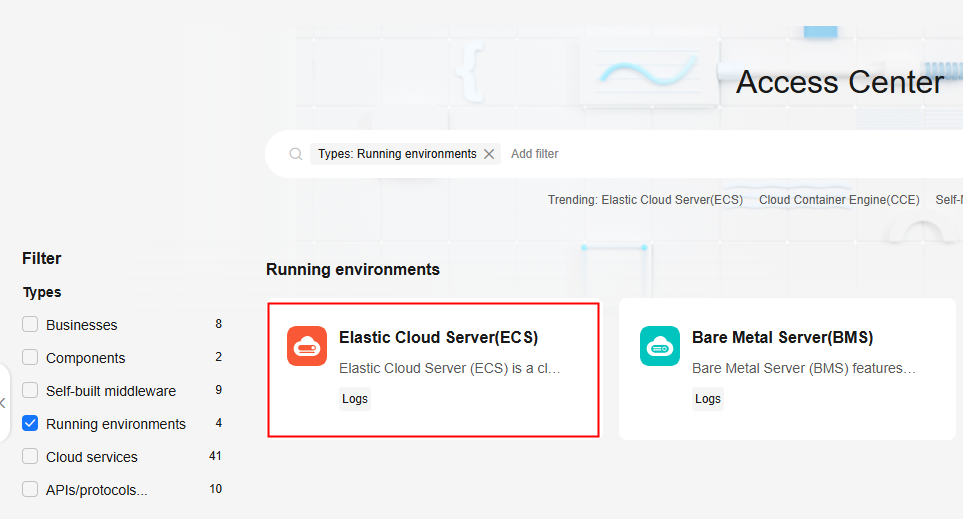
Alternatively, choose Log Ingestion > Ingestion Management in the navigation pane. Click Create. On the displayed page, select Running environments or Cloud services under Types. Hover the cursor over the Elastic Cloud Server(ECS) card and click Ingest Log (LTS) to access the configuration page.
- Set the parameters and click Next: (Optional) Select Host Group.
- Set the parameters and click Next: Configurations.
- On the Configurations page, configure structuring parsing.
Enable Structuring Parsing and select a parsing rule based on your log content. For more information, see Configuring Structuring Parsing.Figure 2 ICAgent structuring parsing configuration

- After completing the settings, click Next: Index Settings. For detailed steps of ECS log ingestion, see Ingesting ECS Text Logs to LTS.
For other ingestion modes, see Using ICAgent to Collect Host Logs and Using ICAgent to Collect Container Logs.
Configuring Structuring Parsing
LTS supports the following log structuring parsing rules:
|
Type |
Description |
|---|---|
|
Uses a newline character \n as the end of a log line and saves each log event in the default key value content. |
|
|
Applicable to scenarios where a raw log spans multiple lines (for example, Java program logs). To distinguish each log logically, use the first line regular expression. If a line of log matches the preset regular expression, the line is considered as the start of a log. The next line is considered as the end of the log. |
|
|
Applicable to scenarios where each line in the log text is a raw log event and each log event can be extracted into multiple key-value pairs based on the JSON parsing rule. |
|
|
Applicable to scenarios where each line in the log text is a raw log event and each log event can be extracted into multiple key-value pairs based on a specified delimiter. |
|
|
Applicable to scenarios where each line in the log text is a raw log event and each log event can be extracted into multiple key-value pairs using a specified regular expression. |
|
|
Applicable to scenarios where a complete log spans multiple lines (for example, Java program logs) and the log can be parsed into multiple key-value pairs using a specified regular expression. |
|
|
For logs with complex structures and requiring multiple parsing modes (for example, completely regular + JSON), you can use this rule. It defines the pipeline logic for log parsing by entering plug-in syntax (in JSON format) under Plug-in Settings. You can add one or more plug-in configurations. ICAgent executes the configurations one by one based on the specified sequence. |
Single-Line - Full-Text Log
This rule uses a newline character \n as the end of a log line and saves each log event in the default key value content. Log structuring is not performed on log data, and log fields are not extracted. The time of a log attribute is determined by the log collection time.
Procedure:
- Select Single-Line - Full-Text Log.
- Log Filtering is disabled by default. To filter records that meet specific conditions from massive log data, enable log filtering and add whitelist or blacklist rules. A maximum of 20 whitelist or blacklist rules can be added.
Figure 3 Log filtering rules

- Set whitelist rules. This filtering rule acts as a matching criterion, collecting and reporting only logs that match the specified regular expression.
- Click Add under Whitelist Rule and enter a key value and filtering rule (regular expression). When adding multiple whitelist filtering rules, you can select the And or Or relationship. This means a log will be collected when it satisfies all or any of the rules. In single-line and multi-line full-text modes, content is used as the key name {key} of the full text by default.
For example, to collect only log lines containing hello from the logs, set the filtering rule to .*hello.*.
- Click Verify in the Operation column. In the displayed dialog box, enter a field value, and click Verify to verify the rule.
Figure 4 Verification
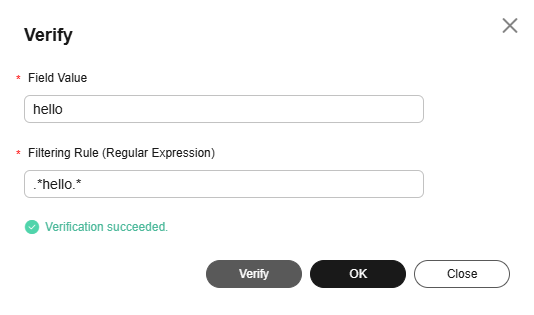
- After the verification is successful, click OK or Close to exit the dialog box.
- Click Add under Whitelist Rule and enter a key value and filtering rule (regular expression). When adding multiple whitelist filtering rules, you can select the And or Or relationship. This means a log will be collected when it satisfies all or any of the rules. In single-line and multi-line full-text modes, content is used as the key name {key} of the full text by default.
- Set blacklist rules. This filtering rule acts as a discarding criterion, discarding logs that match the specified regular expression.
- Click Add under Blacklist Rule and enter a key value and filtering rule (regular expression). When adding multiple blacklist filtering rules, you can select the And or Or relationship. This means a log will be excluded when it satisfies all or any of the rules. In single-line and multi-line full-text modes, content is used as the key name {key} of the full text by default.
For example, if you do not want to collect log lines containing hello from the logs, set the filtering rule to .*hello.*.
- Click Verify in the Operation column. In the displayed dialog box, enter a field value, and click Verify to verify the rule.
- After the verification is successful, click OK or Close to exit the dialog box.
- Click Add under Blacklist Rule and enter a key value and filtering rule (regular expression). When adding multiple blacklist filtering rules, you can select the And or Or relationship. This means a log will be excluded when it satisfies all or any of the rules. In single-line and multi-line full-text modes, content is used as the key name {key} of the full text by default.
- Set whitelist rules. This filtering rule acts as a matching criterion, collecting and reporting only logs that match the specified regular expression.
Example:
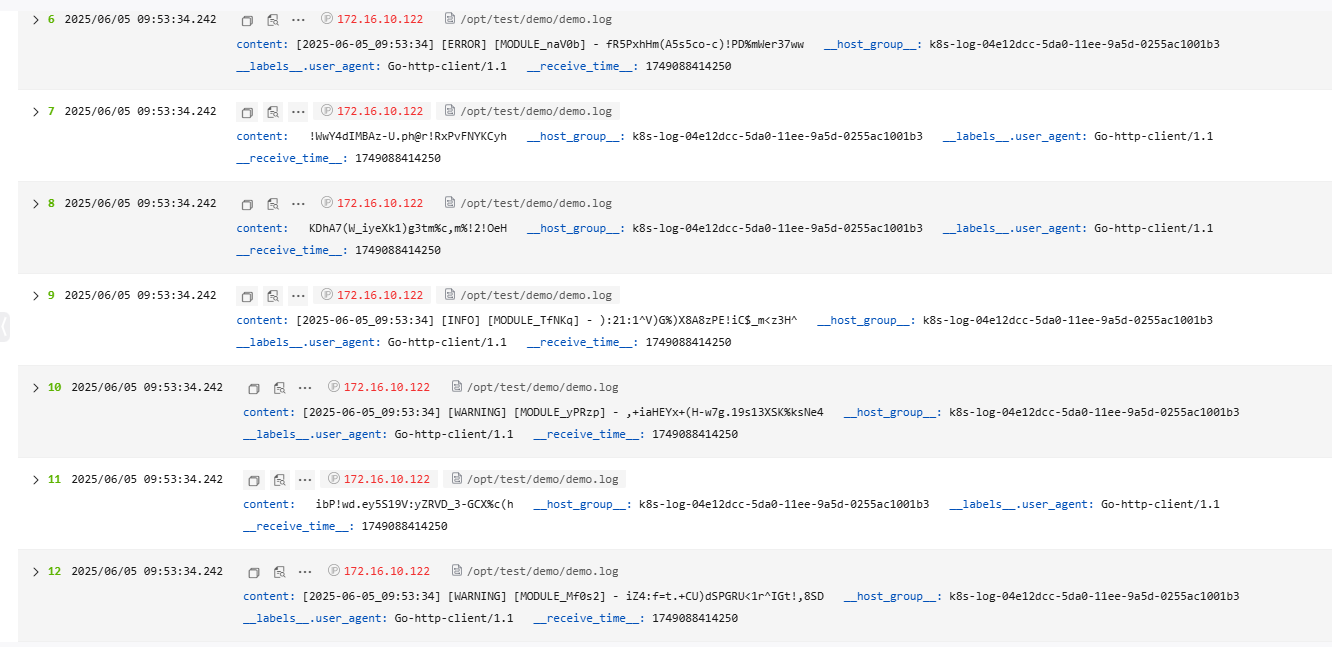
The following is an example of the Single-Line - Full-Text Log parsing rule. The raw log reported to LTS is as follows. Figure 5 shows how the log data is displayed in LTS after being structured.
- Raw log example:
[2025-06-05_09:53:34] [WARNING] [MODULE_Mf0s2] - iZ4:f=t.+CU)dSPGRU<1r^IGt!,8SD
ibP!wd.ey5S19V:yZRVD_3-GCX%c(h
[2025-06-05_09:53:34] [WARNING] [MODULE_yPRzp] - ,+iaHEYx+(H-w7g.19s13XSK%ksNe4
[2025-06-05_09:53:34] [INFO] [MODULE_TfNKq] - ):21:1^V)G%)X8A8zPE!iC$_m<z3H^
KDhA7(W_iyeXk1)g3tm%c,m%!2!OeH
!WwY4dIMBAz-U.ph@r!RxPvFNYKCyh
[2025-06-05_09:53:34] [ERROR] [MODULE_naV0b] - fR5PxhHm(A5s5co-c)!PD%mWer37ww
zZ3@(^vC#CELo;(BR=f_AhzJADlpR@
V;ZLg3c)N,q-K5t,*ke7jPnY)s#5i2
[2025-06-05_09:53:34] [INFO] [MODULE_5fMUb] - 6i%B0qSI.yDP3.o)C&U+dE%-Sabony
G.7Pfr7xcx/NrX3SV%*ZVWgW+CGD;(
-lJHB4ckm(=OQ,rx8zeYFGNtcK/Z)x
- Result display:
Multi-Line - Full-Text Log
A complete multi-line - full-text log is a single log that spans multiple lines, such as a Java program log. In this case, using the newline character \n as the end identifier of a log is improper. To distinguish each log logically, use the first line regular expression. If a line of log matches the preset regular expression, the line is considered as the start of a log. The next line is considered as the end of the log.
When the multi-line full-text log parsing rule is used to collect logs, the default key value content is set to store multi-line logs. The log data is not processed by log structuring, and log fields are not extracted. The time of the log attribute is determined by the log collection time.
Procedure:
- Select Multi-Line - Full-Text Log.
- Select a log example from existing logs or paste it from the clipboard.
- Click Select from Existing Logs, filter logs by time range, select a log event, and click OK.
- Click Paste from Clipboard to paste the copied log content to the Log Example box.

- A regular expression can be automatically generated or manually entered under Regular Expression of the First Line. The regular expression of the first line must match the entire first line, not just the beginning of the first line.
Figure 6 Regular expression of the first line

- Log Filtering is disabled by default. To filter records that meet specific conditions from massive log data, enable log filtering and add whitelist or blacklist rules. A maximum of 20 whitelist or blacklist rules can be added.
Figure 7 Log filtering rules

- Set whitelist rules. This filtering rule acts as a matching criterion, collecting and reporting only logs that match the specified regular expression.
- Click Add under Whitelist Rule and enter a key value and filtering rule (regular expression). When adding multiple whitelist filtering rules, you can select the And or Or relationship. This means a log will be collected when it satisfies all or any of the rules. In single-line and multi-line full-text modes, content is used as the key name {key} of the full text by default.
For example, to collect only log lines containing hello from the logs, set the filtering rule to .*hello.*.
- Click Verify in the Operation column. In the displayed dialog box, enter a field value, and click Verify to verify the rule.
Figure 8 Verification

- After the verification is successful, click OK or Close to exit the dialog box.
- Click Add under Whitelist Rule and enter a key value and filtering rule (regular expression). When adding multiple whitelist filtering rules, you can select the And or Or relationship. This means a log will be collected when it satisfies all or any of the rules. In single-line and multi-line full-text modes, content is used as the key name {key} of the full text by default.
- Set blacklist rules. This filtering rule acts as a discarding criterion, discarding logs that match the specified regular expression.
- Click Add under Blacklist Rule and enter a key value and filtering rule (regular expression). When adding multiple blacklist filtering rules, you can select the And or Or relationship. This means a log will be excluded when it satisfies all or any of the rules. In single-line and multi-line full-text modes, content is used as the key name {key} of the full text by default.
For example, if you do not want to collect log lines containing hello from the logs, set the filtering rule to .*hello.*.
- Click Verify in the Operation column. In the displayed dialog box, enter a field value, and click Verify to verify the rule.
- After the verification is successful, click OK or Close to exit the dialog box.
- Click Add under Blacklist Rule and enter a key value and filtering rule (regular expression). When adding multiple blacklist filtering rules, you can select the And or Or relationship. This means a log will be excluded when it satisfies all or any of the rules. In single-line and multi-line full-text modes, content is used as the key name {key} of the full text by default.
- Set whitelist rules. This filtering rule acts as a matching criterion, collecting and reporting only logs that match the specified regular expression.
Example:
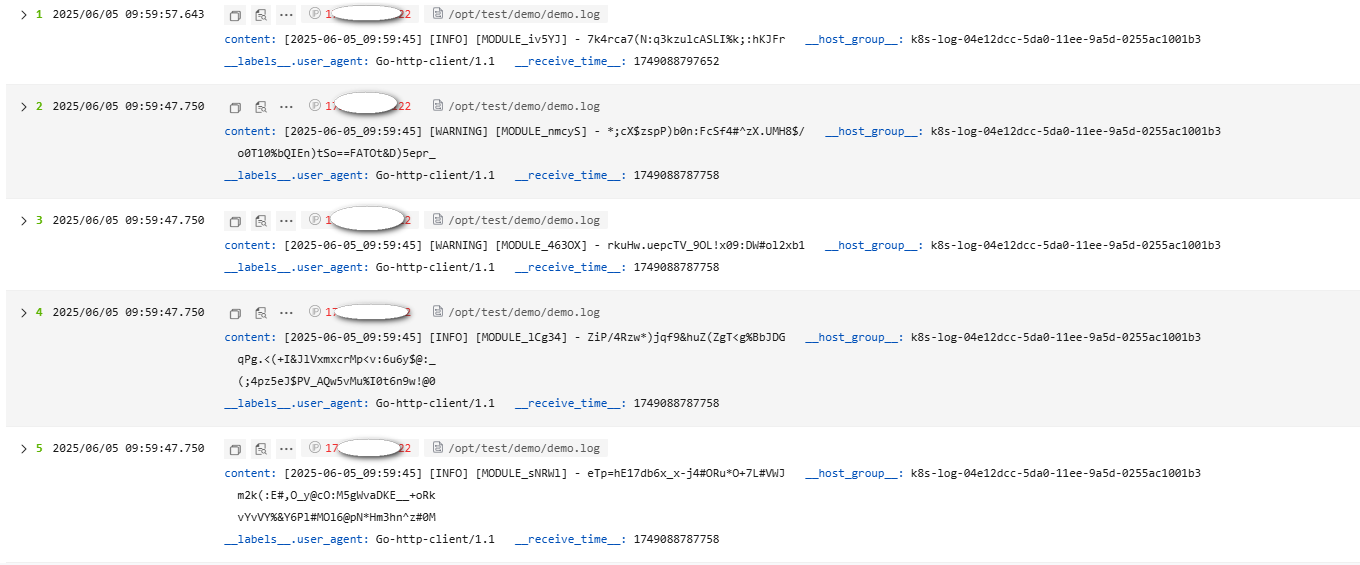
The following is an example of the Multi-Line - Full-Text Log parsing rule. The raw log reported to LTS is as follows. Figure 9 shows how the log data is displayed in LTS after being structured.
- Raw log example:
[2025-06-05_09:59:45] [INFO] [MODULE_sNRWl] - eTp=hE17db6x_x-j4#ORu*O+7L#VWJ
m2k(:E#,O_y@cO:M5gWvaDKE__+oRk
vYvVY%&Y6Pl#MOl6@pN*Hm3hn^z#0M
[2025-06-05_09:59:45] [INFO] [MODULE_lCg34] - ZiP/4Rzw*)jqf9&huZ(ZgT<g%BbJDG
qPg.<(+I&JlVxmxcrMp<v:6u6y$@:_
(;4pz5eJ$PV_AQw5vMu%I0t6n9w!@0
[2025-06-05_09:59:45] [WARNING] [MODULE_463OX] - rkuHw.uepcTV_9OL!x09:DW#ol2xb1
[2025-06-05_09:59:45] [WARNING] [MODULE_nmcyS] - *;cX$zspP)b0n:FcSf4#^zX.UMH8$/
o0T10%bQIEn)tSo==FATOt&D)5epr_
[2025-06-05_09:59:45] [INFO] [MODULE_iv5YJ] - 7k4rca7(N:q3kzulcASLI%k;:hKJFr
Regular expression of the first line:^\[\d{4}-\d{2}-\d{2}_\d{2}:\d{2}:\d{2}\] - Result display
JSON
The JSON parsing rule is applicable to scenarios where each line in the log text is a raw log event and each log event can be extracted into multiple key-value pairs based on the JSON parsing rule. If the extraction of key-value pairs is not desired, follow the instructions in Multi-Line - Full-Text Log.
Procedure:
- Choose JSON.
- Log Filtering is disabled by default. To filter records that meet specific conditions from massive log data, enable log filtering and add whitelist or blacklist rules. A maximum of 20 whitelist or blacklist rules can be added.
Figure 10 Log filtering rules

- Set whitelist rules. This filtering rule acts as a matching criterion, collecting and reporting only logs that match the specified regular expression.
- Click Add under Whitelist Rule and enter a key value and filtering rule (regular expression). A key value is a log field name.
When adding multiple whitelist filtering rules, you can select the And or Or relationship. This means a log will be collected when it satisfies all or any of the rules.
For example, to collect only log lines containing hello, enter hello as the key value, and set the filtering rule to .*hello.*.
- Click Verify in the Operation column. In the displayed dialog box, enter a field value, and click Verify to verify the rule.
Figure 11 Verification
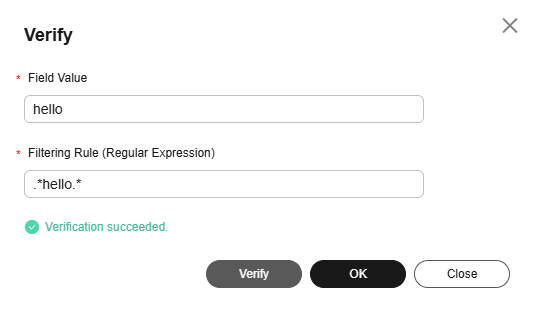
- After the verification is successful, click OK or Close to exit the dialog box.
- Click Add under Whitelist Rule and enter a key value and filtering rule (regular expression). A key value is a log field name.
- Set blacklist rules. This filtering rule acts as a discarding criterion, discarding logs that match the specified regular expression.
- Click Add under Blacklist Rule and enter a key value and filtering rule (regular expression). A key value is a log field name.
When adding multiple blacklist filtering rules, you can select the And or Or relationship. This means a log will be excluded when it satisfies all or any of the rules.
For example, if you do not want to collect log lines containing hello, enter hello as the key value, and set the filtering rule to .*hello.*.
- Click Verify in the Operation column. In the displayed dialog box, enter a field value, and click Verify to verify the rule.
- After the verification is successful, click OK or Close to exit the dialog box.
- Click Add under Blacklist Rule and enter a key value and filtering rule (regular expression). A key value is a log field name.
- Set whitelist rules. This filtering rule acts as a matching criterion, collecting and reporting only logs that match the specified regular expression.
- Raw Log Upload:
After this function is enabled, raw logs are uploaded to LTS as the value of the content field.
- Upload Parsing Failure Log:
After this function is enabled, raw logs are uploaded to LTS as the value of the _content_parse_fail_ field.
- The following describes how logs are reported when Raw Log Upload and Upload Parsing Failure Log are enabled or disabled.
Figure 12 Structuring parsing

Table 2 Log reporting description Parameter
Description
- Raw Log Upload enabled
- Upload Parsing Failure Log enabled
- Parsing succeeded: The parsed log and the raw log's content field are reported.
- Parsing failed: The raw log's content and _content_parse_fail_ fields are reported.
- Raw Log Upload enabled
- Upload Parsing Failure Log disabled
- Parsing succeeded: The parsed log and the raw log's content field are reported.
- Parsing failed: The raw log's content field is reported.
- Raw Log Upload disabled
- Upload Parsing Failure Log enabled
- Parsing succeeded: The parsed log is reported.
- Parsing failed: The _content_parse_fail_ field is reported.
- Raw Log Upload disabled
- Upload Parsing Failure Log disabled
- Parsing succeeded: The parsed log is reported.
- Parsing failed: Only the system built-in and label fields are reported.
- Custom Time:
Enabling this lets you specify a field as the log time. Otherwise, the time set during ingestion configuration is used.
- JSON Parsing Layers: Configure the JSON parsing layers. The value must be an integer ranging from 1 (default) to 4.
This function expands the fields of a JSON log. For example, for raw log {"key1":{"key2":"value"}}, if you choose to parse it into 1 layer, the log will become {"key1":{"key2":"value"}}; if you choose to parse it into 2 layers, the log will become {"key1.key2":"value"}.
- JSON String Parsing: disabled by default. After this function is enabled, escaped JSON strings can be parsed into JSON objects. For example, {"key1":"{\"key2\":\"value\"}"} can be parsed into key1.key2:value.
Example:
The following is an example of the JSON parsing rule. The raw log reported to LTS is as follows. Figure 13 shows how the log data is displayed in LTS after being structured.
- Raw log example:
{"timestamp":"2025-06-05_10:32:08","level":"INFO","module":"MODULE_eJvyE","msg":"P^I^CBHYyIEo98@#R1gp5.io5jU:i!"} {"timestamp":"2025-06-05_10:32:08","level":"WARNING","module":"MODULE_ADPxy","msg":"/DfP7p=^w.rx<$,ep+oLrg@QVe<p0%"} {"timestamp":"2025-06-05_10:32:08","level":"WARNING","module":"MODULE_pEzEl","msg":"rPe%_T(vo_=b#PUrBXa&Sx9KYR2Y%y"} {"timestamp":"2025-06-05_10:32:08","level":"DEBUG","module":"MODULE_zk5l0","msg":"(c)PC<H.,wdlSG%=//hDZ=o5u/(a47"} {"timestamp":"2025-06-05_10:32:08","level":"INFO","module":"MODULE_stz3u","msg":"L@J3+_icq%2w_Vc,):hGbQ/b0i1oy+"} - Result display:
Delimiter
The parsing rule is applicable to scenarios where each line in the log text is a raw log event and each log event can be extracted into multiple key-value pairs based on a specified delimiter. If the extraction of key-value pairs is not desired, follow the instructions in Single-Line - Full-Text Log.
Procedure:
- Select a delimiter.
- Select or customize a delimiter.
- Select a log example from existing logs or paste it from the clipboard, click Verify, and view the results under Extraction Results.
- Click Select from Existing Logs, select a log event, and click OK. You can select different time ranges to filter logs.
- Click Paste from Clipboard to paste the copied log content to the Log Example box.
Figure 14 Delimiter
- Log Filtering is disabled by default. To filter records that meet specific conditions from massive log data, enable log filtering and add whitelist or blacklist rules. A maximum of 20 whitelist or blacklist rules can be added.
Figure 15 Log filtering rules

- Set whitelist rules. This filtering rule acts as a matching criterion, collecting and reporting only logs that match the specified regular expression.
- Click Add under Whitelist Rule and enter a key value and filtering rule (regular expression). A key value is a log field name.
When adding multiple whitelist filtering rules, you can select the And or Or relationship. This means a log will be collected when it satisfies all or any of the rules.
For example, to collect only log lines containing hello, enter hello as the key value, and set the filtering rule to .*hello.*.
- Click Verify in the Operation column. In the displayed dialog box, enter a field value, and click Verify to verify the rule.
Figure 16 Verification

- After the verification is successful, click OK or Close to exit the dialog box.
- Click Add under Whitelist Rule and enter a key value and filtering rule (regular expression). A key value is a log field name.
- Set blacklist rules. This filtering rule acts as a discarding criterion, discarding logs that match the specified regular expression.
- Click Add under Blacklist Rule and enter a key value and filtering rule (regular expression). A key value is a log field name.
When adding multiple blacklist filtering rules, you can select the And or Or relationship. This means a log will be excluded when it satisfies all or any of the rules.
For example, if you do not want to collect log lines containing hello, enter hello as the key value, and set the filtering rule to .*hello.*.
- Click Verify in the Operation column. In the displayed dialog box, enter a field value, and click Verify to verify the rule.
- After the verification is successful, click OK or Close to exit the dialog box.
- Click Add under Blacklist Rule and enter a key value and filtering rule (regular expression). A key value is a log field name.
- Set whitelist rules. This filtering rule acts as a matching criterion, collecting and reporting only logs that match the specified regular expression.
- Raw Log Upload:
After this function is enabled, raw logs are uploaded to LTS as the value of the content field.
- Upload Parsing Failure Log:
After this function is enabled, raw logs are uploaded to LTS as the value of the _content_parse_fail_ field.
- The following describes how logs are reported when Raw Log Upload and Upload Parsing Failure Log are enabled or disabled.
Figure 17 Structuring parsing

Table 3 Log reporting description Parameter
Description
- Raw Log Upload enabled
- Upload Parsing Failure Log enabled
- Parsing succeeded: The parsed log and the raw log's content field are reported.
- Parsing failed: The raw log's content and _content_parse_fail_ fields are reported.
- Raw Log Upload enabled
- Upload Parsing Failure Log disabled
- Parsing succeeded: The parsed log and the raw log's content field are reported.
- Parsing failed: The raw log's content field is reported.
- Raw Log Upload disabled
- Upload Parsing Failure Log enabled
- Parsing succeeded: The parsed log is reported.
- Parsing failed: The _content_parse_fail_ field is reported.
- Raw Log Upload disabled
- Upload Parsing Failure Log disabled
- Parsing succeeded: The parsed log is reported.
- Parsing failed: Only the system built-in and label fields are reported.
- Custom Time:
Enabling this lets you specify a field as the log time. Otherwise, the time set during ingestion configuration is used.
Example:
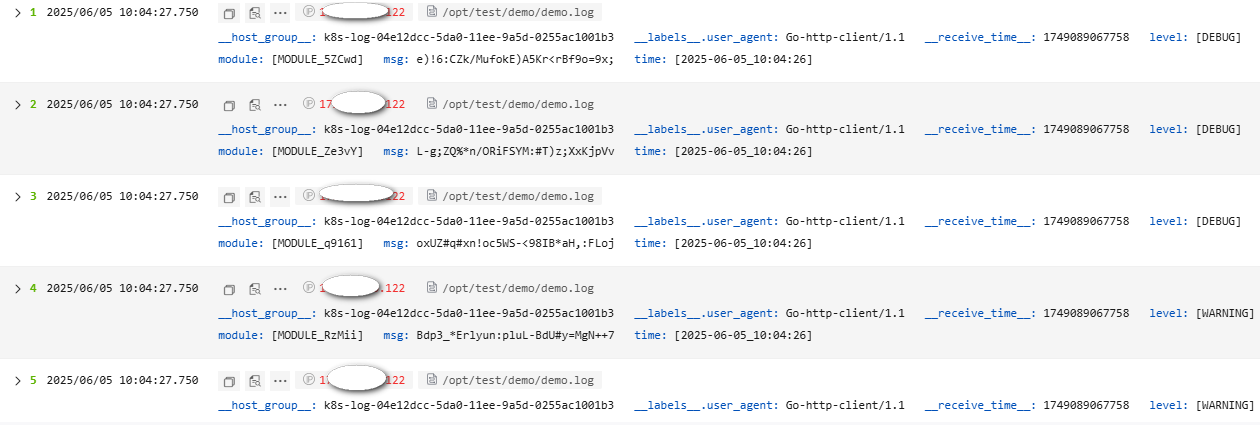
The following is an example of the Delimiter parsing rule. The raw log reported to LTS is as follows. Figure 18 shows how the log data is displayed in LTS after being structured.
- Raw log example:
[2025-06-05_10:04:26] [WARNING] [MODULE_vlQR1] - _4xi&#$Um2Ua*M.VHv1_L#CQzas-nC
[2025-06-05_10:04:26] [WARNING] [MODULE_RzMii] - Bdp3_*Erlyun:pluL-BdU#y=MgN++7
[2025-06-05_10:04:26] [DEBUG] [MODULE_q9161] - oxUZ#q#xn!oc5WS-<98IB*aH,:FLoj
[2025-06-05_10:04:26] [DEBUG] [MODULE_Ze3vY] - L-g;ZQ%*n/ORiFSYM:#T)z;XxKjpVv
[2025-06-05_10:04:26] [DEBUG] [MODULE_5ZCwd] - e)!6:CZk/MufokE)A5Kr<rBf9o=9x;
Enter a log under Log Example, select Space as the delimiter, and click Verify to extract key-value pairs. You can change the key values as required.
[2025-06-05_09:53:34] [WARNING] [MODULE_yPRzp] - ,+iaHEYx+(H-w7g.19s13XSK%ksNe4
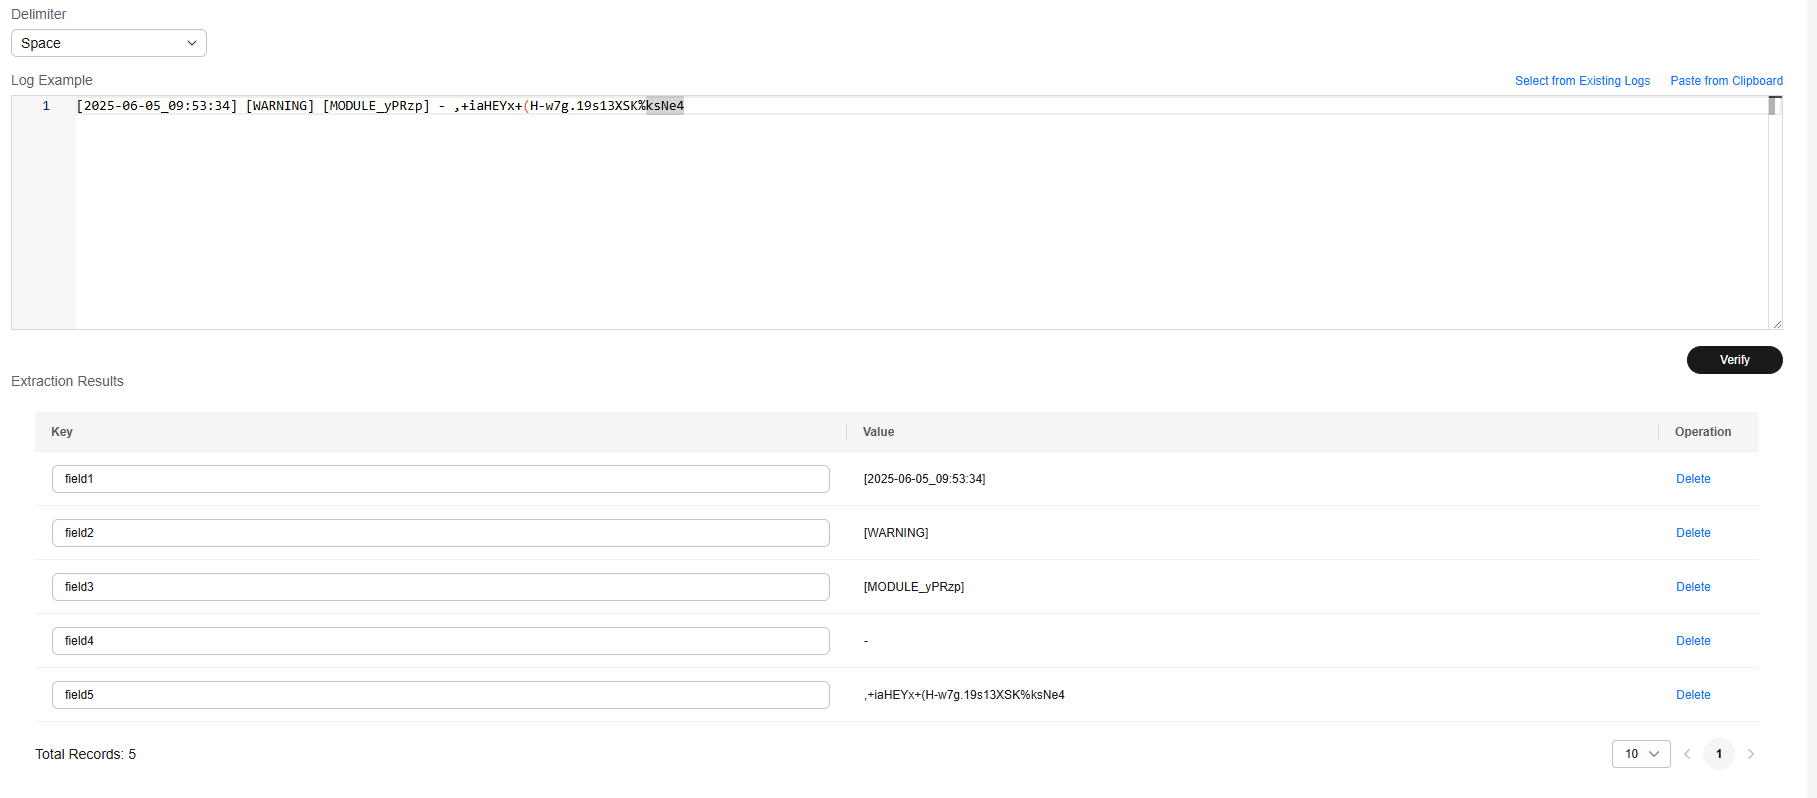
- Result display:
Single-Line - Completely Regular
This parsing rule is applicable to scenarios where each line in the log text is a raw log event and each log event can be extracted into multiple key-value pairs using a specified regular expression. If the extraction of key-value pairs is not desired, follow the instructions in Single-Line - Full-Text Log.
Procedure:
- Select Single-Line - Completely Regular.
- Select a log example from existing logs or paste it from the clipboard.
- Click Select from Existing Logs, select a log event, and click OK. You can select different time ranges to filter logs.
- Click Paste from Clipboard to paste the copied log content to the Log Example box.
- Enter a regular expression for extracting the log under Extraction Regular Expression, click Verify, and view the results under Extraction Results.
Alternatively, click automatic generation of regular expressions. In the displayed dialog box, extract fields based on the log example, enter the key, and click OK to automatically generate a regular expression. Then, click OK.
Figure 19 Extracting a regular expression
- Log Filtering is disabled by default. To filter records that meet specific conditions from massive log data, enable log filtering and add whitelist or blacklist rules. A maximum of 20 whitelist or blacklist rules can be added.
Figure 20 Log filtering rules

- Set whitelist rules. This filtering rule acts as a matching criterion, collecting and reporting only logs that match the specified regular expression.
- Click Add under Whitelist Rule and enter a key value and filtering rule (regular expression). A key value is a log field name.
When adding multiple whitelist filtering rules, you can select the And or Or relationship. This means a log will be collected when it satisfies all or any of the rules.
For example, to collect only log lines containing hello, enter hello as the key value, and set the filtering rule to .*hello.*.
- Click Verify in the Operation column. In the displayed dialog box, enter a field value, and click Verify to verify the rule.
Figure 21 Verification

- After the verification is successful, click OK or Close to exit the dialog box.
- Click Add under Whitelist Rule and enter a key value and filtering rule (regular expression). A key value is a log field name.
- Set blacklist rules. This filtering rule acts as a discarding criterion, discarding logs that match the specified regular expression.
- Click Add under Blacklist Rule and enter a key value and filtering rule (regular expression). A key value is a log field name.
When adding multiple blacklist filtering rules, you can select the And or Or relationship. This means a log will be excluded when it satisfies all or any of the rules.
For example, if you do not want to collect log lines containing hello, enter hello as the key value, and set the filtering rule to .*hello.*.
- Click Verify in the Operation column. In the displayed dialog box, enter a field value, and click Verify to verify the rule.
- After the verification is successful, click OK or Close to exit the dialog box.
- Click Add under Blacklist Rule and enter a key value and filtering rule (regular expression). A key value is a log field name.
- Set whitelist rules. This filtering rule acts as a matching criterion, collecting and reporting only logs that match the specified regular expression.
- Raw Log Upload:
After this function is enabled, raw logs are uploaded to LTS as the value of the content field.
- Upload Parsing Failure Log:
After this function is enabled, raw logs are uploaded to LTS as the value of the _content_parse_fail_ field.
- The following describes how logs are reported when Raw Log Upload and Upload Parsing Failure Log are enabled or disabled.
Figure 22 Structuring parsing

Table 4 Log reporting description Parameter
Description
- Raw Log Upload enabled
- Upload Parsing Failure Log enabled
- Parsing succeeded: The parsed log and the raw log's content field are reported.
- Parsing failed: The raw log's content and _content_parse_fail_ fields are reported.
- Raw Log Upload enabled
- Upload Parsing Failure Log disabled
- Parsing succeeded: The parsed log and the raw log's content field are reported.
- Parsing failed: The raw log's content field is reported.
- Raw Log Upload disabled
- Upload Parsing Failure Log enabled
- Parsing succeeded: The parsed log is reported.
- Parsing failed: The _content_parse_fail_ field is reported.
- Raw Log Upload disabled
- Upload Parsing Failure Log disabled
- Parsing succeeded: The parsed log is reported.
- Parsing failed: Only the system built-in and label fields are reported.
- Custom Time:
Enabling this lets you specify a field as the log time. Otherwise, the time set during ingestion configuration is used.
Example:
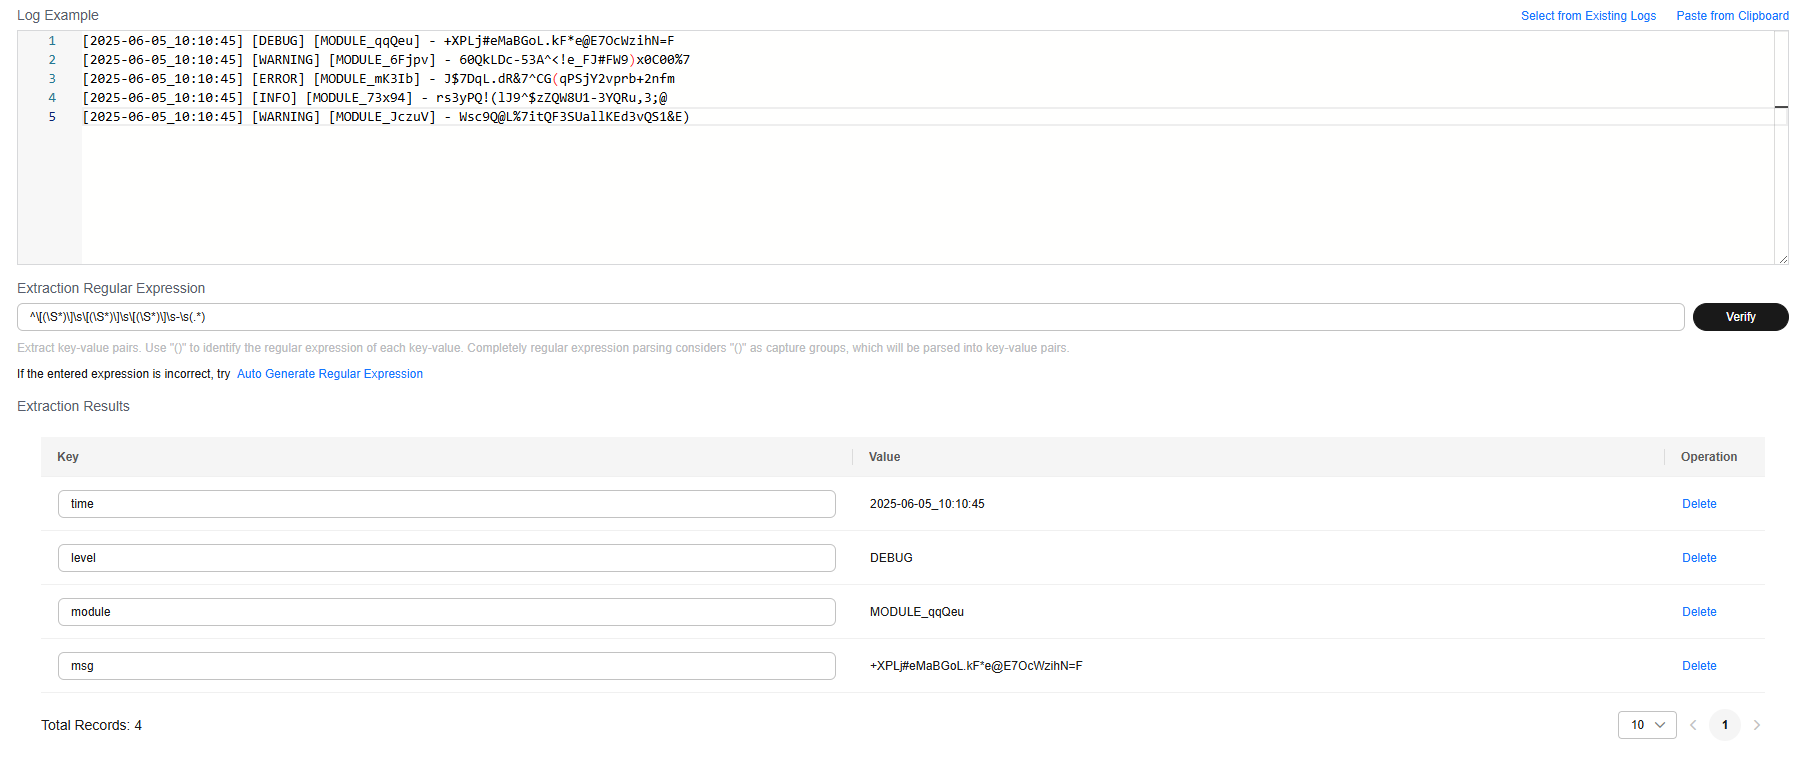
The following is an example of the Single-Line - Completely Regular parsing rule. The raw log reported to LTS is as follows. Figure 23 shows how the log data is displayed in LTS after being structured.
- Raw log example:
[2025-06-05_10:10:45] [DEBUG] [MODULE_qqQeu] - +XPLj#eMaBGoL.kF*e@E7OcWzihN=F
[2025-06-05_10:10:45] [WARNING] [MODULE_6Fjpv] - 60QkLDc-53A^<!e_FJ#FW9)x0C00%7
[2025-06-05_10:10:45] [ERROR] [MODULE_mK3Ib] - J$7DqL.dR&7^CG(qPSjY2vprb+2nfm
[2025-06-05_10:10:45] [INFO] [MODULE_73x94] - rs3yPQ!(lJ9^$zZQW8U1-3YQRu,3;@
[2025-06-05_10:10:45] [WARNING] [MODULE_JczuV] - Wsc9Q@L%7itQF3SUallKEd3vQS1&E)
Enter a regular expression, and click Verify. The key-value pairs are extracted. Modify the key value pairs based on your log content for easy identification.
^\[(\S*)\]\s\[(\S*)\]\s\[(\S*)\]\s-\s(.*)
- Result display:
Multi-Line - Completely Regular
This parsing rule is applicable to scenarios where a complete log spans multiple lines (for example, Java program logs) and the log can be parsed into multiple key-value pairs using a specified regular expression. If the extraction of key-value pairs is not desired, follow the instructions in Multi-Line - Full-Text Log. When configuring Multi-Line - Completely Regular, you need to enter a log example, use the first-line regular expression to match the complete content of the first line, and customize the extraction regular expression.
Procedure:
- Select Multi-Line - Completely Regular.
- Select a log example from existing logs or paste it from the clipboard.
- Click Select from Existing Logs, select a log event, and click OK. You can select different time ranges to filter logs.
- Click Paste from Clipboard to paste the copied log content to the Log Example box.
- A regular expression can be automatically generated or manually entered under Regular Expression of the First Line. The regular expression of the first line must match the entire first line, not just the beginning of the first line.
The regular expression of the first line is used to identify the beginning of a multi-line log. Example:
2024-10-11 10:59:07.000 a.log:1 level:warn
  no.1 log
2024-10-11 10:59:17.000 a.log:2 level:warn
  no.2 log
Complete lines:
2024-10-11 10:59:07.000 a.log:1 level:warn
no.1 log
First line:
2024-10-11 10:59:07.000 a.log:1 level:warn
Example of the regular expression of the first line: ^\d{4}-\d{2}-\d{2}\d{3}:\d{2}:\d{2}\.\d{3}$. The date in each first line is unique. Therefore, the regular expression in the first line can be generated based on the date.
- Enter a regular expression for extracting the log under Extraction Regular Expression, click Verify, and view the results under Extraction Results.
Alternatively, click automatic generation of regular expressions. In the displayed dialog box, extract fields based on the log example, enter the key, and click OK to automatically generate a regular expression. Then, click OK.
The extraction result is the execution result of the extraction regular expression instead of the first line regular expression. To check the execution result of the first line regular expression, go to the target log stream.
If you enter an incorrect regular expression for Regular Expression of the First Line, you cannot view the reported log stream data.
Figure 24 Setting a regular expression
- Log Filtering is disabled by default. To filter records that meet specific conditions from massive log data, enable log filtering and add whitelist or blacklist rules. A maximum of 20 whitelist or blacklist rules can be added.
Figure 25 Log filtering rules

- Set whitelist rules. This filtering rule acts as a matching criterion, collecting and reporting only logs that match the specified regular expression.
- Click Add under Whitelist Rule and enter a key value and filtering rule (regular expression). A key value is a log field name.
When adding multiple whitelist filtering rules, you can select the And or Or relationship. This means a log will be collected when it satisfies all or any of the rules.
For example, to collect only log lines containing hello, enter hello as the key value, and set the filtering rule to .*hello.*.
- Click Verify in the Operation column. In the displayed dialog box, enter a field value, and click Verify to verify the rule.
Figure 26 Verification

- After the verification is successful, click OK or Close to exit the dialog box.
- Click Add under Whitelist Rule and enter a key value and filtering rule (regular expression). A key value is a log field name.
- Set blacklist rules. This filtering rule acts as a discarding criterion, discarding logs that match the specified regular expression.
- Click Add under Blacklist Rule and enter a key value and filtering rule (regular expression). A key value is a log field name.
When adding multiple blacklist filtering rules, you can select the And or Or relationship. This means a log will be excluded when it satisfies all or any of the rules.
For example, if you do not want to collect log lines containing hello, enter hello as the key value, and set the filtering rule to .*hello.*.
- Click Verify in the Operation column. In the displayed dialog box, enter a field value, and click Verify to verify the rule.
- After the verification is successful, click OK or Close to exit the dialog box.
- Click Add under Blacklist Rule and enter a key value and filtering rule (regular expression). A key value is a log field name.
- Set whitelist rules. This filtering rule acts as a matching criterion, collecting and reporting only logs that match the specified regular expression.
- Raw Log Upload:
After this function is enabled, raw logs are uploaded to LTS as the value of the content field.
- Upload Parsing Failure Log:
After this function is enabled, raw logs are uploaded to LTS as the value of the _content_parse_fail_ field.
- The following describes how logs are reported when Raw Log Upload and Upload Parsing Failure Log are enabled or disabled.
Figure 27 Structuring parsing

Table 5 Log reporting description Parameter
Description
- Raw Log Upload enabled
- Upload Parsing Failure Log enabled
- Parsing succeeded: The parsed log and the raw log's content field are reported.
- Parsing failed: The raw log's content and _content_parse_fail_ fields are reported.
- Raw Log Upload enabled
- Upload Parsing Failure Log disabled
- Parsing succeeded: The parsed log and the raw log's content field are reported.
- Parsing failed: The raw log's content field is reported.
- Raw Log Upload disabled
- Upload Parsing Failure Log enabled
- Parsing succeeded: The parsed log is reported.
- Parsing failed: The _content_parse_fail_ field is reported.
- Raw Log Upload disabled
- Upload Parsing Failure Log disabled
- Parsing succeeded: The parsed log is reported.
- Parsing failed: Only the system built-in and label fields are reported.
- Custom Time:
Enabling this lets you specify a field as the log time. Otherwise, the time set during ingestion configuration is used.
Example:
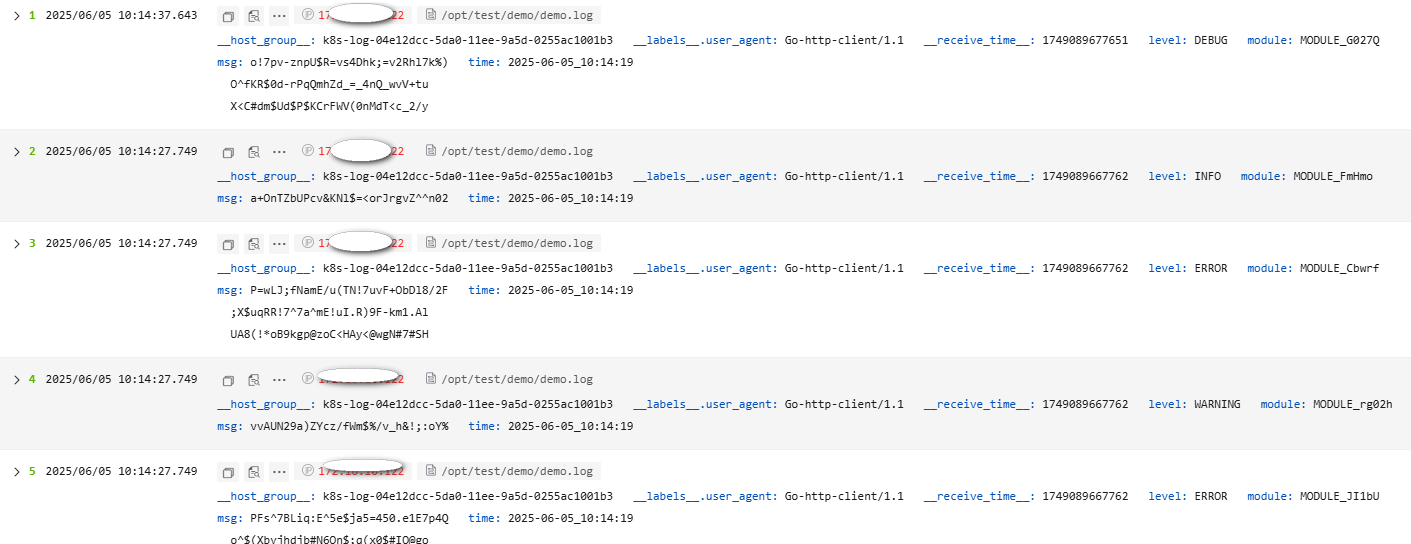
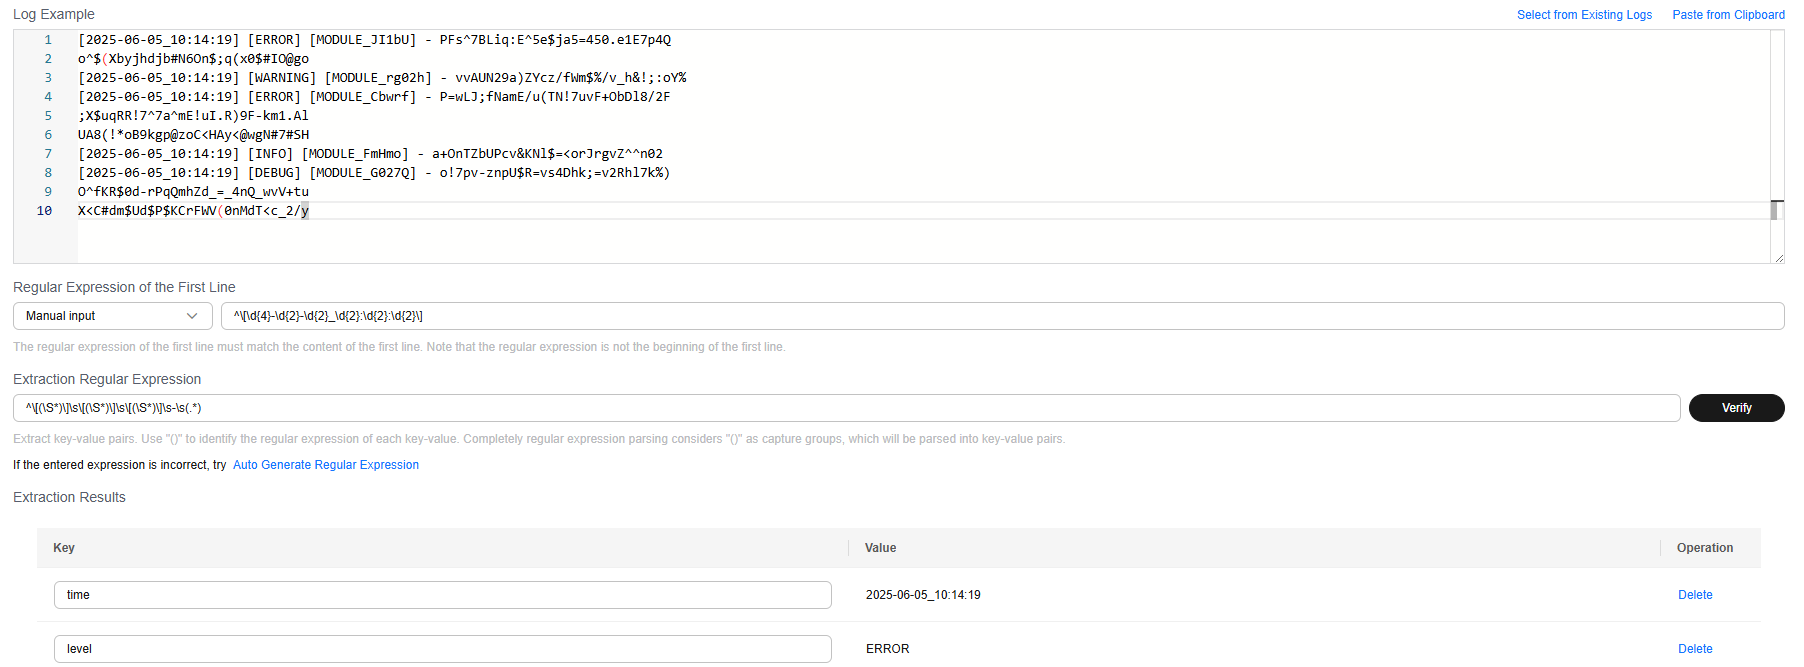
The following is an example of the Multi-Line - Completely Regular parsing rule. The raw log reported to LTS is as follows. Figure 28 shows how the log data is displayed in LTS after being structured.
- Raw log:
[2025-06-05_10:14:19] [ERROR] [MODULE_JI1bU] - PFs^7BLiq:E^5e$ja5=450.e1E7p4Q
o^$(Xbyjhdjb#N6On$;q(x0$#IO@go
[2025-06-05_10:14:19] [WARNING] [MODULE_rg02h] - vvAUN29a)ZYcz/fWm$%/v_h&!;:oY%
[2025-06-05_10:14:19] [ERROR] [MODULE_Cbwrf] - P=wLJ;fNamE/u(TN!7uvF+ObDl8/2F
;X$uqRR!7^7a^mE!uI.R)9F-km1.Al
UA8(!*oB9kgp@zoC<HAy<@wgN#7#SH
[2025-06-05_10:14:19] [INFO] [MODULE_FmHmo] - a+OnTZbUPcv&KNl$=<orJrgvZ^^n02
[2025-06-05_10:14:19] [DEBUG] [MODULE_G027Q] - o!7pv-znpU$R=vs4Dhk;=v2Rhl7k%)
O^fKR$0d-rPqQmhZd_=_4nQ_wvV+tu
X<C#dm$Ud$P$KCrFWV(0nMdT<c_2/y
A regular expression can be automatically generated or manually entered for Regular Expression of the First Line.
^\[\d{4}-\d{2}-\d{2}_\d{2}:\d{2}:\d{2}\]Enter a regular expression, and click Verify. The key-value pairs are extracted. Modify the key value pairs based on your log content for easy identification.
^\[(\S*)\]\s\[(\S*)\]\s\[(\S*)\]\s-\s(.*)
- Result display:
Combined Parsing
For logs with complex structures and requiring multiple parsing modes (for example, Nginx, completely regular, and JSON), you can use this rule. It defines the pipeline logic for log parsing by entering plug-in syntax (in JSON format) under Plug-in Settings. You can add one or more plug-in configurations. ICAgent executes the configurations one by one based on the specified sequence.
Procedure:
- Select Combined Parsing.
- Select a log example from existing logs or paste it from the clipboard and enter the configuration content under Plug-in Settings.
- Customize the settings based on the log content by referring to the following plug-in syntax. After entering the plug-in configuration, you can click Verify to view the parsing result under Extraction Results. You can learn about the usage of the plug-in configuration by referring to the log example provided in 4.
- processor_regex
Table 6 Regular expression extraction Parameter
Type
Description
source_key
String
Original field name.
multi_line_regex
String
Regular expression of the first line.
regex
String
() in a regular expression indicates the field to be extracted.
keys
string array
Field name for the extracted content.
keep_source
Boolean
Whether to retain the original field.
keep_source_if_parse_error
Boolean
Whether to retain the original field when a parsing error occurs.
- processor_split_string
Table 7 Parsing using delimiters Parameter
Type
Description
source_key
String
Original field name.
split_sep
String
Delimiters. Enter delimiters based on the value of split_type.
keys
string array
Field name for the extracted content.
keep_source
Boolean
Whether to retain the original field in the parsed log.
split_type
char/special_char/string
Delimiter type. The options are char (single character), special_char (invisible character), and string.
keep_source_if_parse_error
Boolean
Whether to retain the original field when a parsing error occurs.
- processor_split_key_value
Table 8 Key-value pair segmentation Parameter
Type
Description
source_key
String
Original field name.
split_sep
String
Delimiter between key-value pairs. The default value is the tab character (\t).
split_type
char/special_char/string
Delimiter type. The options are char (single character), special_char (invisible character), and string.
expand_connector
String
Delimiter between the key and value in a key-value pair. The default value is a colon (:).
keep_source
Boolean
Whether to retain the original field in the parsed log.
- processor_add_fields
Table 9 Adding a field Parameter
Type
Description
fields
json/object
Name and value of the field to be added. The field is in key-value pair format. Multiple key-value pairs can be added.
- processor_drop
Table 10 Discarded fields Parameter
Type
Description
drop_keys
string array
List of discarded fields.
- processor_rename
Table 11 Renaming a field Parameter
Type
Description
source_keys
string array
Original name.
dest_keys
string array
New name.
- processor_json
Table 12 JSON expansion and extraction Parameter
Type
Description
source_key
String
Original field name.
keep_source
Boolean
Whether to retain the original field in the parsed log.
expand_depth
int
JSON expansion depth. The default value 0 indicates that the depth is not limited. Other numbers, such as 1, indicate the current level.
expand_connector
String
Connector for expanding JSON. The default value is a period (.).
prefix
String
Prefix added to a field name when JSON is expanded.
keep_source_if_parse_error
Boolean
Whether to retain the original field when a parsing error occurs.
parse_escaped_json
Boolean
Parses escaped JSON strings into JSON objects.
keys
String array
After fields are parsed, the fields to be reported are retained. If the prefix field is used to add a prefix, the field name with the prefix needs to be written in keys (supported by ICAgent 7.4.3 and later).
- processor_filter_regex
Table 13 Filters Parameter
Type
Description
include
json/object
The key indicates the log field, and the value indicates the regular expression to be matched.
exclude
json/object
The key indicates the log field, and the value indicates the regular expression to be matched.
- processor_gotime
Table 14 Extraction time Parameter
Type
Description
source_key
String
Original field name.
source_format
String
Original time format.
source_location
int
Original time zone. If the value is empty, it indicates the time zone of the host or container is located.
set_time
Boolean
Whether to set the parsed time as the log time.
keep_source
Boolean
Whether to retain the original field in the parsed log.
- processor_base64_decoding
Table 15 Base64 decoding Parameter
Type
Description
source_key
String
Original field name.
dest_key
String
Target field after parsing.
keep_source_if_parse_error
Boolean
Whether to retain the original field when a parsing error occurs.
keep_source
Boolean
Whether to retain the original field in the parsed log.
- processor_base64_encoding
Table 16 Base64 encoding Parameter
Type
Description
source_key
String
Original field name.
dest_key
String
Target field after parsing.
keep_source
Boolean
Whether to retain the original field in the parsed log.
- processor_regex
- Parse the following log example by combining the plug-ins provided.
Raw log example (for reference only):
2025-03-19:16:49:03 [INFO] [thread1] {"ref":"https://www.test.com/","curl":"https://www.test.com/so/search?spm=1000.1111.2222.3333&q=linux%20opt%testabcd&t=&u=","sign":"1234567890","pid":"so","0508":{"sign":"112233445566 English bb Error, INFO, error bb&&bb","float":15.25,"long":15},"float":15.25,"long":15}You can parse fields by using combined plug-ins. The following is an example of a complete plug-in configuration. You can copy it to Plug-in Settings and click Verify to view the parsing result.
[{
        "detail": {
            "keys": ["nowtime", "level", "thread", "jsonmsg"],
            "keep_source": true,
            "regex": "(\\d{4}-\\d{2}-\\d{2}:\\d{2}:\\d{2}:\\d{2})\\s+\\[(\\w+)\\]\\s+\\[(\\w+)\\]\\s+(.*)",
            "source_key": "content"
        },
        "type": "processor_regex"
    }, {
        "detail": {
            "expand_connector": ".",
            "expand_depth": 4,
            "keep_source": true,
            "source_key": "jsonmsg"
        },
        "type": "processor_json"
    }, {
        "detail": {
            "keep_source": true,
            "keep_source_if_parse_error": true,
            "keys": [
                "key1",
                "key2",
                "key3"
            ],
            "source_key": "0508.sign",
            "split_sep": ",",
            "split_type": "char"
        },
        "type": "processor_split_string"
    }, {
        "detail": {
            "keep_source": true,
            "keep_source_if_parse_error": true,
            "keys": [
                "a1",
                "a2",
                "a3"
            ],
            "regex": "^(\\w+)(?:[^ ]* ){1}(\\w+)(?:[^ ]* ){2}([^\\$]+)",
            "source_key": "key1"
        },
        "type": "processor_regex"
    }
]
The following describes the plug-in configuration and parsing results of the example.
- Copy the raw log example to the Log Example box under Combined Parsing.
Raw log example (for reference only):
2025-03-19:16:49:03 [INFO] [thread1] {"ref":"https://www.test.com/","curl":"https://www.test.com/so/search?spm=1000.1111.2222.3333&q=linux%20opt%testabcd&t=&u=","sign":"1234567890","pid":"so","0508":{"sign":"112233445566 English bb Error, INFO, error bb&&bb","float":15.25,"long":15},"float":15.25,"long":15}Figure 29 Log example
- In the analysis result of the raw log example, the log time is 2025-03-19:16:49:03, the log level is [INFO], the thread ID is [thread1], and the log content is a complete JSON object as follows:
{"ref":"https://www.test.com/","curl":"https://www.test.com/so/search?spm=1000.1111.2222.3333&q=linux%20opt%testabcd&t=&u=","sign":"1234567890","pid":"so","0508":{"sign":"112233445566 English bb Error, INFO, error bb&&bb","float":15.25,"long":15},"float":15.25,"long":15} - Extract logs based on the log time, log level, thread ID, and log content. Each part is separated by spaces. However, the JSON text may also contain spaces. Therefore, the delimiter plug-in is not used for extraction. The regular expression extraction plug-in (processor_regex) is used for extraction.
Regular expression examples:
For extracting the log time as nowtime: (\d{4}-\d{2}-\d{2}:\d{2}:\d{2}:\d{2})
For extracting the log level as level: \[(\w+)\]
For extracting the thread ID as thread: \[(\w+)\]
For extracting the log content as jsonmsg: (.*)
These regular expressions are separated by spaces to form a complete extraction regular expression: (\d{4}-\d{2}-\d{2}:\d{2}:\d{2}:\d{2})\s+\[(\w+)\]\s+\[(\w+)\]\s+(.*)
The processor_regex plug-in is configured as follows. Replace the value of regex with your regular expression, and replace \ in the regular expression with \\ for escape.[{ "detail": { "keys": ["nowtime", "level", "thread", "jsonmsg"], "regex": "(\\d{4}-\\d{2}-\\d{2}:\\d{2}:\\d{2}:\\d{2})\\s+\\[(\\w+)\\]\\s+\\[(\\w+)\\]\\s+(.*)", "source_key": "content" }, "type": "processor_regex" }] - Copy the configuration content to the Plug-in Settings box and click Verify. The extraction result will be displayed under Extraction Results, showing that the keys and values are correctly extracted.
- You can use the JSON plug-in (processor_json) to expand the log content (jsonmsg) in JSON format. (Separate each pair of braces ({}) with commas (,).)
, {
        "detail": {
            "expand_connector": ".",
            "expand_depth": 4,
            "keep_source": true,
            "source_key": "jsonmsg",
            "source_location": 8
        },
        "type": "processor_json"
    }
Add the JSON plug-in (processor_json) to the end of the regular expression extraction plug-in (processor_regex) configuration, and click Verify. The extraction result will be displayed.
- To split the 0508.sign field extracted from JSON, you can use the delimiter parsing plug-in (processor_split_string) to split the field using commas (,) and extract the key1, key2, and key3 fields.
,{
        "detail": {
            "keys": [
                "key1",
                "key2",
                "key3"
            ],
            "source_key": "0508.sign",
            "split_sep": ",",
            "split_type": "char"
        },
        "type": "processor_split_string"
    }
Add the delimiter parsing plug-in (processor_split_string) to the end of the JSON plug-in (processor_json) configuration, and click Verify. The key1, key2, and key3 fields will be displayed under Extraction Results.
- You can also use the regular expression extraction plug-in processor_regex to extract fields such as a1, a2, and a3 from key1.
, {
        "detail": {
            "keep_source": true,
            "keep_source_if_parse_error": true,
            "keys": [
                "a1",
                "a2",
                "a3"
            ],
            "regex": "^(\\w+)(?:[^ ]* ){1}(\\w+)(?:[^ ]* ){2}([^\\$]+)",
            "source_key": "key1"
        },
        "type": "processor_regex"
    }
Add the regular expression extraction plug-in (processor_regex) configuration to the end of the delimiter parsing plug-in (processor_split_string) configuration, and click Verify. The a1, a2, and a3 fields will be displayed under Extraction Results.
- Copy the raw log example to the Log Example box under Combined Parsing.
Custom Time
You can enable Custom Log Time to display the custom log time on the Log Search tab page. For details about how to set parameters, see Table 17. If Custom Log Time is disabled, the log collection time is displayed as the log time on the Log Search tab page.
Table 19 lists common time standards, examples, and expressions.
|
Parameter |
Description |
Example Value |
|---|---|---|
|
Key Name of the Time Field |
Name of an extracted field. You can select an extracted field from the drop-down list. The field is of the string or long type. |
test |
|
Field Value |
For an extracted field, after you select a key, its value is automatically filled in. |
2023-07-19 12:12:00 |
|
Time Format |
By default, log timestamps in LTS are accurate to seconds. You do not need to configure information such as milliseconds and microseconds. For details, see Table 18.
|
yyyy-MM-dd HH:mm:ss |
|
Operation |
Click the verification icon ( |
- |
|
Format |
Description |
Example Value |
|---|---|---|
|
EEE |
Abbreviation for a day of the week. |
Fri |
|
EEEE |
Full name for a day of the week. |
Friday |
|
MMM |
Abbreviation for a month. |
Jan |
|
MMMM |
Full name for a month. |
January |
|
dd |
Day of the month, ranging from 01 to 31 (decimal). |
07, 31 |
|
HH |
Hour, in 24-hour format. |
22 |
|
h |
Hour, in 12-hour format. |
11 |
|
MM |
Month, ranging from 01 to 12 (decimal). |
08 |
|
mm |
Minute, ranging from 00 to 59 (decimal). |
59 |
|
a |
a.m. or p.m. |
am or pm |
|
h:mm:ss a |
Time, in 12-hour format. |
11:59:59 am |
|
HH:mm |
Hour and minute. |
23:59 |
|
ss |
Number of the second, ranging from 00 to 59 (decimal). |
59 |
|
yy |
Year without century, ranging from 00 to 99 (decimal). |
04 or 98 |
|
yyyy |
Year (decimal). |
2004 or 1998 |
|
d |
Day of the month, ranging from 1 to 31 (decimal). |
7 or 31 |
|
%s |
Unix timestamp. |
147618725 |
|
Example |
Time Expression |
Time Standard |
|---|---|---|
|
2022-07-14T19:57:36+08:00 |
yyyy-MM-dd'T'HH:mm:ssXXX |
Custom |
|
1548752136 |
%s |
Custom |
|
27/Jan/2022:15:56:44 |
dd/MMM/yyyy:HH:mm:ss |
Custom |
|
2022-07-24T10:06:41.000 |
yyyy-MM-dd'T'HH:mm:ss.SSS |
Custom |
|
Monday, 02-Jan-06 15:04:05 MST |
EEEE, dd-MMM-yy HH:mm:ss Z |
RFC850 |
|
Mon, 02 Jan 2006 15:04:05 MST |
EEE, dd MMM yyyy HH:mm:ss Z |
RFC1123 |
|
02 Jan 06 15:04 MST |
dd MMM yy HH:mm Z |
RFC822 |
|
02 Jan 06 15:04 -0700 |
dd MMM yy HH:mm Z |
RFC822Z |
|
2023-01-02T15:04:05Z07:00 |
yyyy-MM-dd'T'HH:mm:ss Z |
RFC3339 |
|
2022-12-11 15:05:07 |
yyyy-MM-dd HH:mm:ss |
Custom |
|
2025-02-24T05:24:07.085Z |
yyyy-MM-dd'T'HH:mm:ss.SSSZ |
Custom |
Feedback
Was this page helpful?
Provide feedbackThank you very much for your feedback. We will continue working to improve the documentation.See the reply and handling status in My Cloud VOC.
For any further questions, feel free to contact us through the chatbot.
Chatbot

