

Configuring Custom Policies for FlexusL Self-Service O&M
Scenarios
FlexusL self-service O&M (such as online password reset) depends on Cloud Operations Center (COC). You need to enable and authorize COC first. After COC is enabled and authorized, two agencies "ServiceLinkedAgencyForCOC" and "ServiceAgencyForCOC" will be created and granted permissions required to perform operations on FlexusL instances through COC. For details, see Enabling COC.
If you want to perform self-service O&M on FlexusL instances as an IAM user, contact the account that the IAM user belongs to so the account can assign COC permissions to the user.
This section describes how to assign COC permissions to an IAM user.
Prerequisites
The IAM user has been granted FlexusL permissions.

If the assigned FlexusL permissions do not meet your requirements, assign permissions to the IAM user by referring to Granting Permissions to Use FlexusL Instances Through IAM.
Procedure
- Access the Policies/Roles page using the account that the IAM user belongs to.
- In the upper right corner of the page, click Create Custom Policy and assign COC permissions.
For details, see Creating a Custom Policy.
The following example describes how to add a custom policy for enabling COC and performing operations on COC.
- (Optional) Create a custom policy named Enable COC and assign the following permissions:
If the account that the IAM user belongs to has enabled COC, you can skip this step.
{ "Version": "1.1", "Statement": [ { "Effect": "Allow", "Action": [ "iam:agencies:list*", "iam:agencies:createAgency", "iam:agencies:createServiceLinkedAgencyV5", "coc:agency:get", "coc:agency:create", "iam:permissions:grantRoleToAgency", "iam:permissions:grantRoleToAgencyOnDomain", "iam:roles:listRoles" ] } ] } - Create a custom policy named COC Operations and assign the following permissions:
{
    "Version": "1.1",
    "Statement": [
        {
            "Effect": "Allow",
            "Action": [
                "coc:instance:listResources",
                "coc:application:listResources",
                "coc:schedule:list",
                "coc:schedule:enable",
                "coc:schedule:update",
                "coc:schedule:disable",
                "coc:schedule:approve",
                "coc:schedule:create",
                "coc:schedule:delete",
                "coc:schedule:count",
                "coc:schedule:get",
                "coc:schedule:getHistories",
                "coc:application:GetDiagnosisTaskDetails",
                "coc:application:CreateDiagnosisTask",
                "coc:document:create",
                "coc:document:listRunbookAtomics",
                "coc:document:getRunbookAtomicDetails",
                "coc:document:list",
                "coc:document:delete",
                "coc:document:update",
                "coc:document:get",
                "coc:document:analyzeRisk",
                "coc:instance:autoBatchInstances",
                "coc:instance:executeDocument",
                "coc:instance:start",
                "coc:instance:reboot",
                "coc:instance:stop",
                "coc:job:action",
                "coc:instance:reinstallOS",
                "coc:instance:changeOS",
                "coc:hostAccount:describe",
                "coc:instance:syncResources"
            ]
        }
    ]
}
- (Optional) Create a custom policy named Enable COC and assign the following permissions:
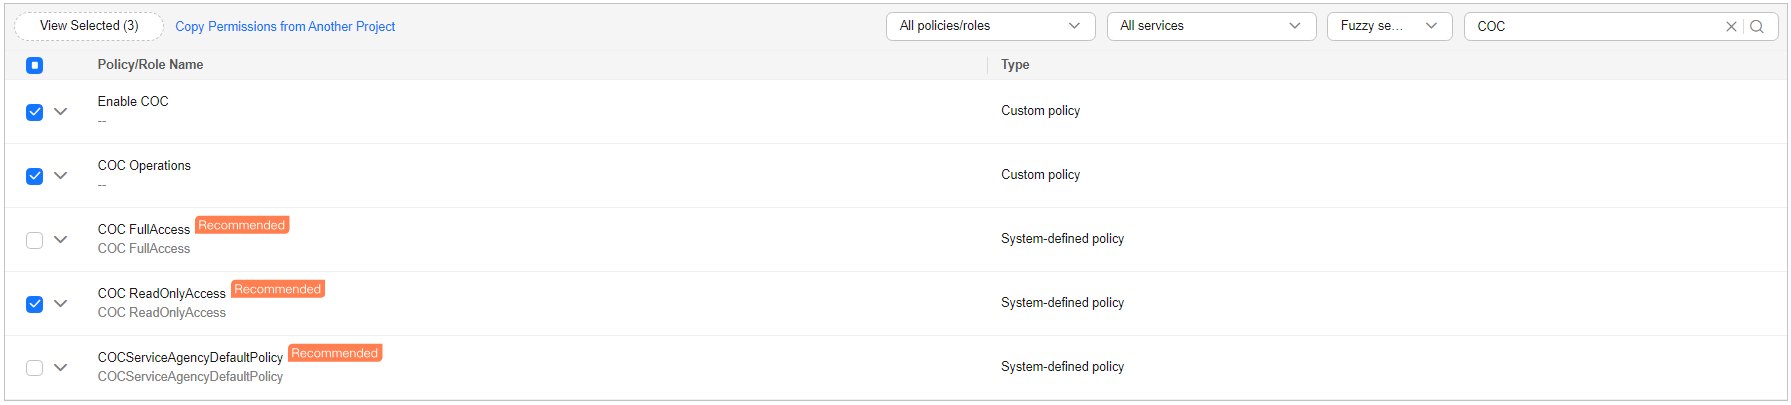
- Create a user group and assign COC permissions to it.
For details, see Creating a User Group and Assigning Permissions.
Assign the following permissions to the user group:
- COC ReadOnlyAccessPolicy
- Custom policy created in 2 for enabling COC and performing operations on COC
Figure 1 Assigning permissions to the user group
- On the Users page of the IAM console, locate the target user and click Authorize in the Operation to assign COC permissions to the user.
For details, see Assigning Permissions to an IAM User.
On the displayed page, select the user group created in 3 so that the user inherits permissions from the group.
What is your overall rating for this page?
Thank you very much for your feedback. We will continue working to improve the documentation.See the reply and handling status in My Cloud VOC.
For any further questions, feel free to contact us through the chatbot.
Chatbot


