
Using HSS to Improve Server Login Security
Scenario
Account and password cracking are the most commonly used ways for attackers to intrude or attack servers. Enhancing login security is the first step to protect server security and ensure that services can run properly.
This section describes how to use HSS to improve server login security.
Solution Architecture and Advantages
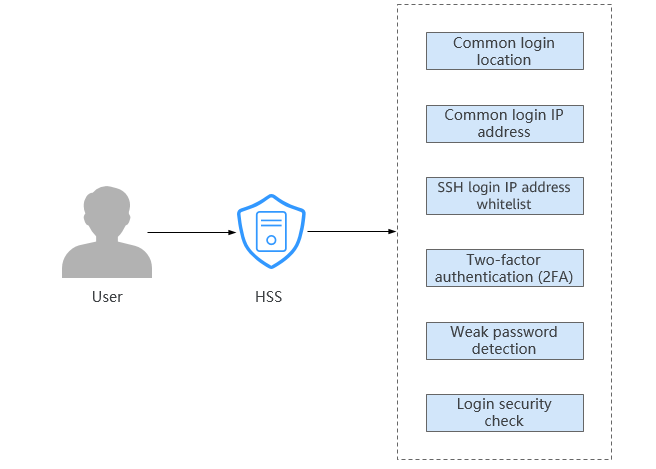
You can configure common login locations, common login IP addresses, SSH login IP address whitelist, two-factor authentication, weak password check, and login security check to protect login security.
- Common login location
After you configure common login IP addresses, HSS will generate alarms on the logins from other login IP addresses.
- Common login IP address
After you configure common login IP addresses, HSS will generate alarms on the logins from other login IP addresses.
- SSH login IP address whitelist
The SSH login whitelist controls SSH access to servers, preventing account cracking.
- Two-factor authentication (2FA)
2FA requires users to provide verification codes before they log in. The codes will be sent to their mobile phones or email boxes.
- Weak password detection
Weak passwords are not attributed to a certain type of vulnerabilities, but they bring no fewer security risks than any type of vulnerabilities. Data and programs will become insecure if their passwords are cracked.
HSS proactively detects the accounts using weak passwords and generates alarms for the accounts. You can also add a password that may have been leaked to the weak password list to prevent server accounts from using the password.
- Login security check
After login security detection policy is configured, you can enable login security check for the target server. HSS will effectively detect brute force attacks, automatically block brute force IP addresses, and trigger and report alarms.
Prerequisites
HSS Professional, Enterprise, Premium, Web Tamper Protection, or Container Edition has been enabled for the server. For details, see HSS Access Overview.
Limitations and Constraints
- 2FA
- If 2FA is enabled, it can be used only in following scenarios:
- Linux: The SSH password is used to log in to an ECS, and the OpenSSH version is earlier than 8.
- Windows: The RDP file is used to log in to a Windows ECS.
- When two-factor authentication is enabled for Windows servers, the User must change password at next logon function is not allowed. To use this function, disable two-factor authentication.
- On a Windows server, 2FA may conflict with G01 and 360 Guard (server edition). You are advised to stop them.
- If 2FA is enabled, it can be used only in following scenarios:
- SSH login IP address whitelist
- The SSH IP address whitelist does not apply to the servers running Kunpeng EulerOS (EulerOS with Arm).
- After you configure the whitelist, SSH logins will be allowed only from whitelisted IP addresses.
- Before enabling this function, ensure that all IP addresses that need to initiate SSH logins are added to the whitelist. Otherwise, you cannot remotely log in to your server using SSH.
If your service needs to access a server, but not necessarily via SSH, you do not need to add its IP address to the whitelist.
- Exercise caution when adding an IP address to the whitelist. HSS will no longer restrict access from this IP address to your servers.
- Before enabling this function, ensure that all IP addresses that need to initiate SSH logins are added to the whitelist. Otherwise, you cannot remotely log in to your server using SSH.
Procedure
- Log in to the HSS console.
- Click
 in the upper left corner and select a region or project.
 - Configure common login locations.
An account can add up to 10 common login locations.
- In the navigation pane, choose .
- Click the Security Configuration tab page and click Common Login Locations.
- Click Add Common Login Location.
Figure 2 Adding a common login location

- In the dialog box, select the common login location to be added and the server where the common login location takes effect. After confirming that the information is correct, click OK.
You can select multiple servers where the common login location takes effect.Figure 3 Configuring common login locations

- Return to the Common Login Locations sub-tab and check the added common login locations.
- Configure common login IP addresses.
An account can add up to 20 common login IP addresses.
- Click the Security Configuration tab page and click Common Login IP Addresses.
- Click Add Common Login IP Addresses.
Figure 4 Adding a common login IP address

- In the dialog box that is displayed, enter a common login IP address and select servers. Confirm the information and click OK.
- Common login IP address: Enter one EIP or IP address segment at a time. To add multiple values, repeat this operation until all of them are added.
- Servers: You can select multiple servers to apply the setting.
Figure 5 Entering a common login IP address
- Return to the Common Login IP Addresses sub-tab and check the added common login IP addresses.
- Configure an SSH login IP address whitelist.
- Click the Security Configuration tab page and click SSH IP Whitelist.
- Click Add IP Address.
Figure 6 Configuring an IP address whitelist

- In the dialog box that is displayed, enter an IP address to be added to the whitelist and select servers. Confirm the information and click OK.
- Whitelist IP address: Enter one IP address or IP address segment at a time. To add multiple values, repeat this operation until all of them are added. Up to 10 IP addresses or IP address segments can be added.
- Servers: You can select multiple servers to apply the setting.
Figure 7 Entering an IP address
- Return to the SSH IP Whitelist sub-tab and check the added IP whitelist.
- Configure 2FA.
- Click the Two-Factor Authentication tab page.
- Click Enable 2FA in the Operation column of a server.
Select servers and click Enable 2FA to enable 2FA for the servers at a time.Figure 8 Enabling 2FA

- In the dialog box, select the authentication mode.
- SMS/Email
You need to select an SMN topic for SMS and email verification.
- The drop-down list displays only notification topics that have been confirmed.
- If there is no topic, click View to create one. For details, see Creating a Topic.
- If your topic contains multiple mobile numbers or email addresses, during two-factor authentication,
- If you use a mobile phone number for verification, all the endpoints (mobile numbers and email addresses) in the topic will receive a verification code.
- If you use an email address for verification, only this address will receive a verification code.
You can delete the mobile numbers and email addresses that do not need to receive verification messages.
Figure 9 SMS/Email verification
- Verification code
Use the verification code you receive in real time for verification.Figure 10 Setting Method to Verification code

- SMS/Email
- Click OK.
- Return to the Two-Factor Authentication tab. Check whether the 2FA Status of the target server changes to Enabled.
It takes about 5 minutes for the 2FA settings to take effect.
When you use a Windows server with 2FA enabled to remotely log in to another Windows server, you need to manually add credentials on the Windows server with 2FA enabled. Otherwise, the remote login will fail.
To add credentials, choose Start > Control Panel, and click User Accounts. Click Manage your credentials and then click Add a Windows credential. Add the username and password of the remote server that you want to access.
- Configure weak password detection.
- In the navigation pane on the left, choose .
- In the upper right corner of the page, click Policies.
- Determine the policy to be edited based on the OS type and policy name.
After HSS is enabled for a server, a default baseline check policy is automatically bound to the server. By default, the servers protected by the basic or professional edition are bound to a basic policy, and those protected by the enterprise edition or higher are bound to an advanced policy.
- For a server protected by the basic or professional edition, select a basic policy.
- For a server protected by the enterprise edition or higher, you can create a custom policy. If you have not created any custom baseline check policies, simply select an advanced policy. If you have created a custom policy and bound it to the server, select that policy.
- In the Operation column of a policy, click Edit to go to the Edit Policy page.
- Modify the policy as needed. For more information, see Table 1.
- Confirm the policy settings and click Next.
- Select the servers where the policy is to be applied. Click OK.
HSS will check for weak passwords on servers based on the policy.
- Configure login security checks.
- Click Login Security Check. The Login Security Check dialog box is displayed.
- Modify the parameters in the Policy Settings based on the site requirements. For details about the parameters, see Table 2.
Figure 11 Modifying the security check policy

Table 2 Parameter description Parameter
Description
Fast Brute-force Attack
Rule for determining a fast brute-force attack.
- Consecutive Login interval: Enter an integer in the range 10 to 180, in the unit of seconds. The default value is 30.
- Consecutive login failures: Enter an integer in the range 3 to 30. The default value is 5.
Slow Brute-force Attack
Rule for determining a slow brute-force attack.
- Consecutive Login interval: Enter an integer in the range 1,800 to 7,200, in the unit of seconds. The default value is 3600.
- Consecutive login failures: Enter an integer in the range 10 to 60. The default value is 15.
Action
- Report alarm: An alarm is generated for a brute-force attack, but the IP address of the brute-force attack is not blocked.
- Report alarm and block IP: An alarm is generated for a brute-force attack, and the IP address of the brute-force attack is blocked. Note: If the software in a container is attacked, the IP address of the brute-force attack is not automatically blocked. Only an alarm is generated.
IP Address Blocking Time
IP address blocking duration, ranging from 1 to 525,600. A blocked IP address cannot be used for login within the duration. After the duration ends, the IP address is automatically unblocked. The default value is 720 minutes.
IP Address Whitelist
After an IP address is added to the whitelist, HSS does not block brute-force attacks from the IP address in the whitelist. A maximum of 50 IP addresses or network segments can be added to the whitelist. Both IPv4 and IPv6 addresses are supported.
Brute-force Attack Alarm on Whitelisted IP
If it is enabled, the system generates alarms for brute-force attacks from whitelisted IP addresses, but does not block the IP addresses.
Login Audit
After this function is enabled, the system reports successful SSH logins, detects remote logins, and generates alarms for remote logins.
- Confirm the information and click OK.
HSS will perform login security detection on the server based on the configured policies.
Feedback
Was this page helpful?
Provide feedbackThank you very much for your feedback. We will continue working to improve the documentation.See the reply and handling status in My Cloud VOC.
For any further questions, feel free to contact us through the chatbot.
Chatbot


