Procedure
Prerequisites
- You have created a VPC and a default subnet.
- You have purchased an RDS for MySQL DB instance, created a database, and ensured that the database contains available tables. The RDS instance must be in the same region as the function. This practice uses CN East-Shanghai1 as an example.
- You have created an agency with the VPC Administrator permission.
Step 1: Creating Function Dependencies
|
Dependency Package |
Description |
Link |
|---|---|---|
|
pymysql |
MySQL database connector compiled using Python, which enables Python programs to communicate with MySQL databases. |
|
|
DBUtils |
Database connection pool tool package, which can manage and reuse database connections. |
- Log in to the FunctionGraph console and select CN East-Shanghai1 region.
- Log in to the FunctionGraph console, and choose Functions > Dependencies in the navigation pane.
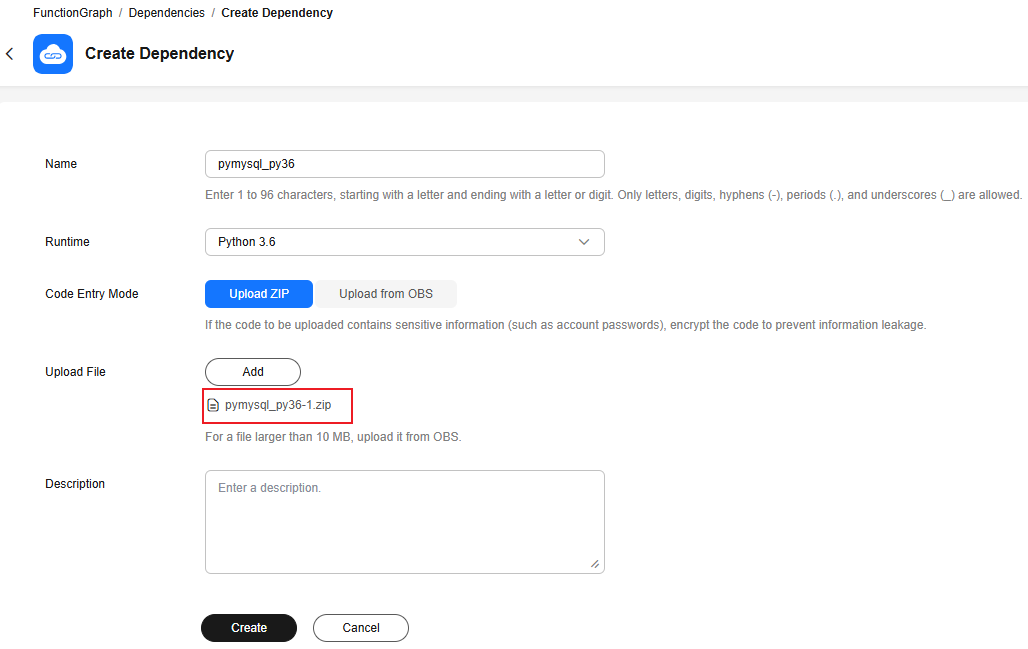
- Click Create Dependency. On the displayed page, create the pymysql_py36 and dbutils_py36 dependencies by referring to Table 2.
The pymysql dependency is used as an example, as shown in Figure 1. The parameters for the dbutils dependency are the same.
Table 2 Parameters for creating a dependency Parameter
Value
Description
Name
pymysql_py36
Dependency name.
The value can contain a maximum of 96 characters, including letters, digits, underscores (_), periods (.), and hyphens (-). Start with a letter and end with a letter or digit.
Runtime
Python 3.6
Runtime language of the dependency.
Code Entry Mode
Upload ZIP
You can upload a ZIP file or upload a ZIP file from OBS.
- Upload ZIP: Click Add to upload a ZIP file. The maximum file size is 10 MB.
- Upload from OBS: Specify an OBS link URL. For details about how to upload an object to OBS, see Uploading an Object. For details about how to obtain the OBS link URL, see Accessing an Object Using a URL.
Upload File
Click Add and upload the ZIP package downloaded in Table 1.
This parameter is displayed after you select Upload ZIP.
Description
-
Enter a description of the dependency.
Step 2: Creating a Function
- Return to the FunctionGraph console. In the navigation pane, choose Functions > Function List, and click Create Function.
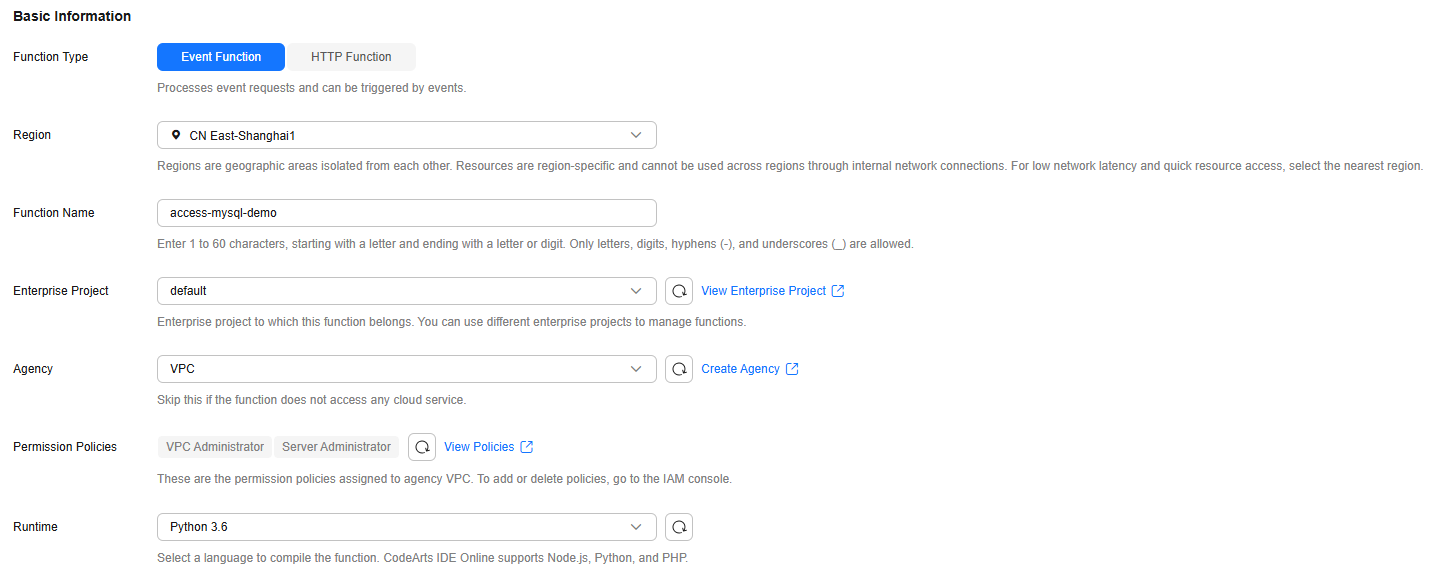
- Set the basic information about the function by referring to Table 3, as shown in Figure 2.
Table 3 Basic information for creating a function Parameter
Example Value
Description
Function Type
Event Function
An event function is triggered by a specific event, which is usually a request event in JSON format.
Region
CN East-Shanghai1
Select the region where the function is located. This practice uses the CN East-Shanghai1 region as an example.
Function Name
access-mysql-demo
Enter a function name. The naming rules are as follows:
- Consists of 1 to 60 characters, and can contain letters, digits, hyphens (-), and underscores (_).
- Starts with a letter and end with a letter or digit.
Enterprise Project
default
Select the enterprise project to which the function belongs. Enterprise projects let you manage cloud resources and users by project.
The default value is default. You can select the created enterprise project.
If the Enterprise Management service is not enabled, this parameter is unavailable. For details, see Enabling the Enterprise Project Function.
Agency
VPC
Select an agency for the function. An agency is used to authorize FunctionGraph to access other cloud services.
In this practice, the function needs to access resources in a VPC. Therefore, you need to select an agency with the VPC Administrator permission.
Runtime
Python 3.6
Select a runtime to compile the function. This practice uses Python 3.6 as an example.
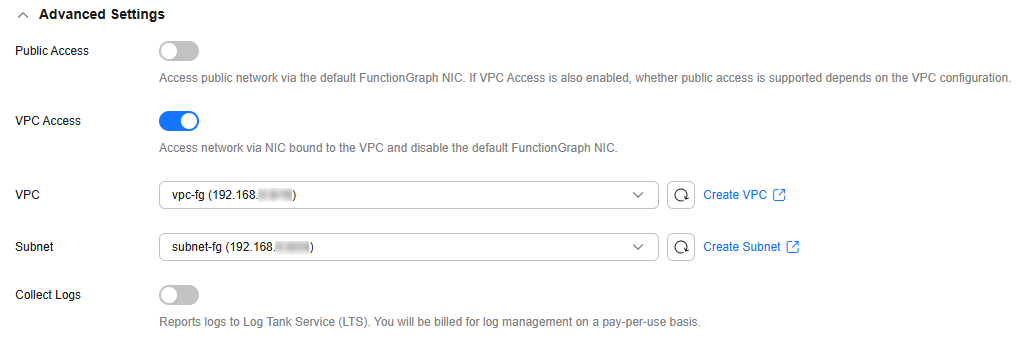
- Configure the advanced settings by referring to Table 4, and click Create Now, as shown in Figure 3.
Table 4 Advanced settings for creating a function Parameter
Example Value
Description
Public Access
Disabled
If this feature is enabled, functions can access services on the public network through the default NIC. The public network access bandwidth is shared among users and applies only to test scenarios.
VPC Access
Enabled
- VPC: vpc-fg (192.168.x.x/x)
- Subnet: subnet-fg (192.168.x.x/x)
After this feature is enabled, you can select the VPC and subnet that the function needs to access. Select the same VPC as the created RDS instance.
If this feature is enabled, functions will use the NIC bound to the configured VPC for network access, and the default NIC of FunctionGraph will be disabled. That is, the Public Access parameter does not take effect.
Collect Logs
Disabled
After it is enabled, logs generated during function execution will be reported to LTS.
LTS will be billed on a pay-per-use basis. For details, see LTS Pricing Details.
Step 3: Configuring the Function
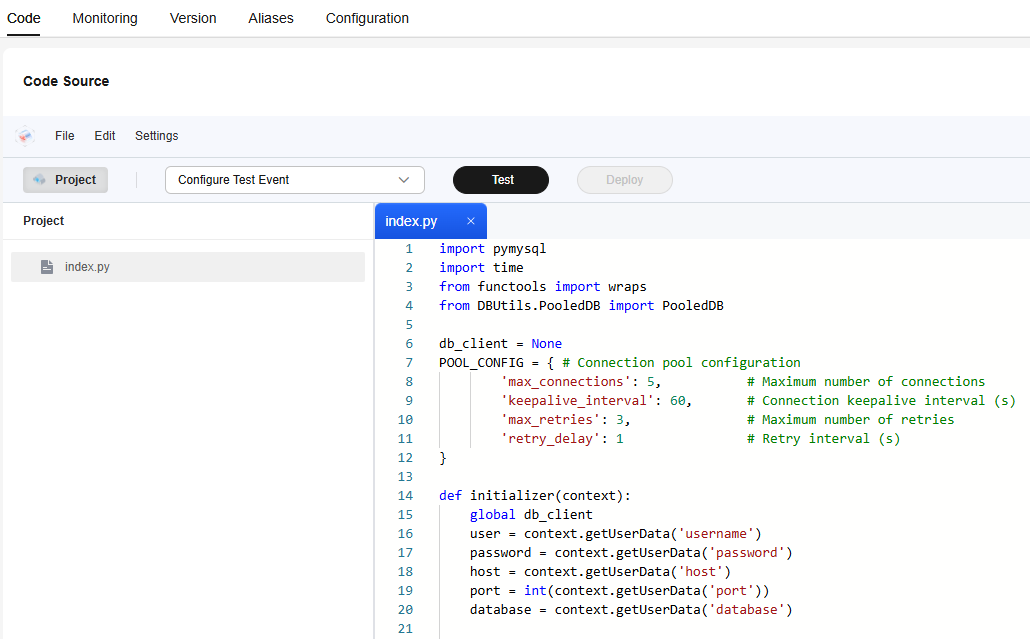
- On the function details page, copy Sample Code for Accessing RDS for MySQL, as shown in Figure 4, paste it to the inline editor to overwrite the code in the index.py file, and click Deploy.

The sample code in this practice queries the first 10 records from the user table in the RDS for MySQL database. Modify the code according to the actual table name in your database.
- On the Code tab page, scroll to the Dependencies area at the bottom of the page and click Add.
- In the Select Dependency dialog box, set Type to Private, and add the pymysql_py36 and dbutils_py36 dependencies created in Step 1: Creating Function Dependencies, as shown in Figure 5.
- After the dependencies are added, the page shown in Figure 6 is displayed.
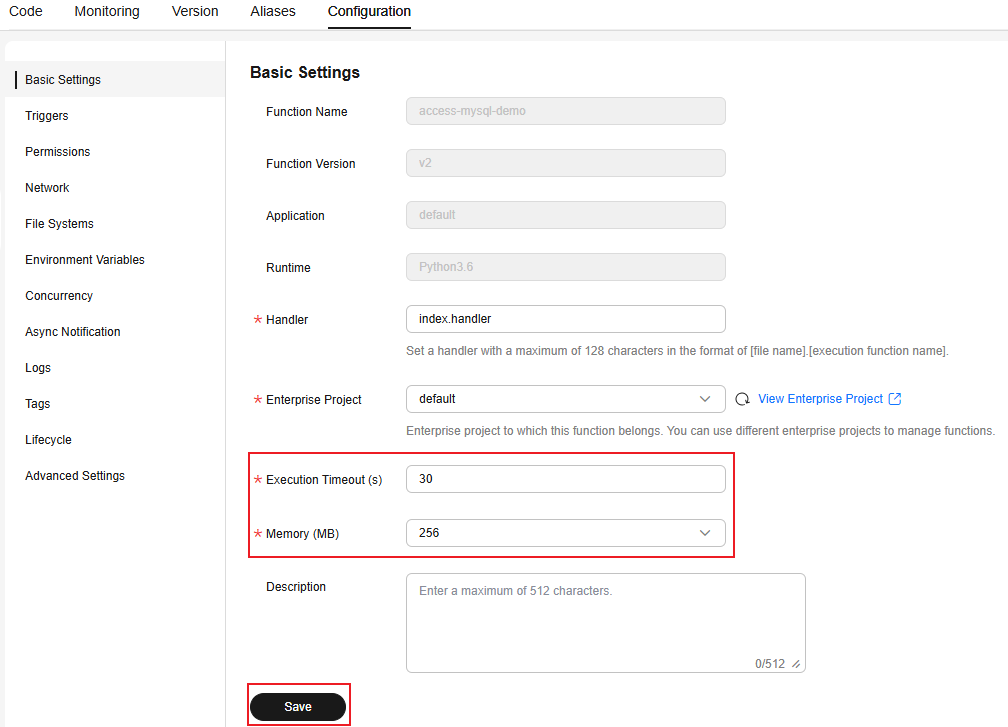
- Choose Configuration > Basic Settings, set Execution Timeout (s) to 30 and Memory (MB) to 256, and click Save.
Figure 7 Configuring basic settings
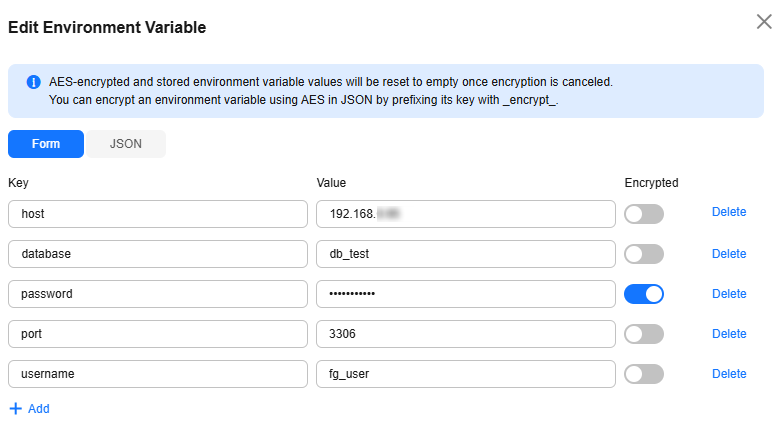
- Choose Configuration > Environment Variables, and click Edit Environment Variable. In the dialog box that is displayed, click Add. Add environment variables by referring to Table 5. After the environment variables are added, the page shown in Figure 8 is displayed. Click OK.
Table 5 Environment variables Key
Example Value
Description
host
192.168.x.x
Access address of the database instance.
- For RDS databases in the same VPC as the function, set this environment variable to the private IP address of the database.
- For RDS databases in different VPCs or regions, set this environment variable to the public IP address of the database.
On the RDS console, go to the details page of the target RDS instance, choose Connectivity & Security in the navigation pane, and obtain the private or public IP address of the database.
database
db_test
Name of the database created in the RDS instance.
password
******
Database password set in the RDS instance.
The password is sensitive information. You are advised to enable encryption.
port
3306
Database port set in the RDS instance.
username
fg_user
Name of the account created in the RDS instance.
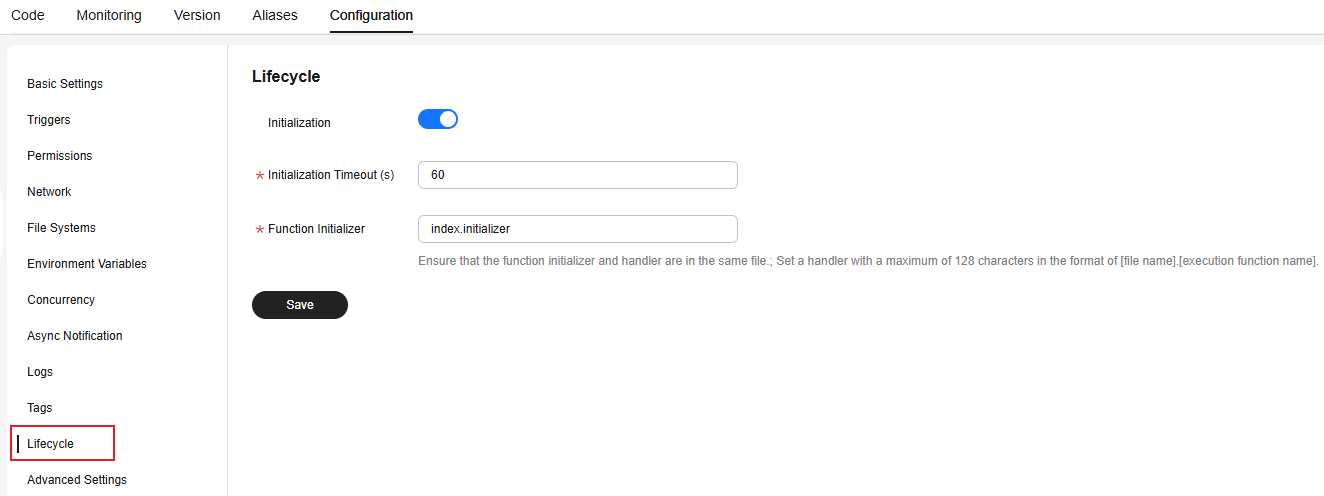
- Choose Configuration > Lifecycle, enable Initialization, set Initialization Timeout (s) to 60 and Function Initializer to index.initializer, as shown in Figure 9, and click Save.
Step 4: Testing the Function
- Return to the Code tab page and click Test. In the displayed dialog box, select Blank Template, and click Create.
- Click Test to view the function execution result, as shown in Figure 10.
Feedback
Was this page helpful?
Provide feedbackThank you very much for your feedback. We will continue working to improve the documentation.See the reply and handling status in My Cloud VOC.
For any further questions, feel free to contact us through the chatbot.
Chatbot

