

Snapshot Capturing
Functions
- Taking snapshots by time interval: The system takes snapshots at regular intervals from the first frame to the last frame. The interval cannot exceed 12 seconds.
- Taking snapshots at fixed time: The system takes snapshots at fixed time points. A maximum of 10 time points can be configured for a video.
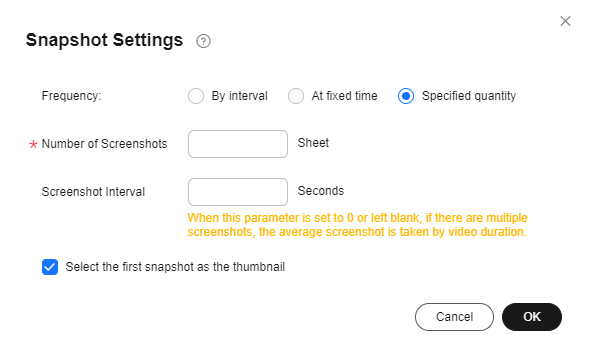
- Taking snapshots by total count: The system takes snapshots at equal intervals throughout video based on the specified count.
Constraints
- You can take snapshots from an MP4, TS, MOV, MXF, FLV, MPG, WMV, AVI, M4V, F4V, MPEG, 3GP, ASF, MKV, WEBM, RMVB, VOB, RM, MTS, DV, DAT, QT, M2T, or SWF video.
- Snapshots are saved as JPG files.
- By default, the system operates in the single-snapshot mode. That is, only the most recent snapshot task and its results are displayed for a video, and historical snapshots are overwritten. Consequently, Figure 4 only displays the latest snapshot task.
- To retain all snapshot tasks and their snapshot results, you need to submit a service ticket to enable the multi-snapshot support. Then Figure 4 will display all snapshot tasks. Note the following when using the multi-snapshot function:
- A maximum of 2,000 snapshot tasks can be created for a single media asset.
- If two snapshot tasks for the same media asset share identical parameters, the system will only retain the latest snapshots and overwrite the historical ones by default.
- To query the snapshots captured by a single-snapshot task, you can call the Querying a Media Asset API. The Querying Snapshot Details API is used to query snapshots captured by a multi-snapshot task.
Procedure
- Log in to the VOD console.
- In the navigation pane, choose Video Processing > Snapshots.
- Locate the target video file and click Create Snapshot Task in the Operation column. You can also select multiple video files and click Create Snapshot Task above the list.
- Configure video snapshot parameters.
Snapshots can be taken at a specified interval, at a specified time point, or at a specified quantity.
- By interval Figure 1 Snapshot settings

- At fixed time Figure 2 Snapshot settings

- Specified quantity Figure 3 Snapshot settings
- By interval
- Click OK.
If video status changes to Captured, snapshots have been captured.
- After snapshots are captured, click Details in the Operation column to view snapshot details, as shown in Figure 4.
You can view the video name, media asset ID, media asset category, current thumbnail, and snapshot task list.
- View the list of all snapshot tasks created for the video file.
You can perform the following operations on a snapshot task:
- Click Preview in the row of the task to open the Task Details page, as shown in Figure 5.
You can view the ID, snapshot type, and all snapshots of the snapshot task. You can select a snapshot as the thumbnail. The new thumbnail takes effect in 3 to 5 minutes.
A maximum of 20,000 snapshots can be previewed. To display more snapshots, submit a service ticket.
- Click Delete in the row of the task to delete the task.
- Click Preview in the row of the task to open the Task Details page, as shown in Figure 5.


What is your overall rating for this page?
Thank you very much for your feedback. We will continue working to improve the documentation.See the reply and handling status in My Cloud VOC.
For any further questions, feel free to contact us through the chatbot.
Chatbot


