
Configuring a Test Plan
In the development phase, CodeArts TestPlan helps test teams formulate comprehensive and detailed test plans based on project requirements and product features.
Test tasks are split and assigned to testers with deadlines. As the testing goes as planned, team members can track the progress of tasks, such as the number of test cases completed and being executed. Test results, including the quantity, type, and severity of bugs, are recorded for timely analysis so that testers can make adjustments and keep the testing process smooth and efficient. This provides a solid guarantee for product quality.
The typical testing process involves creating a test plan, designing tests, executing them, and generating a test report.
- In the test planning and design stages, define the test scope and objectives, and develop strategies, tools, environments, models, test cases, and automated test scripts.
- A test plan specifies the test time, scope, and objectives, and manages all test activities. It can be specific to a version, sprint, or project.
Prerequisites
You have obtained the permissions to create and modify test plans in the target project. For details, see Table 1.
Constraints
For Scrum and IPD projects, work items that can be added as requirements to test plans include epics, features, and stories.
For Kanban projects, the default requirement work items can be added to test plans as requirements.
Creating a Test Plan
- Access CodeArts TestPlan through a project.
- In the navigation pane, choose .
- Click Create Plan in the upper part of the page. The Create Test Plan page is displayed.
- Configure the following information and click Next.
Configuration Item
Description
Name
Name of a test plan. Describe the test scenario or function.
Enter 3 to 128 characters. Use only letters, digits, spaces, and special characters (,-_/|*&`^~;:(){}=+,×...'!@#$%.\'[]<>?"—). Do not start with a space.
Version (optional)
The version of the test plan.
Enter 3 to 32 characters of digits, letters, hyphens (-), underscores (_), and periods (.).
Processor
Select a member in the project as the processor of the test plan.
Plan Period
Select the start date and end date of the test plan.
Release (optional)
This parameter is available when the project type of the plan is IPD-Standalone Software or IPD-System Device.
Sprint (optional)
Associate the test plan with a sprint of the project.
Description (optional)
Brief description of a plan. The value contains a maximum of 1,000 bytes.
- Select the execution mode, add a requirement, and click Save.
- The execution mode selected here can be modified in the test plan later.
- The Testing Case and Testing Execution pages will show the tabs for the selected modes. Click the tabs and then handle test cases and suites for manual or automated API testing. The Quality Report page will also show relevant statistics.
- Check the test plan in the test plan list in card mode.
Editing a Test Plan
In the test plan list, click the name of the test plan to be edited. The editing window is displayed on the right of the page.
- On the Details tab page, edit the test plan (including the test plan name, description, execution mode, and basic information) and click Save.
- On the Requirements tab page, add or remove requirements within the current test plan scope. The operations are the same as those in Creating a Test Plan.
- On the Test Cases tab page, view the test cases in the plan, and add test cases from the version that the test plan belongs to.
- On the Operation History tab page, view the editing history of the test plan.
Designing a Test Plan
Design test cases, develop automated testing scripts, and prepare test data based on specified test requirements.
- Log in to the CodeArts homepage, search for your target project, and click the project name to access the project.
- In the navigation pane, choose .
- Select a test plan to be designed from the list.
- Hover over Design. The design progress is displayed, including the numbers of test cases, requirements, and covered requirements.
- Click Design to go to the Testing Case page.
- Click a required test type tab and then click Create Case to create a test case.
After a test case is created, the Design circle changes from gray to blue, indicating that the test plan is under design.
For details about how to create a test case, see related topics.
- Click the test plan name in the upper left corner of the page to switch to another test plan, or view the global test case library.
The global test case library displays all test cases of all test plans in the current version. You can maintain the global test case library as required.

Related Topics
- Creating a Manual Test Case: Create manual test cases on the Manual Test tab page.
- Creating an Automated API Test Case: Create automated API test cases on the Auto API Test tab page.
Executing a Test Plan
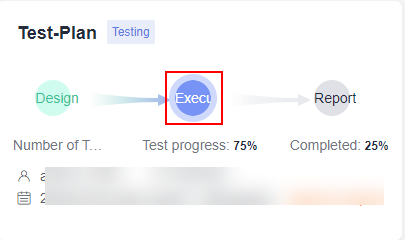
- Return to the Testing Plan page and select the test plan to be executed from the list.
- Move the cursor over Execute to view the execution progress of the test plan. Statistics include the test progress, number of executed test cases, pass rate, and completed bugs/total bugs.
- Click Execute to go to the Testing Execution page.
- Create a test suite to execute test cases in batches.
After a test case is executed, the Execute circle changes from gray to blue, indicating that the test plan is under test.
For details about test execution operations, see related topics.
- Set the status of all test cases in the test plan to Completed. Then the status of the test plan is automatically updated to Completed.
Related Topics
- Creating a Manual Test Suite: Execute multiple test cases in a test suite on the Manual Test tab page.
- Executing an Automated API Test Suite: Execute the automated API test suite on the Auto API Test tab page.
Managing and Measuring a Test Plan
- Log in to the CodeArts homepage, search for your target project, and click the project name to access the project.
- In the navigation pane, choose .
- Move the cursor over the test plan whose report you want to view, and click Report.

- View the quality report of the test plan.
- The page displays the current requirement coverage, defects, case pass rate, and case completion rate of the test plan. You can analyze and record test risks on the page.
- In the Manual Test and Auto API Test areas, statistics on the execution of test cases and the number of bugs are displayed by execution type.
- To add more reports to the page, click Add Report in the lower left corner, or click Create Report in the upper right corner.
- To switch to another test plan or view the quality report of the global test case library, click the test plan name in the upper left corner of the page and select the target plan.
Related Topics
Viewing the Test Quality Dashboard: Check the test quality dashboard. It shows the statistics on requirements and test cases in the current plan.
Feedback
Was this page helpful?
Provide feedbackThank you very much for your feedback. We will continue working to improve the documentation.See the reply and handling status in My Cloud VOC.
For any further questions, feel free to contact us through the chatbot.
Chatbot


