Querying and Downloading Binlogs
Binlogs record all DDL and DML statements (except data query statements). You can download binlogs to a local PC for further analysis.
This section describes how to enable binlog, and then query and download binlogs on the TaurusDB console.
Billing
Binlogs transferred to OBS are stored in OBS buckets. For the billing details, see How Is TaurusDB Backup Data Billed?
Binlogs stored within an instance consume the storage space of the instance. For details about the unit price of storage space, see "Storage Space Price" in TaurusDB Pricing Details.
Prerequisites
- Binlog can only be enabled when the following conditions are met:
- If the kernel version is earlier than 2.0.45.230900, set log-bin to ON. You need to reboot the instance to apply the change. For details about the impact and precautions for rebooting an instance, see Rebooting a DB Instance. You can view or change parameter values by referring to Modifying Parameters of a DB Instance.
- If the kernel version is 2.0.45.230900 or later, set rds_global_sql_log_bin to ON. The change is applied immediately. There is no need to reboot the instance.
For details about how to check the kernel version, see How Can I Check the Version of a TaurusDB Instance?
- Before viewing and downloading binlogs, you need to enable binlog by referring to Enabling Binlog.
Constraints
- To use binlogs, set log-bin or rds_global_sql_log_bin to ON.
- Enabling binlog does not affect SELECT operations, but affects INSERT, UPDATE, DELETE and other write operations. There are no significant differences between TaurusDB binlog and open-source MySQL binlog. The binlog syntax of TaurusDB is fully compatible with that of open-source MySQL.
- After binlog is enabled, the instance's binlogs are transferred to OBS. For details about how to obtain binlogs before binlog is enabled, see How Do I use mysqlbinlog to Obtain Binlog Files?
Differences Between Binlogs Stored Locally and Those Transferred to OBS
|
Item |
Binlogs Stored Locally |
Binlogs Transferred to OBS |
|---|---|---|
|
Description |
Binlogs are stored within an instance and consume its storage space. |
Binlogs are transferred to OBS for storage. They consume OBS storage space instead of the instance's. |
|
Status |
For details about how to change the parameter values, see Modifying Parameters of a DB Instance. |
By default, this function is disabled. To enable it, see Enabling Binlog. |
|
Expiration time |
The binlog_expire_logs_seconds parameter controls the expiration time. The default value is 3,600s. Binlogs that have been retained for a period longer than the value of this parameter will be automatically deleted. For details about how to change the parameter value, see Modifying Parameters of a DB Instance. |
You can set the expiration time on the management console. The default value is 7 days. For details about how to change the expiration time, see Enabling Binlog. |
|
Billing |
The binlogs consume the storage space of an instance. For details about the unit price of storage space, see "Storage Space Price" in TaurusDB Pricing Details. |
If the free space OBS provides is used up, the additional space required will be billed. For the billing details, see How Is TaurusDB Data Transferred to OBS Billed? |
Enabling Binlog and Querying and Downloading Binlogs
- Log in to the TaurusDB console.
- On the Instances page, click the instance name.
- In the navigation pane, choose Logs.
- Click the Binlog tab.
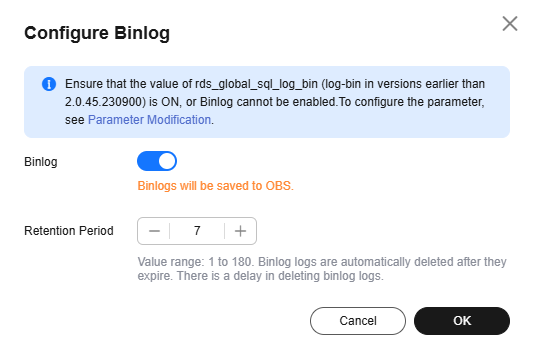
- Click Configure Binlog. In the displayed dialog box, enable Binlog and set Retention Period. The retention period ranges from 1 to 180 days.
Figure 1 Configuring binlog

- Click OK.
- Log in to the TaurusDB console.
- On the Instances page, click the instance name.
- In the navigation pane, choose Logs.
- Click the Binlog tab.
- Click Configure Binlog. In the displayed dialog box, disable Binlog.
Existing binlogs will be automatically deleted at the end of the retention period. Deleted logs cannot be restored. Exercise caution when disabling binlog.
- Click OK.
- Log in to the TaurusDB console.
- On the Instances page, click the instance name.
- In the navigation pane, choose Logs.
- Click the Binlog tab.
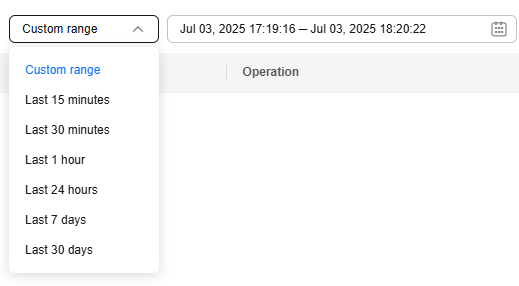
- View binlogs generated in the last 15 minutes, last 30 minutes, last 1 hour, last 24 hours, last 7 days, last 30 days, or a custom time range.
Figure 2 Selecting a time range

- Click Download in the Operation column to download a binlog to a local PC.
- View binlogs generated in the last 15 minutes, last 30 minutes, last 1 hour, last 24 hours, last 7 days, last 30 days, or a custom time range.
Feedback
Was this page helpful?
Provide feedbackThank you very much for your feedback. We will continue working to improve the documentation.See the reply and handling status in My Cloud VOC.
For any further questions, feel free to contact us through the chatbot.
Chatbot


