

Creating a Database
Scenarios
After a TaurusDB instance is created, you can create databases on it.
Constraints
- This operation is not allowed when another operation is being performed on your DB instance.
- After a database is created, the database name cannot be changed.
- An account with read-only or read/write permissions on all databases can still be granted read-only or read/write permissions on specific databases. The account's actual permissions are a combination of permissions on all and specific databases.
Procedure
- Log in to the TaurusDB console.
- Click
 in the upper left corner and select a region.
- On the Instances page, click the instance name.
- In the navigation pane, choose Databases.
- Click Create Database, configure the database and authorized account information in the displayed dialog box, and click OK. Figure 1 Creating a database

Table 1 Parameter description Parameter
Description
Database Name
The database name can consist of 1 to 64 characters. Only letters, digits, hyphens (-), and underscores (_) are allowed. The total number of hyphens (-) cannot exceed 10.
Character Set
Select a character set as required.
Authorized Account
Select one or more unauthorized accounts from the drop-down list. In the account list, select the target accounts and grant them read/write or read-only permissions on the database.
After granting permissions, you can click Revoke Permissions and then grant permissions again as needed.
If you do not have any unauthorized accounts, click Create Account, enter the required account information, and click OK.
Description
The description can consist of up to 512 characters. It cannot contain carriage returns or any of the following special characters: !<"='>&
- After the database is created, authorize or delete it on the Databases page. You can search for the desired database by character set and database name.
- Log in to the TaurusDB console.
- Click in the upper left corner and select a region.
- On the Instances page, locate an instance and click Log In in the Operation column.
- On the displayed DAS login page, enter the username and password and click Log In.
- Create a database.
You can use either of the following methods.
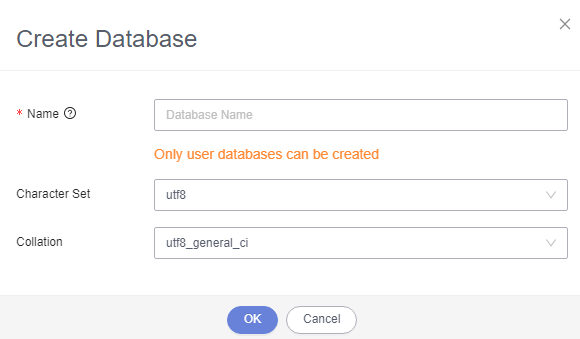
- On the home page, click Create Database. In the displayed dialog box, set the database name, character set, and collation and click OK. Figure 2 Creating a database
- Choose SQL Operations > SQL Window. In the displayed SQL window, select the target database and run the following command:
create database database_name;
- On the home page, click Create Database. In the displayed dialog box, set the database name, character set, and collation and click OK.
What is your overall rating for this page?
Thank you very much for your feedback. We will continue working to improve the documentation.See the reply and handling status in My Cloud VOC.
For any further questions, feel free to contact us through the chatbot.
Chatbot


