
Managing Component Labels
Labels are used to identify cloud resources. When you have multiple cloud resources of the same type, you can use labels to classify them based on usage, owner, or environment. Each label contains a key and a value. Labels are attached to resources in the format of "key:value".
The following describes how to manage labels of a container-deployed stateless workload. Workload labels are often used for affinity and anti-affinity scheduling. For details, see Configuring a Scheduling Policy of a Component Instance. You can add labels to multiple workloads or a specified workload.
You can manage the labels of stateless workloads, stateful workloads, and Daemon sets based on service requirements. This section uses stateless workloads as an example to describe how to manage labels.
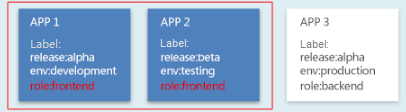
As shown in Figure 1, labels release, env, and role are defined for workloads APP 1, APP 2, and APP 3. The values of these labels vary with workload.
- APP 1: [release:alpha;env:development;role:frontend]
- APP 2: [release:beta;env:testing;role:frontend]
- APP 3: [release:alpha;env:production;role:backend]
If you set key to role and value to frontend when using workload scheduling or another function, APP 1 and APP 2 will be selected.
ServiceStage allows you to add labels of the key-value pair type to manage and select components.
Each component can have a maximum of 20 labels.
If your organization has configured tag policies for ServiceStage, add tags to trackers based on the policies. If a tag does not comply with the tag policies, environment creation may fail. Contact your administrator to learn more about tag policies.
Labels can be managed for components in the Running and Not ready states. For details about how to check the component status, see Viewing Component Details.
This section describes how to add or delete a component label.
Adding a Component Label
- Log in to ServiceStage.
- Use either of the following methods to go to the component Overview page:
- On the Application Management page, click the application to which the component belongs, and click the target component in Component List.
- On the Component Management page, click the target component.
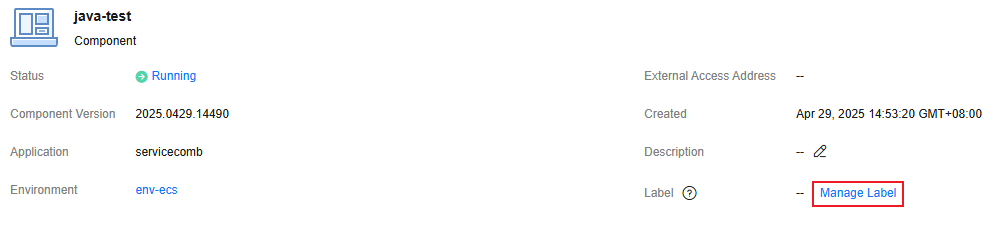
- Click Manage Label.
- On the displayed page, click Add Label and enter a key and value.
If you want to use the same label to identify multiple resources, that is, all resources can select the same label from the drop-down list, you are advised to create a predefined label in TMS by referring to Creating Predefined Tags.
- The key contains 1 to 63 characters. Start and end with a letter or digit. Only use digits, letters, underscores (_), hyphens (-), and periods (.). The key cannot be the same as an existing key, and cannot be the built-in app, casid, or version.
- The value contains 0 to 63 characters. Start and end with a letter or digit. Only use digits, letters, underscores (_), hyphens (-), and periods (.).
- Click OK.
Deleting a Component Label
- Log in to ServiceStage.
- Use either of the following methods to go to the component Overview page:
- On the Application Management page, click the application to which the component belongs, and click the target component in Component List.
- On the Component Management page, click the target component.
- Click Manage Label.
- Select the label to be deleted and click
 .
.

- Click OK.
Feedback
Was this page helpful?
Provide feedbackThank you very much for your feedback. We will continue working to improve the documentation.See the reply and handling status in My Cloud VOC.
For any further questions, feel free to contact us through the chatbot.
Chatbot


