
Enabling Database Proxy for Read/Write Splitting
You can enable database proxy for your RDS for MySQL instance to automatically forward read and write requests through a proxy address. To reduce read pressure of the primary instance, write requests are forwarded to the primary instance and read requests to read replicas based on the routing policy of the database proxy.
This section describes how to use a database proxy to implement read/write splitting. The process is as follows:
- Step 1: Enable Database Proxy
- Step 2: Grant Access Permissions
- Step 3: Check Security Group Rules
- Step 4: Use the Read/Write Splitting Address to Connect to the RDS for MySQL Instance
- Step 5: Verify Read/Write Splitting
Precautions
- Before enabling database proxy, ensure that you have purchased an RDS for MySQL instance.
- Both the primary instance and read replicas must be available.
- You have learned the regions and versions that support database proxies. For details, see Constraints on Database Proxy.
Step 1: Enable Database Proxy
- Buying a single database proxy: In the CN-Hong Kong, AP-Bangkok, and AP-Singapore regions, single database proxy is enabled by default. That means only one database proxy can be purchased for an RDS for MySQL instance. With low flexibility, single-proxy is suitable for a single workload environment where workload isolation is not required. A single proxy provides only one entry for accessing the database.
- Buying multiple database proxies: Multi-proxy is enabled by default in the CN North-Beijing4, CN East-Shanghai1, CN South-Guangzhou, and CN Southwest-Guiyang1 regions. That means multiple database proxies (up to 4) can be purchased for an RDS for MySQL instance. Multi-proxy is suitable for a complex multi-workload environment. Multiple database proxies provide different entries for accessing the database. This ensures workload isolation and improves resource utilization.
For more information, see Introduction to RDS for MySQL Database Proxy.
For details about region restrictions, see Constraints on Database Proxy.
- Click
 in the upper left corner and select a region.
 - Click
 in the upper left corner of the page and choose Databases > Relational Database Service.
 - On the Instances page, click the target instance name to go to the Overview page.
- In the navigation pane on the left, choose Database Proxy.
Alternatively, on the Summary page, expand the details and click Configure under Read/Write Splitting Address.
- On the displayed page, click Create Database Proxy.
- Configure parameters and click Next.
Figure 1 Selecting the weighted routing policy
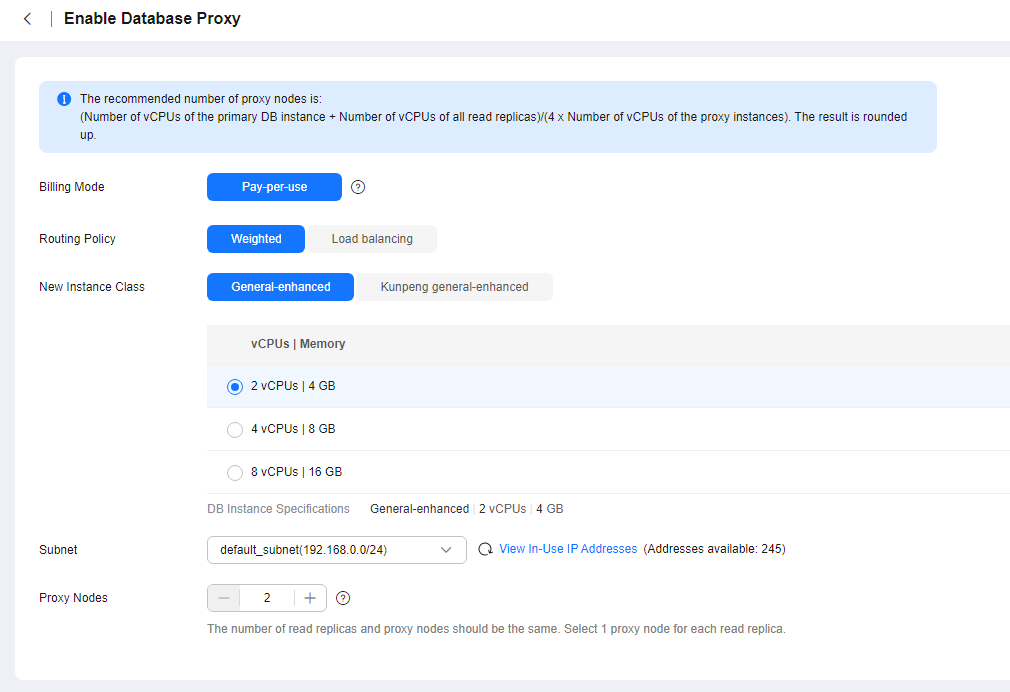 Figure 2 Selecting the load balancing policy
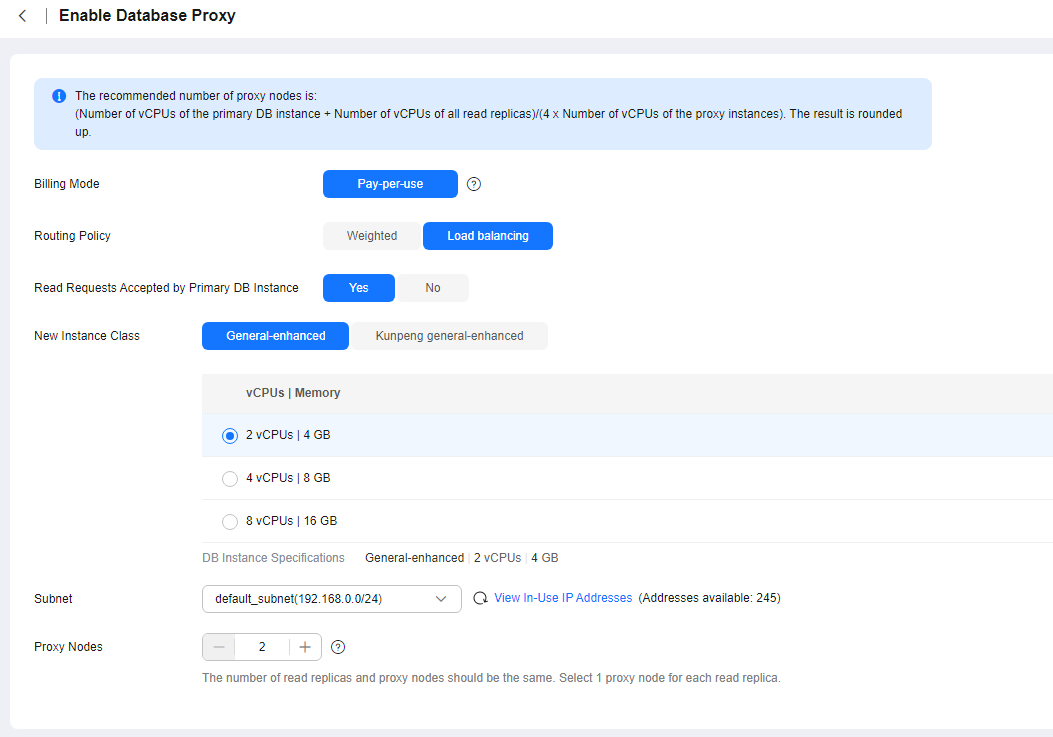
Table 1 Parameter description Parameter
Description
Billing Mode
- Only Pay-per-use can be selected for pay-per-use DB instances.
- Either Pay-per-use or Yearly/monthly can be selected for yearly/monthly DB instances. A pay-per-use proxy can be changed to a yearly/monthly proxy later.
Routing Policy
- Weighted: You can change the weights of your DB instance and read replicas after read/write splitting is enabled.
- Load balancing: This policy is only available if proxy load balancing is enabled. After Load balancing is selected, read requests are automatically distributed to multiple read replicas based on the number of active connections to balance the load among these read replicas.
You can change the routing policy after the database proxy is created. For details, see Configuring the Delay Threshold and Routing Policy.
Read Requests Accepted by Primary DB Instance
This parameter is only available if Load balancing is selected.
- Yes: Read requests can be routed to both the primary instance and read replicas.
- No: Read requests are routed only to read replicas to offload read pressure from the primary instance.
New Instance Class
Select specifications for the proxy instance based on service demands. You can change the specifications after the proxy instance is created. For details, see Changing the Instance Class of a DB Proxy Instance.
For details about performance metrics, see Table 2.
Subnet
Select the subnet where the proxy is located.
Proxy Nodes
Enter an integer from 2 to 8. You can change the nodes after the proxy instance is created. For details, see Changing the Number of Proxy Nodes.
You are advised to set proxy nodes to the quantity of read replicas, with one proxy node for one read replica.
- Read/write splitting maintains database connectivity but splits read and write requests. If read/write splitting is enabled, an additional address called a read/write splitting address is provided. To use read/write splitting, switch your applications to this address.
- Read/write splitting address: You can connect to databases through the read/write splitting address, with read and write requests distributed to different databases automatically.
The read/write splitting address and the floating IP address of the DB instance are in the same VPC and subnet and are independent from each other.
- Delay threshold: You can set the delay threshold after read/write splitting is enabled. For details, see Configuring Delay Threshold.
- DB instances for load balancing: You can select DB instances for load balancing after read/write splitting is enabled.
- Confirm the database proxy configuration.
- To modify the configuration, click Previous.
- If there is no need to change the settings, click Submit.
- View and manage the proxy on the Database Proxy page.
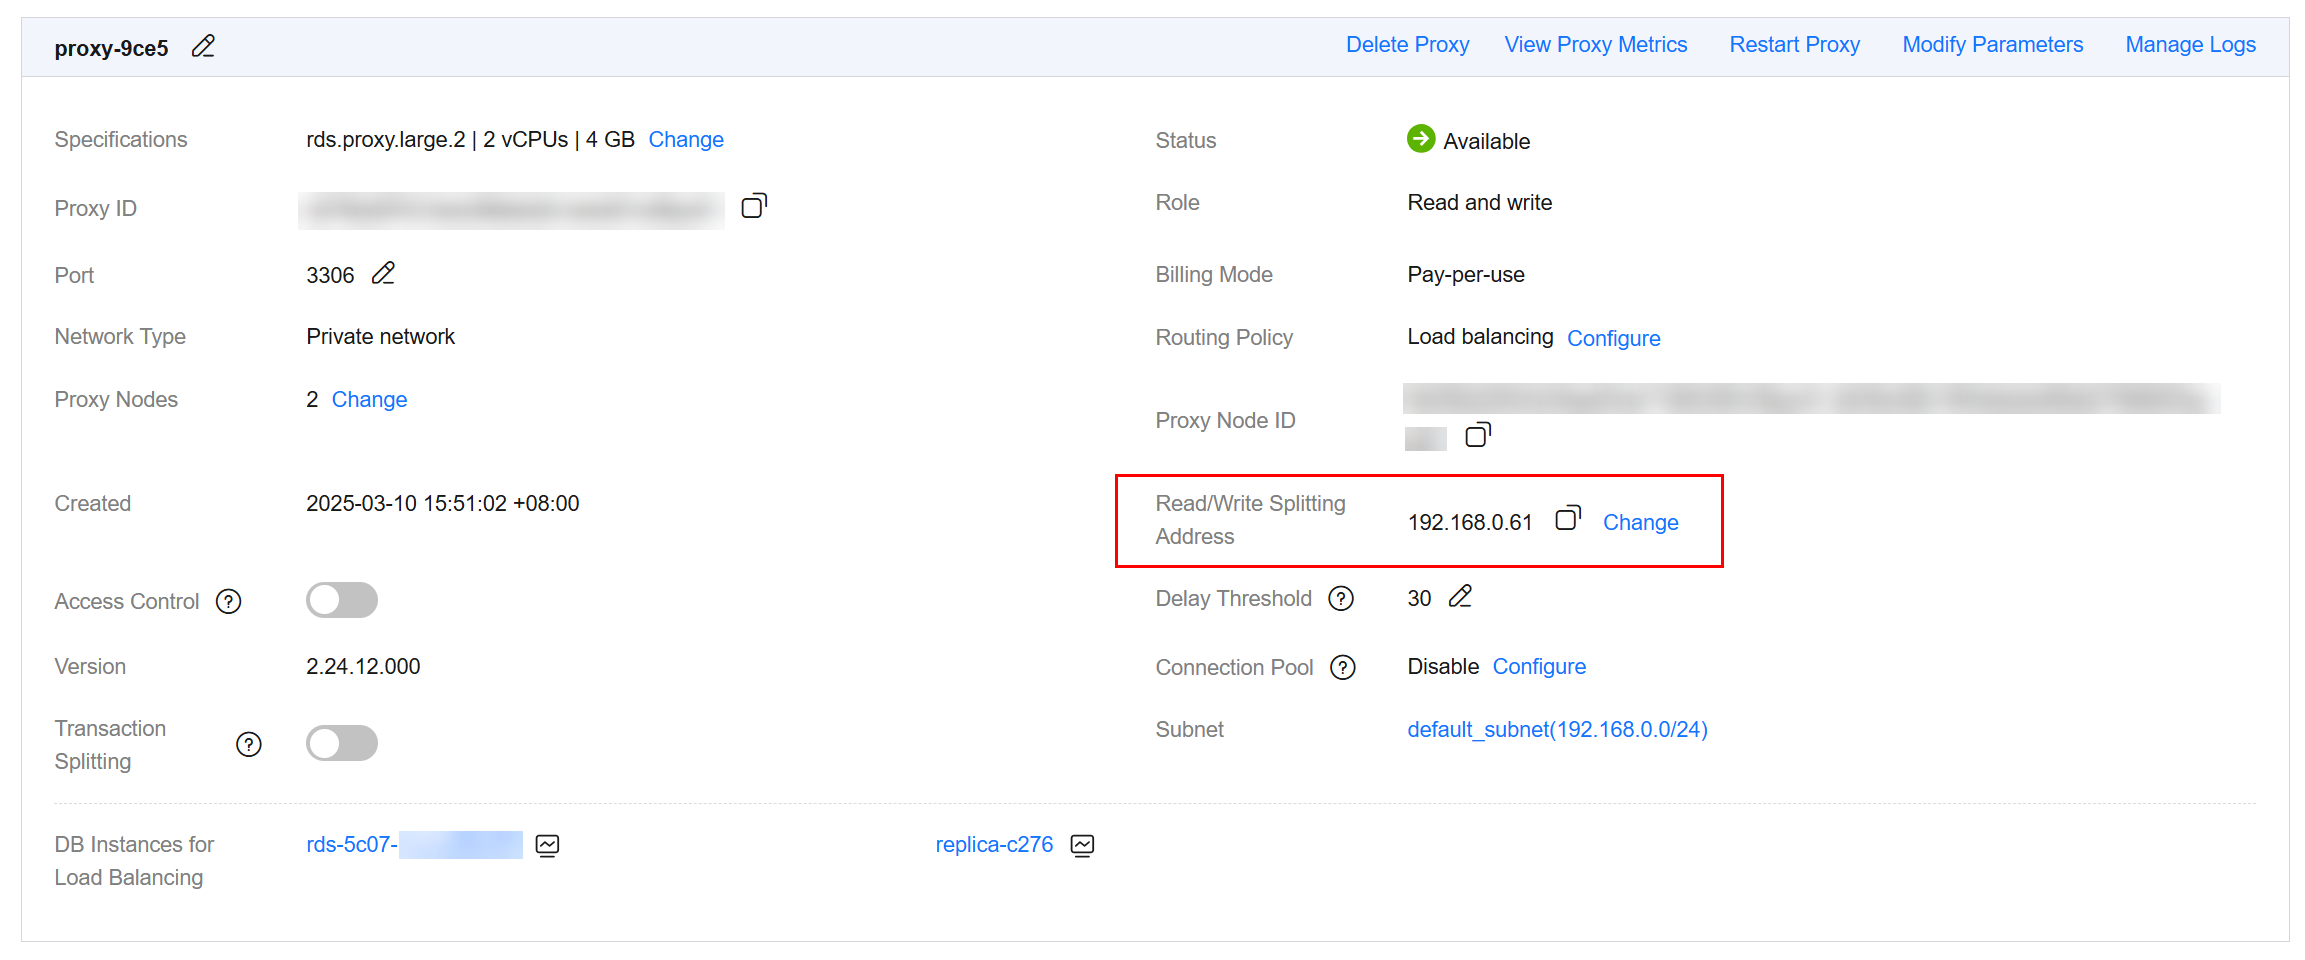
You can view the read/write splitting address on the Overview page. Read and write requests can be split through the read/write splitting address.
The read/write splitting address and the floating IP address of the DB instance are in the same VPC and subnet and are independent from each other.
Figure 3 Viewing the read/write splitting address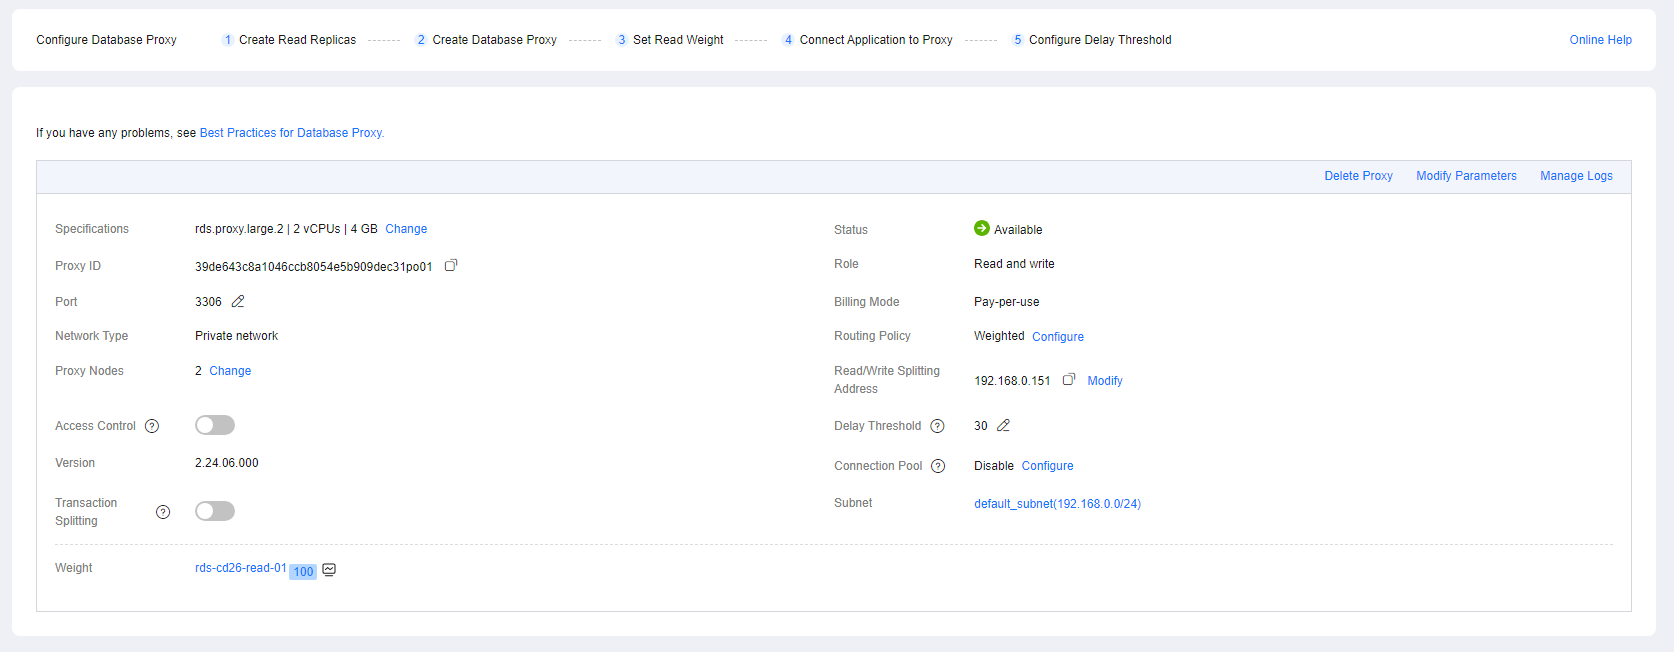
- Click in the upper left corner and select a region.
- Click in the upper left corner of the page and choose Databases > Relational Database Service.
- On the Instances page, click the target instance name to go to the Summary page.
- In the navigation pane on the left, choose Database Proxy.
Alternatively, on the Summary page, expand the details and click Configure under Read/Write Splitting Address.
Figure 4 Applying for a read/write splitting address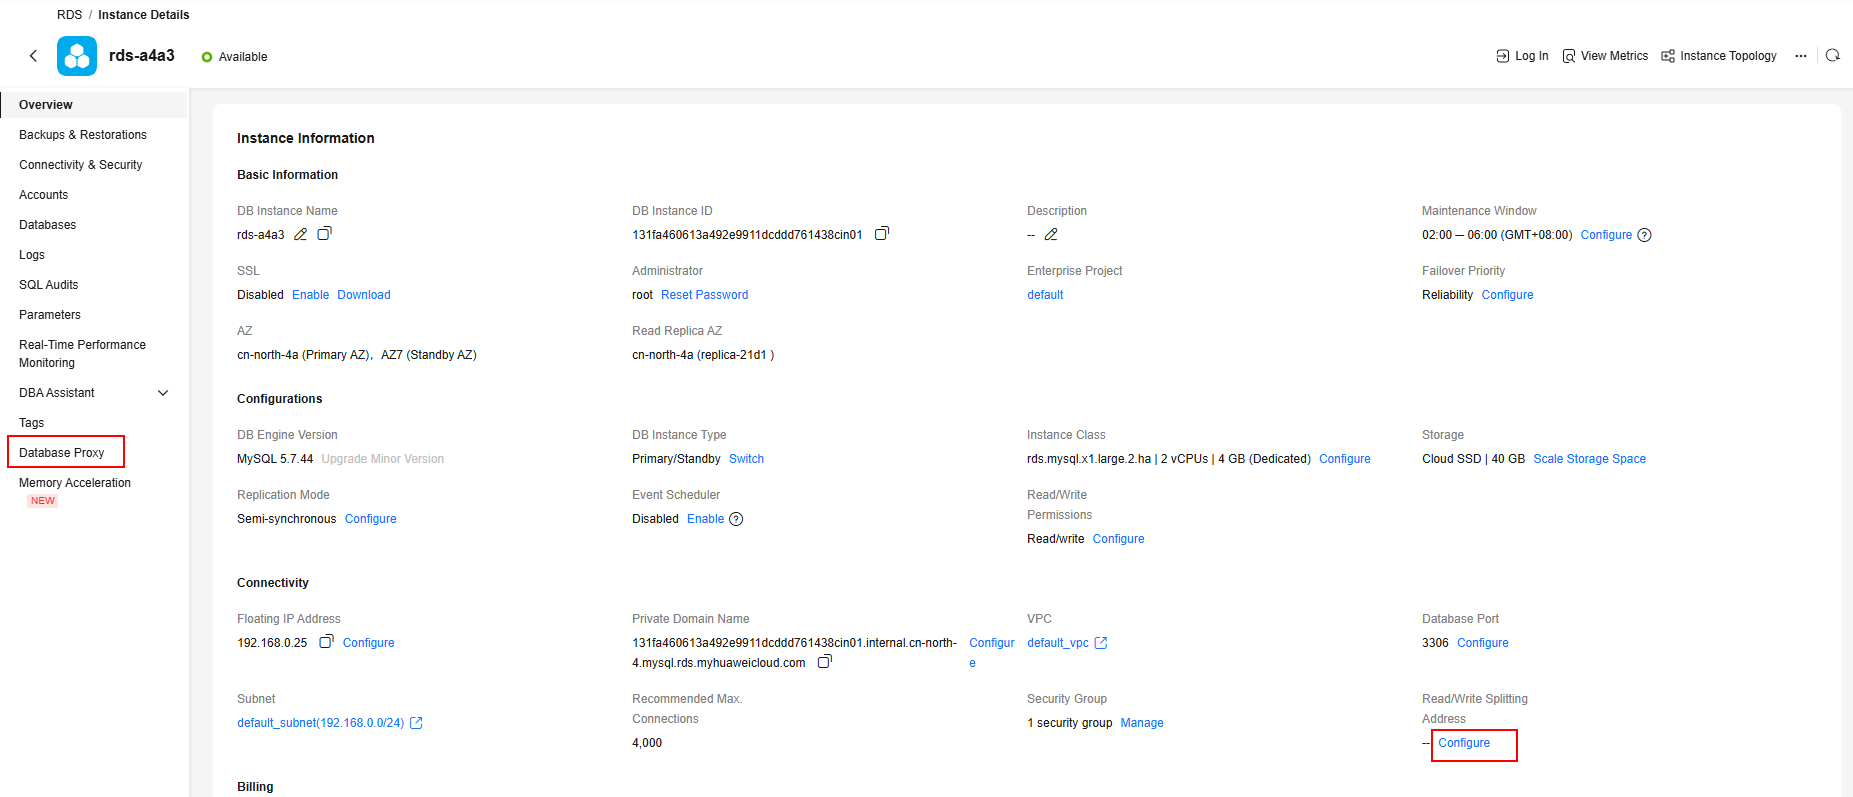
- On the displayed page, click Create Database Proxy.
Figure 5 Creating database proxy

- On the displayed page, set the required parameters and click Next.
Figure 6 Setting Routing Policy to Weighted
 Figure 7 Setting Routing Policy to Load balancing
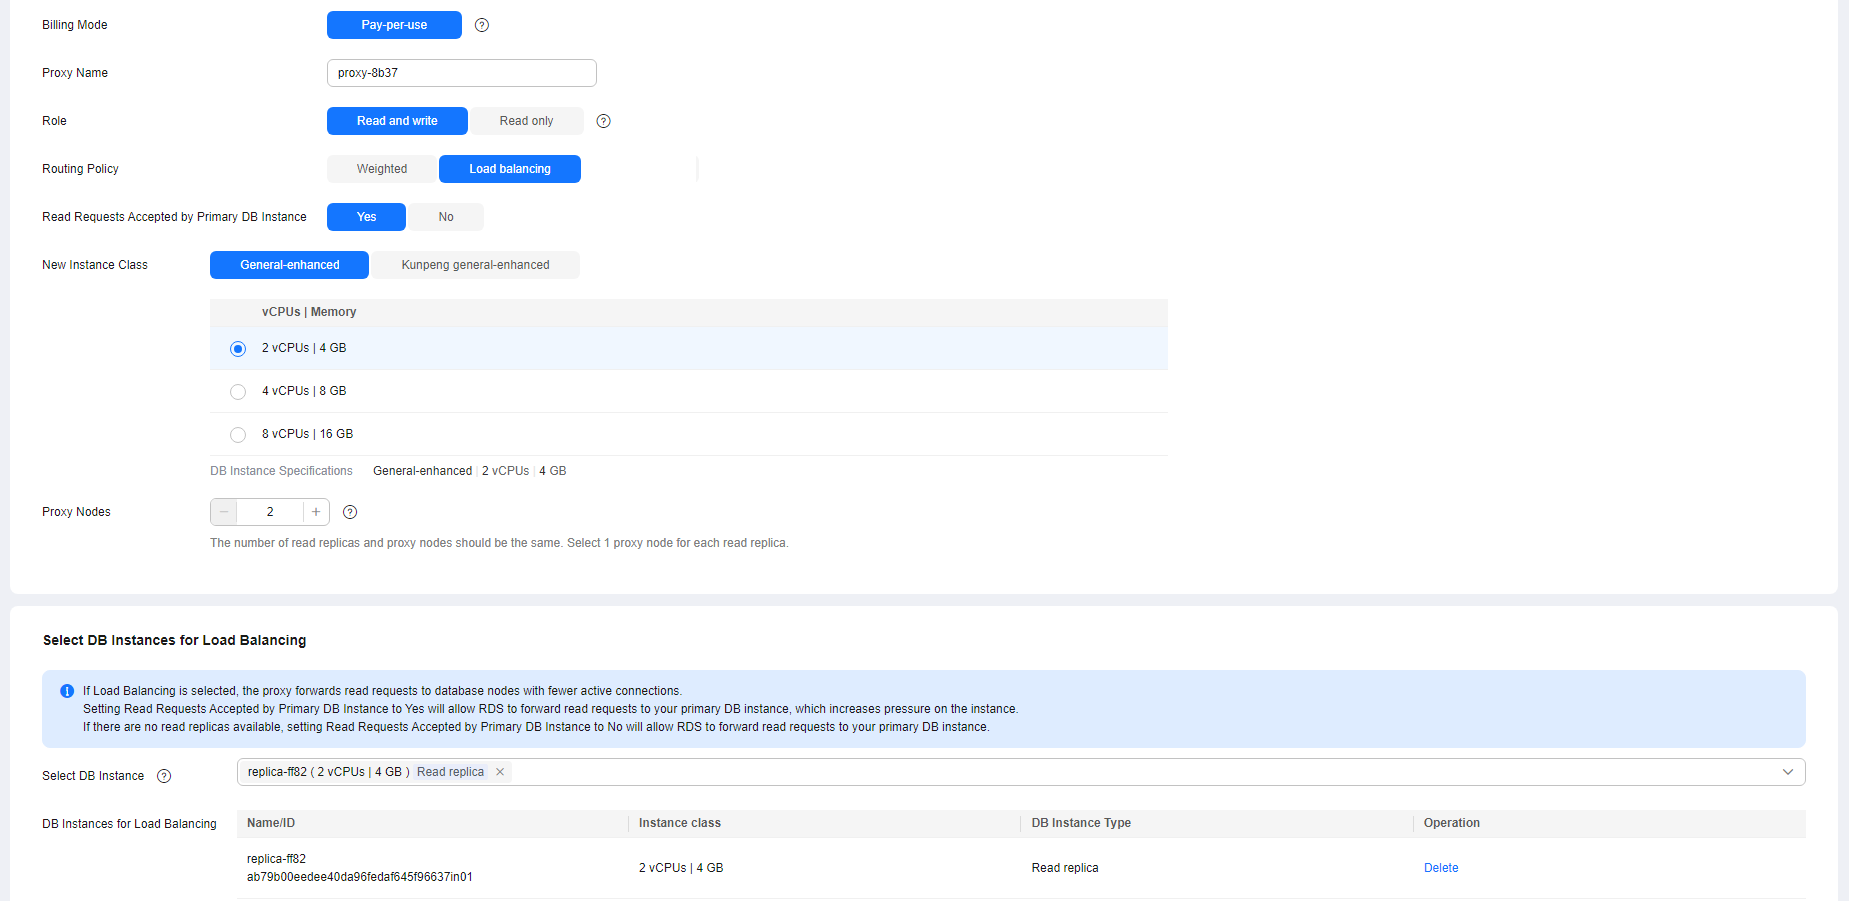
Table 2 Parameter description Parameter
Description
Billing Mode
- Only Pay-per-use can be selected for pay-per-use DB instances.
- Either Pay-per-use or Yearly/monthly can be selected for yearly/monthly DB instances. A pay-per-use proxy can be changed to a yearly/monthly proxy later.
Proxy Name
The proxy name must start with a letter and consist of 4 to 64 characters. Only letters (case-sensitive), digits, hyphens (-), and underscores (_) are allowed.
Role
- Read and write: Read and write requests are split.
- Read only: The proxy is not connected to your primary instance and cannot receive write requests.
Routing Policy
- Weighted: You can change the weights of your DB instance and read replicas after read/write splitting is enabled.
- Load balancing: If selected, to balance the load among read replicas, read requests are automatically distributed to multiple read replicas based on the number of active connections.
You can change the routing policy after the database proxy is created. For details, see Configuring the Delay Threshold and Routing Policy.
Read Requests Accepted by Primary DB Instance
This parameter is available only when Load balancing is selected.
- Yes: Read requests can be routed to both the primary instance and read replicas, which increases the load of the primary instance. Configure this parameter as required.
- No: Read requests are routed only to read replicas to offload read pressure from the primary instance.
New Instance Class
Select specifications for the proxy instance based on service requirements. You can change the specifications after the proxy instance is created. For details, see Changing the Instance Class of a DB Proxy Instance.
For details about performance metrics, see Table 2.
Proxy Nodes
Enter an integer from 2 to 8. You can change the nodes after the proxy instance is created. For details, see Changing the Number of Proxy Nodes.
You are advised to set proxy nodes to the quantity of read replicas, with one proxy node for one read replica.
Set Read Weight
This parameter is only available if Weighted is selected. Select the primary instance and read replicas to which you want to assign weights.
Rules for configuring read weights
- Read requests are allocated proportionate to the read weight you configure. For example, if you associate two read replicas with the proxy and set their read weights to 100 and 200, all read requests forwarded to the proxy are automatically routed to the read replicas in the ratio of 1:2 (the read weights for unselected instances are 0).
- A read replica can be associated with more than one proxy. To balance traffic among the read replicas of your primary instance, set read weights for them based on the existing proxies' weights and on the amount of traffic routed to the read replicas.
- You can change read weights of the primary instance and read replicas after read/write splitting is enabled. For details, see Configuring the Delay Threshold and Routing Policy.
Select DB Instances for Load Balancing
This parameter is available only when Load balancing is selected. Select the DB instances for load balancing.
After Load balancing is selected, the proxy forwards read requests to database nodes with fewer active connections.
You can change the DB instances for load balancing after read/write splitting is enabled. For details, see Configuring the Delay Threshold and Routing Policy.
- Confirm the database proxy configuration.
- To modify the configuration, click Previous.
- To submit the request, click Submit.
- View and manage the proxy on the Database Proxy page.
You can view the read/write splitting address on the Overview page. Read and write requests can be split through the read/write splitting address.
The read/write splitting address and the floating IP address of the DB instance are in the same VPC and subnet and are independent from each other.
Figure 8 Viewing the read/write splitting address
Step 2: Grant Access Permissions
Before using a database proxy to connect to an RDS for MySQL instance, ensure that the current database account has the permission to access the proxy address.
You can perform the following steps to check and grant an account the permission to access a proxy address.
- Connect to your RDS for MySQL instance by referring to Instance Connection.
- Check whether host of your account contains a database proxy address.
SELECT user,host FROM mysql.user;
Figure 9 Checking the host address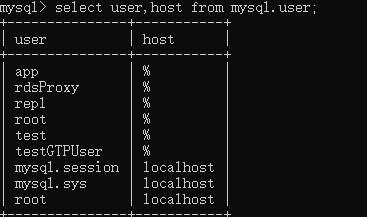
If the address is %, the host contains all CIDR blocks.
- If the host does not contain the CIDR block where the database proxy is located, grant the remote access permission to the account.
For example, if you want to connect to an RDS for MySQL instance from the IP address range starting with 192.168.0 as the root user, you can set host of the account to 192.168.% on the user management page of Data Admin Service (DAS). For details, Editing a User.
Figure 10 Configuring the host IP address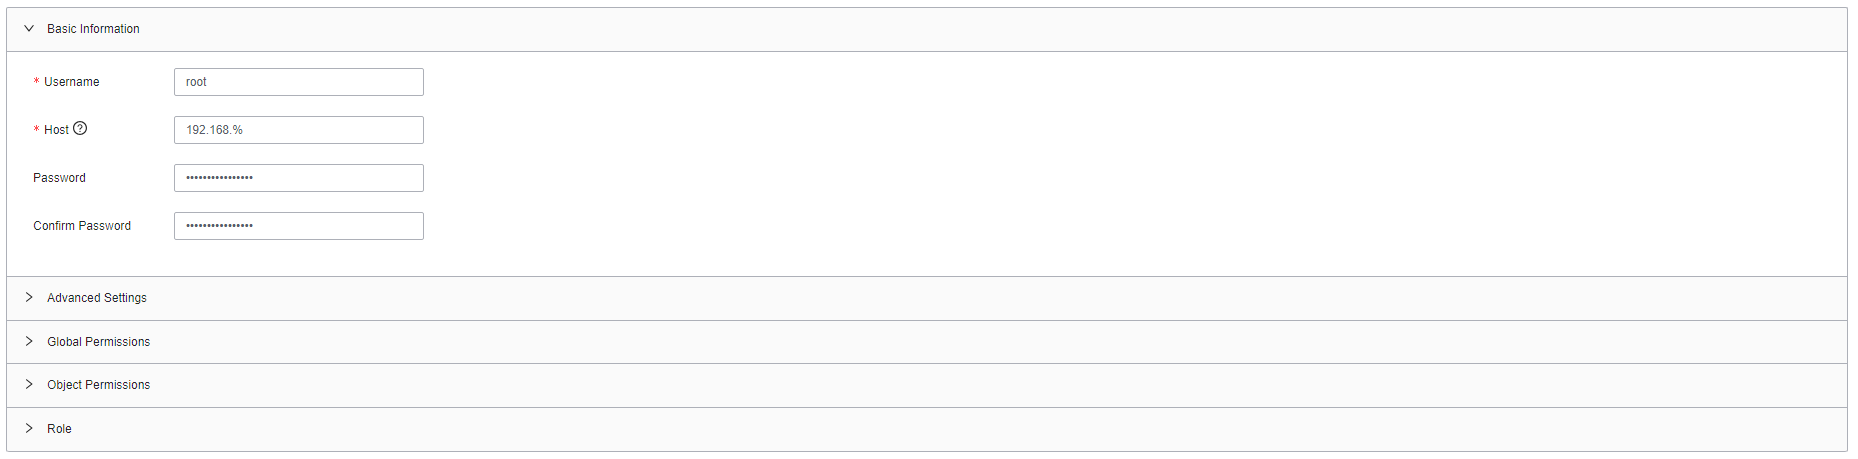
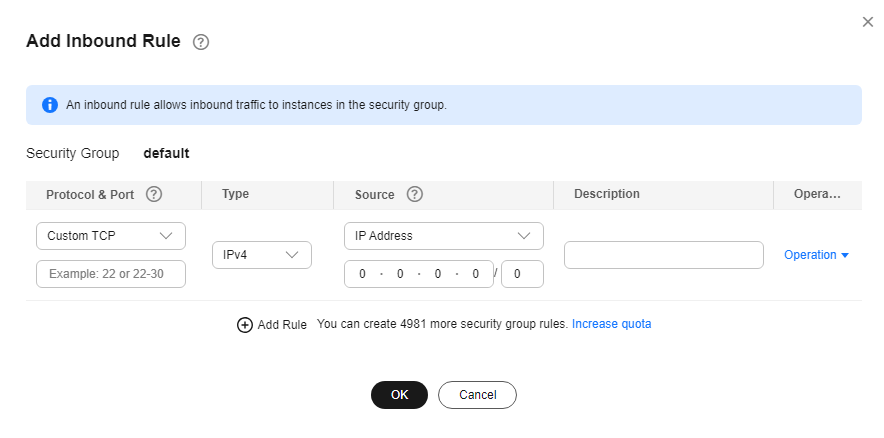
Step 3: Check Security Group Rules
Ensure that there is an inbound rule that allows access from the proxy address. The default port is 3306.
- On the Instances page, click the target instance name to go to the Summary page.
- In the navigation pane, choose Connectivity & Security. In the Security Group Rules area, click the security group name to view the security group rules.
- On the Inbound tab, check whether access through port 3306 is allowed by default.
If there is no such a rule, click Add Inbound Rule or Allow All IP.Figure 11 Adding an inbound rule
Step 4: Use the Read/Write Splitting Address to Connect to the RDS for MySQL Instance
- Obtain the read/write splitting address and port by referring to 8.
Figure 12 Obtaining the read/write splitting address and port
- Log in to an ECS.
For details, see Logging In to a Linux ECS.
- Run the following command to connect to the RDS for MySQL instance through the read/write splitting address:
mysql -h <host> -P <port> -u <userName> -p
Example:
mysql -h 192.168.0.61 -P 3306 -u root -p
Enter the password of the database account if the following information is displayed:Enter password:
Table 3 Parameter description Parameter
Description
<host>
The read/write splitting address obtained in 1.
<port>
The database port obtained in 1.
<userName>
The username of the database administrator account. The default username is root.

When you use a MySQL 8.0 client to access a database proxy, the error message "auth user failed" may be displayed.
Add --default-auth=mysql_native_password when connecting to the database.
Step 5: Verify Read/Write Splitting
You can run the show last route command to check the routing result after you perform a read operation.
The following uses a read operation as an example to describe how to check the routing result of read requests.
- After connecting to your RDS for MySQL instance, perform a read operation.
Example:
select 1;
Figure 13 Performing a read operation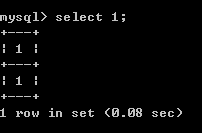
- Run the following command to check the routing result of the read operation in 1:
show last route;
Figure 14 Query result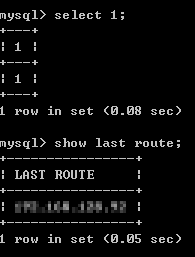
The IP address in the command output is the IP address of the node to which the read operation is routed. Read operations are routed to the primary node or read replicas based on the specified routing policy.
Do not include show last route in service code or multi-statement requests.
FAQ
How Do I Check the IP Addresses of a DB Instance and Its Read Replicas?
- Checking the IP address of the primary node
- On the Instances page, click the primary instance name to go to the Overview page.
- Find the primary node's IP address next to the Floating IP Address field.
- Checking the IP address of a read replica
- On the Instances page, click
 and then click the target read replica name to go to the Overview page.
 - Find the read replica's IP address next to the Floating IP Address field.
- On the Instances page, click
Feedback
Was this page helpful?
Provide feedbackThank you very much for your feedback. We will continue working to improve the documentation.See the reply and handling status in My Cloud VOC.
For any further questions, feel free to contact us through the chatbot.
Chatbot


