

Configuring Logging for a Bucket
When a bucket is accessed, OBS logs all requests to the bucket. After log storage is enabled for the bucket, OBS stores the logs either in the logged bucket or in another bucket that belongs to the same account and region. You can search and analyze these logs to trace and locate abnormal events. This section describes how to configure logging, verify the logging configuration, and disable logging for a bucket.
Configuring Log Storage for a Bucket
You can use OBS Console, APIs, or SDKs to configure log storage for a bucket. You cannot use OBS Browser+ or obsutil to do so.
Using OBS Console
- In the navigation pane of OBS Console, choose Buckets.
- In the bucket list, click the desired bucket. The Objects page is displayed.
- In the navigation pane, choose Overview.
- In the Basic Configurations area, click Log Storage. The Log Storage dialog box is displayed.
Alternatively, choose Log Management > Log Storage in the navigation pane. The Log Storage page is displayed.
- Enable Log Storage. Configure related parameters. Figure 1 Log storage

Table 1 Parameters for configuring logging for the bucket Parameter
Description
Save Logs To
Select a bucket to store the log files of the source bucket.
You can use the source bucket or another bucket as the log storage bucket. If you select another bucket, it must belong to the same account and region as the source bucket.
After a log storage bucket is specified, OBS grants the log delivery user group the required write and ACL read permissions for that bucket.
Log File Name Prefix
The prefix of each log file name. By default, OBS assigns the bucket-name-log/ prefix. This prefix represents a folder (for storing log files) in the bucket's root directory.
Each log file follows this naming format:
<log-file-name-prefix>YYYY-mm-DD-HH-MM-SS-<UniqueString>
- <log-file-name-prefix> is the log file name prefix you specify here.
- If <log-file-name-prefix> ends with a slash (/), the log files are stored in a folder named after the prefix (without the trailing slash) in the target bucket. Each log file is named YYYY-mm-DD-HH-MM-SS-<UniqueString>. Example: 2025-06-03-07-18-11-WKK0T9O74VAWMHB7
- If <log-file-name-prefix> does not end with a slash /, the log files are stored in the root directory of the target bucket. Each log file is named <log-file-name-prefix>YYYY-mm-DD-HH-MM-SS-<UniqueString>. Example: example-bucket-a-log2025-06-03-07-18-11-WKK0T9O74VAWMHB7
- YYYY-mm-DD-HH-MM-SS indicates when the log file was generated. The fields in it represent the year, month, day, hour, and minute, respectively.
- <UniqueString> indicates a string assigned by OBS.
IAM Agency
An agency is required to grant OBS the permissions needed to upload log files to the log storage bucket.
- By default, the agency only needs the upload permission (obs:object:PutObject) for the log storage bucket.
- If the log storage bucket has server-side encryption enabled, the agency also requires the KMS Administrator permission for the region where the bucket is located.
You can choose an existing IAM agency from the drop-down list or click Create Agency to create one.
For details about creating an agency, see Creating an Agency for Uploading Logs.
Log Grouping (Optional)
Specify the frequency for grouping bucket logs.
You can leave this parameter blank or select Do not configure, Hourly, or Daily:
- If you leave this parameter blank or select Do not configure, the system stores all generated bucket logs in a single folder.
- If you select Hourly, the system automatically stores bucket logs generated each hour in a separate folder.
- If you select Daily, the system automatically stores bucket logs generated each day in a separate folder.
- <log-file-name-prefix> is the log file name prefix you specify here.
- Click OK.
After log storage is configured for a bucket, its operation logs will appear in the log storage bucket in about 15 minutes.
Verifying the Log Storage Configuration of a Bucket
After configuring Log Storage for a bucket, you can use OBS Console, APIs, SDKs, or obsutil to verify the configuration. You can check whether OBS has generated log files and whether you have access to them. You cannot use OBS Browser+ to do so.
Using OBS Console
- In the navigation pane of OBS Console, choose Buckets.
- In the bucket list of OBS Console, click the log storage bucket to go to the Objects page.
- Check for existing log files.
Check whether any log files or the folder derived from the log file name prefix appear in the object list, based on the configured prefix and log file naming rules.
Figure 2 Checking for the log folder or log files

- Verify that you can access the log files.
- In the object list or in the log folder, click the name of a log file to open its Basic Information page.
- Click
 next to the link to copy the log file link.
 - Open this link in a browser.
- If the log file can be downloaded, the account can access log files.
- If the log file cannot be downloaded, the account does not have the permission to access log files. In this case, grant the IAM user read permissions for log files or grant the account read permissions for log files.
Disabling Log Storage for a Bucket
Uploading and storing bucket logs incurs costs for PUT requests and storage. If you no longer need to record logs, disable logging for the bucket. After logging is disabled, OBS stops generating new logs, but any existing logs in the log storage bucket are retained.
You can use OBS Console to disable log storage for a bucket. You cannot use APIs, SDKs, OBS Browser+, or obsutil to do so.
References
If you are using the old IAM console, see Creating an Agency for Uploading Logs. If you are using the new IAM console, see Creating a Trust Agency for Uploading Logs.
Creating an Agency for Uploading Logs
- In the Log Storage dialog box, click Create Agency. The Create Agency dialog box is displayed on the right.
- Enter an agency name. The agency name cannot be left blank.
- (Optional) Create a custom policy that grants OBS permissions to the agency. If a suitable policy already exists, skip this step.
- In the navigation pane of the IAM console, choose Permissions > Policies/Roles.
- On the Policies/Roles page, click Create Custom Policy in the upper right corner.
- On the Create Custom Policy page, configure the parameters as described below. Keep the default settings for other parameters. Figure 3 Configuring a custom policy
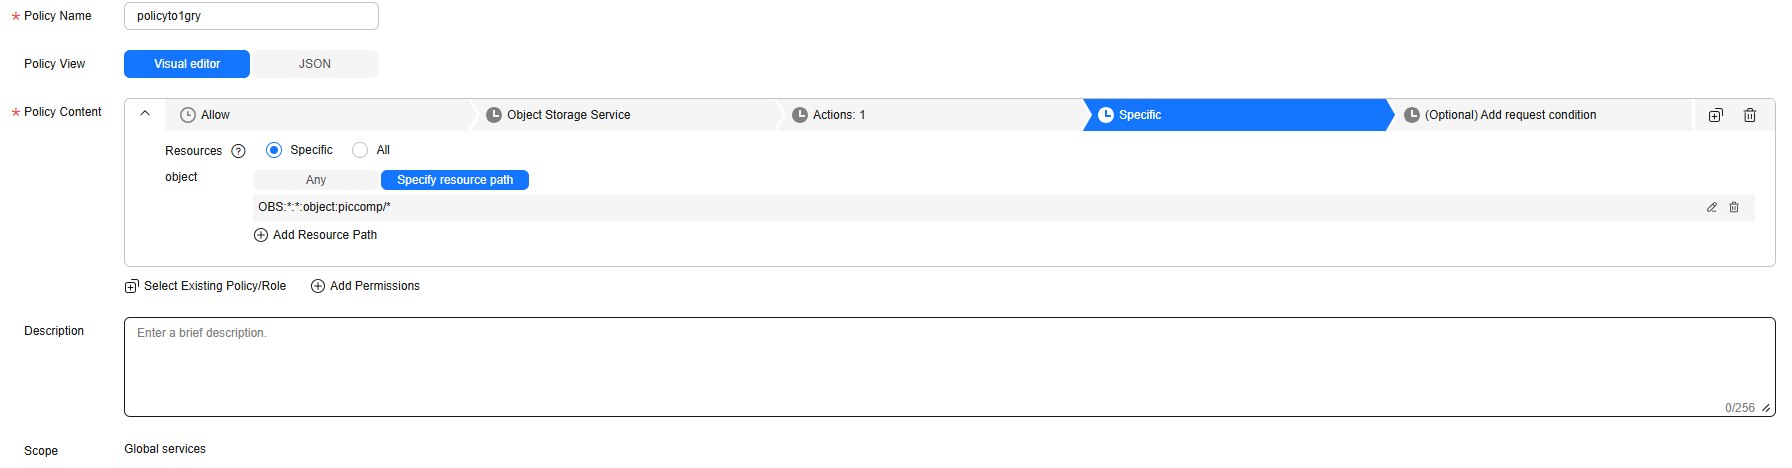
- Policy Name: Enter a name that is easy to remember.
- Select service: Select Object Storage Service (OBS).
- Actions: Select obs:object:PutObject.
- Resources: Select Specific.
object: Select Specify resource path. The resource path format is OBS:*:*:object:bucket-name/object-name.
Replace bucket-name with the name of the log storage bucket. For example, OBS:*:*:object:piccomp/* indicates all objects in the log storage bucket piccomp.
- Click OK. If the created custom policy appears in the list, it was created successfully.
- Grant related permissions to the agency.
Select Custom policy from the first drop-down list under Authorization. In the custom policy list, select the policy created in 3.
If Replicate KMS encrypted objects is selected, the agency also needs the KMS CMKFullAccess permission for the regions where the source and destination buckets are located.
- Click OK.
The agency drop-down list is automatically populated with the newly created agency. To view agency authorization details, click Check authorization details in the agency drop-down list.
- (Optional) If the log storage bucket has server-side encryption enabled, add the KMS Administrator permission for the bucket's region to the agency.
- In the navigation pane of the IAM console, choose Agencies.
- Click Authorize in the Operation column of the agency created in 1.
- On the Select Policy/Role page, search for and select KMS Administrator. Then, click Next.
- Select Region-specific projects for Scope, and select the projects in the region where the log storage bucket resides.
- Click OK.
What is your overall rating for this page?
Thank you very much for your feedback. We will continue working to improve the documentation.See the reply and handling status in My Cloud VOC.
For any further questions, feel free to contact us through the chatbot.
Chatbot


