
Discovering Resources over the Internet
Before migrating, you need to discover your resources and collect their details. This section describes how to discover resources provisioned on cloud platforms such as Alibaba Cloud, Huawei Cloud, AWS, Tencent Cloud, Google Cloud, Azure, Qiniu Cloud, and Kingsoft Cloud over the Internet. The resource types MgC can discover depends on the cloud platform.
- Alibaba Cloud and Huawei Cloud: servers, containers, middleware, databases, networks, and storage
- Tencent Cloud: servers, databases, and storage
- AWS, Google Cloud, and Azure: servers, containers, middleware, databases, storage, and networks
- Qiniu Cloud and Kingsoft Cloud: object storage
Creating a Discovery Task
- Sign in to the MgC console.
- In the navigation pane on the left, choose Research > Source Resources. Select a migration project in the upper left corner of the page.
- In the Discovery Tasks card, choose Discover > Over Internet.
Figure 1 Discovery over Internet

- Configure a discovery task based on Table 1.
Table 1 Parameters for creating an Internet-based discovery task Area
Parameter
Description
Mandatory
Basic Settings
Task Name
Specify a name for the task.
Yes
Task Description
Describe the task.
No
Task Settings
Source Platform
Select the source cloud platform. Currently, Alibaba Cloud, Huawei Cloud, AWS, Tencent Cloud, Google Cloud, Azure, Qiniu Cloud, and Kingsoft Cloud are supported.
Yes
Credential
Select the credential for accessing the source cloud platform. If no credential is available, choose Create to add one. For details, see Managing Credentials.
- If the source cloud platform is Alibaba Cloud, Huawei Cloud, AWS, Tencent Cloud, Qiniu Cloud, or Kingsoft Cloud, select AK/SK for Authentication and enter the AK/SK pair of your source cloud account.
- If the source cloud platform is Google Cloud, select Configuration File for Authentication and upload the configuration file that contains your Google Cloud service account credentials. The file must be in JSON format and cannot exceed 4 KB.
- If the source cloud platform is Azure, Select ID/Secret for Authentication. To learn how to obtain Azure credentials, see How Do I Obtain Azure Credentials?
Yes
Region
Select the region where your source environment is located. Multiple regions can be selected.
Yes
- Choose the resource types (collection items) to be collected from the Resource Type drop-down list. For resource types supported for each cloud platform, see Table 2.
Figure 2 Selecting the categories of resources to be discovered
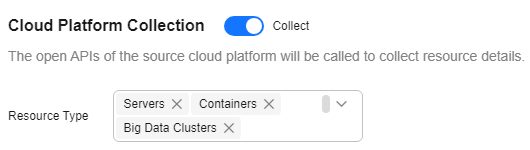
Table 2 Supported resource types Cloud Platform
Resource Type
Subtype
Alibaba Cloud
- Servers
- Containers
- Big data clusters
- Databases
-
Middleware
- Redis
- Kafka
Storage
- Object storage
- File storage
Networks
- Cloud connections
- Load balancers (ALB and CLB)
- Private lines
- Public domain names
- Private domain names
- EIPs
- Public NAT gateways
- Route tables
- Security groups
- VPCs
- VPN gateways
Huawei Cloud
- Servers
- Containers
- Big data clusters
- Databases
-
Middleware
- Redis
- Kafka
Storage
- Object storage
- File storage
Networks
- Load balancers (ELB)
- Public domain names
- Private domain names
- EIPs
- Public NAT gateways
- Route tables
- Security groups
- VPCs
AWS
- Servers
- Containers
- Databases
-
Storage
- Object storage
- File storage
Networks
- Load balancers (ELB) (Currently, only CLB balancers are supported.)
- Public domain names
- Private domain names
- EIPs
- Public NAT gateways
- Route tables
- Security groups
- VPCs
Storage
- Object storage
- File storage
Tencent Cloud
- Servers
- Databases
-
Storage
- Object storage
- File storage
Google Cloud
- Servers
- Containers
- Databases
-
Middleware
Redis
Storage
- Object storage
- File storage
Networks
- EIPs
- Route tables
- Security groups
- VPCs
Azure
- Servers
- Containers
- Databases
-
Storage
- Object storage
- File storage
Middleware
- Redis
- Kafka
Networks
- EIPs
- Route tables
- Security groups
- Public NAT gateways
- VPCs
- Load balancers
Qiniu Cloud
Storage
Object storage
Kingsoft Cloud
Storage
Object storage
- (Optional) Group the servers to be discovered as an application.
- If an application is available, select the application from the Application drop-down list.
- If no applications are available, click Create Application. In the displayed dialog box, enter an application name and description, select the business scenario, environment, and region, and click OK.
- Click Confirm. After this Internet-based discovery task is created, MgC starts discovering details about resources and applications.
- You can view the list and details of discovered resources on the Resource Discovery page.
- You can view the task status and details on the task list page.
- Wait until the task status changes to Succeeded. Then perform subsequent operations for different types of resources.
- For discovered servers, perform a deep collection or check their migration readiness and then design a migration solution or migration plan.
- For discovered containers, perform a deep collectionand design a migration solution.
- Design migration solutions for middleware, database, and storage resources. Deep collection is available for AWS RDS (for MySQL, MariaDB, Aurora, PostgreSQL, SQL Server, and Oracle) and AWS DocumentDB databases.
- Perform a deep collection and design migration plans for object storage resources. For details, see Migration Plans.
Check Migration Readiness for Servers
- Install Edge in the source intranet environment and connect Edge to MgC.
- In the Resources area, click Server in the Category column or the number in the Total Resources column.
- Select the servers to migrate together and click Group as Application above the list.
- If you have created an application, select the application from the drop-down list and click OK.
- If you have not created an application, click Create Application in the displayed dialog box. Then enter an application name and description, select a business scenario, environment, and target region, and click Create. Then click OK.
- On the top of the server list, choose Migration Scenario > Server migration.
- For each source server, click Configure in the Migration Readiness column.
- Configure the parameters listed in Table 3.
Table 3 Parameters for configuring migration readiness Parameter
Configuration
Type
Set this parameter based on the source server OS type.
Edge Device
Select the Edge device in the source environment.
Access IP Address
Select the IP address for accessing the source server. It can be a public or private IP address. After the pre-migration check is passed, the IP address you select here will be used for migration.
Port
Enter the port on the source server that allows access from the Edge device.
- By default, port 5985 on Windows source servers must be opened to the Edge device. The port cannot be changed.
- By default, port 22 on Linux source servers must be opened to the Edge device. You can specify a different port if needed.
Credential
Select the server credential. If the credential has not been added to MgC, go to the Edge console, add the server credential to Edge, and synchronize it to MgC.
NOTICE:The account provided in the credential must have sufficient permissions, so Edge can collect necessary server details. To perform a deep collection for the server to collect as much as details, the credential you provided must meet the following requirements:
- Linux: root and its password
- Windows: administrator and its password
- Click Confirm. The system checks whether the source server can be accessed using the information you provided and whether the server can be migrated. If Ready shows up in the Migration Readiness column, the source server can be migrated. Then you can design a migration solution or design a migration plan to migrate the server.
Performing a Deep Collection for Servers
- Ensure that Edge has been installed in the source intranet environment and has been connected to MgC.
- In the Resources area, click Server in the Category column or the number in the Total Resources column.
- For each server whose details need to be collected, in the Edge Device column, click Configure. Configure the parameters listed in Table 4.
Table 4 Parameters for configuring a deep collection Parameter
Configuration
Type
Set this parameter based on the source server OS type.
Edge Device
Select the Edge device in the source environment.
Access IP Address
Select the IP address for accessing the source server. It can be a public or private IP address. After the pre-migration check is passed, the IP address you select here will be used for migration.
Port
Enter the port on the source server that allows access from the Edge device.
- By default, port 5985 on Windows source servers must be opened to the Edge device. The port cannot be changed.
- By default, port 22 on Linux source servers must be opened to the Edge device. You can specify a different port if needed.
Credential
Select the server credential. If the credential has not been added to MgC, go to the Edge console, add the server credential to Edge, and synchronize it to MgC.
NOTICE:The account provided in the credential must have sufficient permissions, so Edge can collect necessary server details. To perform a deep collection for the server to collect as much as details, the credential you provided must meet the following requirements:
- Linux: root and its password
- Windows: administrator and its password
- Click Confirm. Then the system automatically starts executing a deep collection. When Collected shows up in the Deep Collection column, the collection is complete. You can design a migration solution or design a migration plan to migrate your servers.
Performing a Deep Collection for Containers
- Ensure that Edge has been installed in the source intranet environment and has been connected to MgC.
- In the Resources area, click Container in the Category column or the number in the Total Resources column.
- For each container resource whose details need to be collected, click Associate in the Edge Device column.
To associate multiple container resources with one Edge device, select them and choose Manage Device Association above the list.
- Select the Edge device in the source environment and click OK. Wait until Associated appears in the Edge Device column.
- For each container resource, in the Credential column, click Associate to configure their credentials.
- Select the resource credential. If the credential has not been added to MgC, go to the Edge console, add the credential to Edge, and synchronize it to MgC.
- Click OK. Then MgC checks whether the resource can be accessed using the associated credential. When Ready appears in the Deep Collection column, click Collect to perform a deep collection. You can click Collect Again in the Deep Collection column to perform a second deep collection if needed. After the collection is complete, click the resource name to view the collected details.
Performing a Deep Collection for Object Storage Resources
- Ensure that Edge has been installed in the source intranet environment and has been registered with MgC.
- On the Resource Discovery page, in the Resources area, click Storage in the Category column or the number in the Total Resources column.
- Locate an object storage resource and click Configure in the Deep Collection column.
- Select the Edge device in the source environment and the credential used for accessing the resource, and click Confirm. If the credential has not been added to MgC, go to the Edge console and add the resource credential to Edge and synchronize it to MgC.

To perform a deep collection for your Azure object storage resources, you need to provide your storage account and access key. For details about how to obtain the credentials, see How Do I Obtain the Required Credentials Before Using MgC to Perform a Deep Collection for My Azure Object Storage Resources?
- Click Add Prefix in the Operation column.
- Enter a prefix to filter the objects whose details need to be collected. If this parameter is not specified, all objects in the bucket are collected by default. Click OK to save the prefix settings.
- Click Deep Collection in the Operation column. The system starts collecting path details. You can perform a deep collection on a resource for multiple times. When Collection Status changes to Completed, click the resource name to view the collected information.
Performing a Deep Collection for Databases
Deep collection is available for AWS RDS (for MySQL, MariaDB, Aurora, PostgreSQL, SQL Server, and Oracle) and AWS DocumentDB databases. The data collected includes database version, engine, server character set, average transactions per second (TPS), and queries per second (QPS), and other key performance metrics (KPIs). The collected data depends on the database type.
- Ensure that Edge has been installed in the source intranet environment, can access source databases, and has been registered with MgC.
- On the Resource Discovery page, in the Resources area, click Database in the Category column or the number in the Total Resources column.
- In the database list, filter all discovered AWS databases by applying the Vendor filter. Locate a supported database and in the Edge Device column, click Associate.
To associate multiple databases with one Edge device, select them and choose Manage Device Association above the list.
- Select your Edge device. For Access Setting, if the selected resource is in the same VPC as the Edge device, select Private access. Otherwise, select Public access. Then click OK. Wait until Associated appears in the Edge Device column.
- In the Credential column, click Associate to associate the credential for accessing the resource.
- Select the database credential. If the credential has not been added to MgC, go to the Edge console, add the credential to Edge, and synchronize it to MgC.
- Click OK. Then MgC checks whether the resource can be accessed using the associated credential. When Ready appears in the Deep Collection column, click Collect to perform a deep collection. You can click Collect in the Deep Collection column to perform a deep collection again if needed.
- Wait for the deep collection to complete. Then click the database name to go to the database details page. In the Database Information area, you can view the collected details.
Viewing Discovered Source Resources
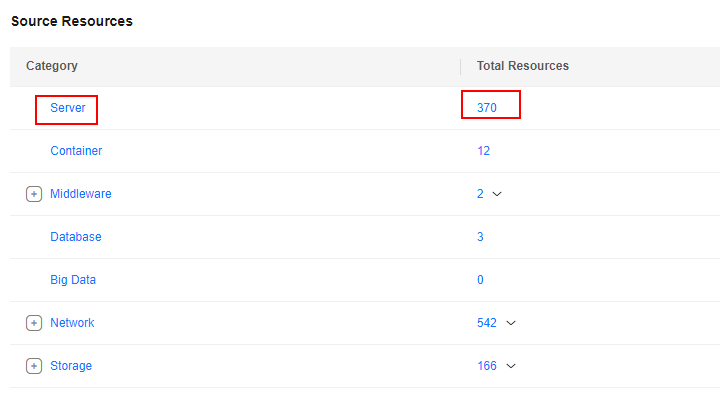
- On the Resource Discovery page, in the Resources area, view the number of discovered resources by category and the number of resources that are not associated with applications.
Figure 3 Viewing the resource list
- Click a resource category or number to view the resource list.
- Click a resource name to view its details.
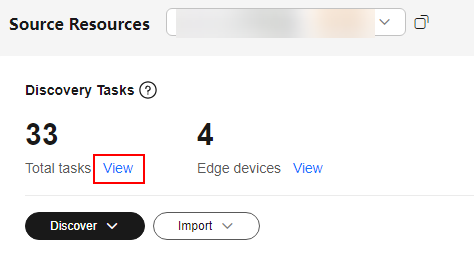
Viewing Discovery Tasks
- On the Resource Discovery page, click View next to Total tasks to go to the task list.
Figure 4 Viewing the task list
- Locate a discovery task, and click View in the Operation column.
- Click
 before a collection item to view the data sources contained in the collection item and the collection results.
Figure 5 Viewing collection results
before a collection item to view the data sources contained in the collection item and the collection results.
Figure 5 Viewing collection results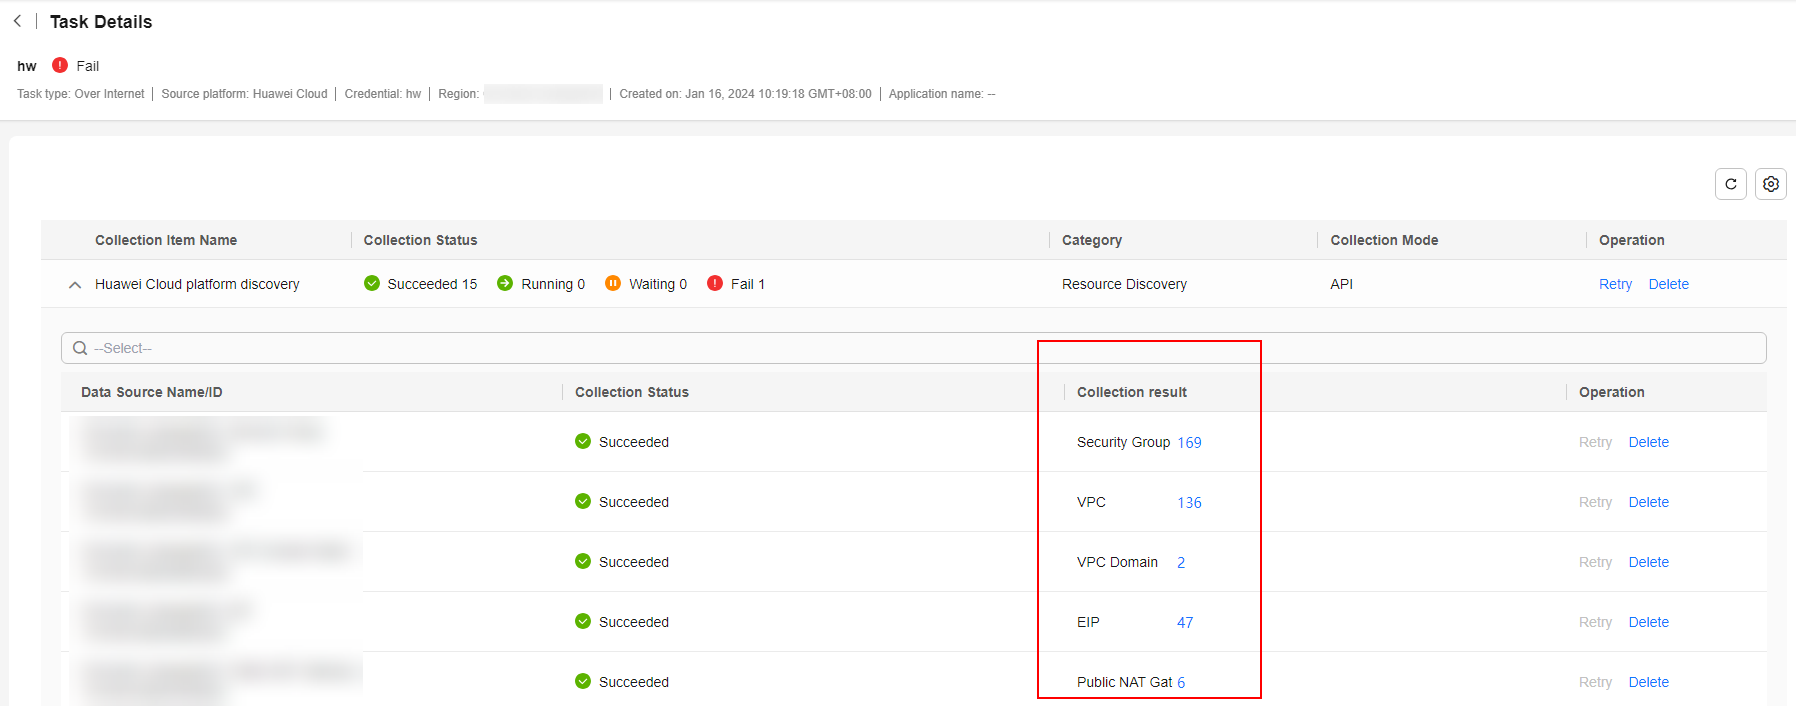
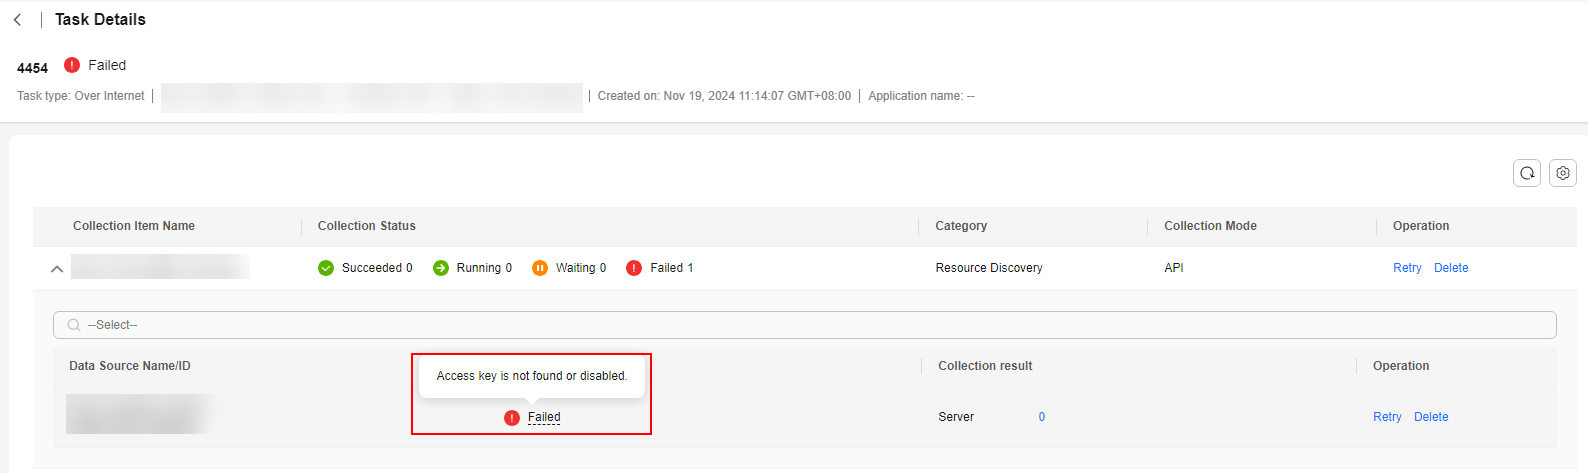
If a data source fails to be collected, you can move the cursor to the collection status of the data source to view the failure cause.
- In the Collection Result column, you can click the number next to a resource category to view the corresponding resource list.
Feedback
Was this page helpful?
Provide feedbackThank you very much for your feedback. We will continue working to improve the documentation.See the reply and handling status in My Cloud VOC.
For any further questions, feel free to contact us through the chatbot.
Chatbot


