
Deployments
The configured multi-cluster Deployments can be automatically deployed on specified Kubernetes clusters.
Currently, MCP provides the following two methods for creating workloads:
Using the CCE Console
- Log in to the MCP console. In the navigation pane, choose Workloads > Deployments. On the page displayed, click Create Deployment.
- Configure basic information about the workload.
- Workload Name: Name of a workload, which must be unique.
- Namespace: Namespace to which the workload belongs.
- Cluster: Select the cluster where the workload is to be deployed. The number of clusters depends on your service requirements.
- Pod Deployment Mode: Two modes Common and Weight are supported.
- Pods: This parameter is valid only when Pod Deployment Mode is set to Common. It specifies the number of pods in each cluster of the multi-cluster Deployment. The default value is 2. Each workload pod consists of the same containers. On MCP, you can set an auto scaling policy to dynamically adjust the number of workload pods based on the workload resource usage.
- Weight Ratio: This parameter is valid only when Pod Deployment Mode is set to Weight. This parameter specifies the total number of pods in the multi-cluster Deployment, and weight and pod range for each cluster in the multi-cluster Deployment.
- Click Next.
- Click Add Container and select the image to be deployed.

If you select multiple cross-region clusters to run the Deployment, you can configure automatic image synchronization for the image to be selected. This function can reduce image upload and update operations and accelerate the speed for applications managed by MCP to pull images across regions. For details, see Configuring Automatic Image Synchronization Between Regions.
- My Images: Create a workload using an image in the HUAWEI CLOUD image repository. If no image is available, click push an image to push an image.
- If your image repository does not require authentication, set Secret Authentication to No, select the corresponding image, and then click OK.
- If your image repository requires authentication (using account and password), select the corresponding secret, and then click OK. If no secret is available, create a secret by following the procedure described in Creating a Secret.
- Open Source Images: Create a workload using an official image in the open source image repository.
- If your image repository does not require authentication, set Secret Authentication to No, select the corresponding image, and then click OK.
- If your image repository requires authentication (using account and password), select the corresponding secret, and then click OK. If no secret is available, create a secret by following the procedure described in Creating a Secret.
- Third-Party Images: Create a workload using an image from any third-party image repository (image repositories other than Huawei Cloud SWR and open source image repository). Ensure that the node where the workload is running is accessible from public networks.
- If your image repository does not require authentication, set Secret Authentication to No, enter an image address, and then click OK.
- If your image repository requires authentication (using account and password), select the corresponding secret, enter an image address, and then click OK.
This secret is a general configuration. To configure the secret of a specific cluster, select Customized Configuration next to Container Settings in the Customize Cluster Configurations step. In the Basic Information area, click Change Image and select the desired secret.
If your workload is a multi-container workload, click Add Container to add more containers.
- My Images: Create a workload using an image in the HUAWEI CLOUD image repository. If no image is available, click push an image to push an image.
- Configure basic container information.
- Image Name: name of the image. You can click Change Image to select another image.
- Image Tag: Select the tag of the image to be used to deploy an application.
- Container Name: container name, which can be changed.
- Container Specifications: resource amount that users can apply for and the maximum amount of resources that are available to users. For details, see Setting Container Specifications.
- Request: minimum amount of resources required for running a container.
- Limit: If a container is overloaded, the system may be faulty. To avoid this situation, set the maximum limits for the container resource quotas to ensure that container resources do not exceed the limits.
- Configure container lifecycle, that is, set the commands that need to be executed in each phase during container management.
- Startup Command: executed when the container is started.
- Post-Start: executed after a container runs successfully. For details, see Setting Container Lifecycle Parameters.
- Pre-Stop: executed to delete logs or temporary files before a container is stopped. For details, see Setting Container Lifecycle Parameters.
- Set the health check function that checks whether containers and services are running properly. Two types of probes are provided: liveness probes and readiness probes. For details, see Setting Health Check for a Container.
- Liveness Probe: The probe restarts the workload when detecting that the workload pod is unhealthy.
- Readiness Probe: The probe sets the workload to the unready state when detecting that the workload pod is unhealthy. In this way, the service traffic will not be directed to the workload pod.
- Set environment variables.
Environment variables can be added to a container. In general, environment variables are used to set parameters.
In the Environment Variables area, click Add Environment Variable.
- Specify security settings.
Set container permissions to protect the system and other containers from being affected.
Enter the user ID to set container permissions and prevent systems and other containers from being affected.
- Configure data storage.
Mounting data storage to containers applies to scenarios where persistent storage and high disk I/O are required. For details, see Federated PVCs.
- Click Add Container and select the image to be deployed.
- Click Next and create a Service.
If your workload will be reachable to other workloads or public networks, add a Service to define the workload access type. The workload access type determines the network attributes of the workload. Workloads with different access types can provide different network capabilities. For details, see Network Management.
- Click Next and configure advanced settings.
- Upgrade Policy
- Rolling upgrade: An old pod is gradually replaced with a new pod. During the upgrade, service traffic is evenly distributed to the old and new pods to ensure service continuity.
Maximum Number of Unavailable Pods: Maximum number of unavailable pods allowed in a rolling upgrade. If the number is equal to the total number of pods, services may be interrupted. Minimum number of alive pods = Total pods – Maximum number of unavailable pods
- In-place upgrade: Old pods are deleted before new pods are created. Services will be interrupted during an in-place upgrade.
- Rolling upgrade: An old pod is gradually replaced with a new pod. During the upgrade, service traffic is evenly distributed to the old and new pods to ensure service continuity.
- Graceful Deletion: Set a time window for pre-stop commands to finish execution before a workload is forcibly deleted. If workload processes are not terminated after the time window elapses, the workload will be forcibly deleted.
- Migration Policy: Set a time window for the system to schedule the workload pod to another available node when the node where the workload pod is running is unavailable. The default value is 300s.
- Pod Label: System-defined app labels added during workload creation cannot be modified. You can click Add Label to add labels.
- Upgrade Policy
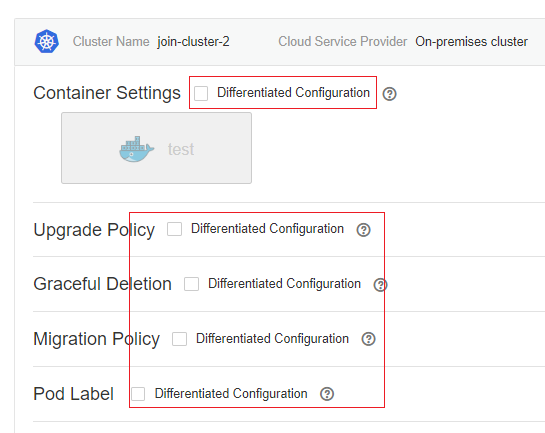
- Click Next to customize configurations for the selected cluster. Select Customized Configuration to customize the parameters of only this cluster. For details about each configuration option, see 3. For details about other configurations, see 5.
Figure 1 Customized configurations
- Click OK.
Using kubectl
The following procedure uses Nginx as an example to describe how to create a workload using kubectl.
1. Use kubectl to connect to the cluster. For details, see Accessing MCP by Using kubectl.
2. Create and edit the nginx-deployment.yaml file. nginx-deployment.yaml is an example file name. You can rename it as required.
vi nginx-deployment.yaml
Insert the following information in the file:
apiVersion: apps/v1
kind: Deployment
metadata:
  name: nginx
spec:
  replicas: 1
  selector:
    matchLabels:
      app: nginx
  strategy:
    type: RollingUpdate
  template:
    metadata:
      labels:
        app: nginx
    spec:
      containers:
      - image: nginx    # If you use an image in My Images, obtain the image path from SWR.
        imagePullPolicy: Always
        name: nginx
      imagePullSecrets:
      - name: default-secret
For details about these parameters, see Table 1.
Parameter |
Description |
Mandatory/Optional |
|---|---|---|
apiVersion |
API version. Set this parameter based on the version of the current cluster.
|
Mandatory |
kind |
Type of the object to be created. |
Mandatory |
metadata |
Metadata definition of the resource object. |
Mandatory |
name |
Name of the Deployment. |
Mandatory |
Spec |
Detailed description of the Deployment. |
Mandatory |
replicas |
Number of pods. |
Mandatory |
selector |
Container pods that can be managed by the Deployment. |
Mandatory |
strategy |
Upgrade mode. Defaults to RollingUpdate.
|
Optional |
template |
Detailed description of a created container pod. |
Mandatory |
metadata |
Metadata. |
Mandatory |
labels |
metadata.labels: Container labels. |
Optional |
spec: containers |
|
Mandatory |
imagePullSecrets |
Name of the secret used during image pulling.
|
If a private image is used, this parameter is mandatory. |
3. Create a Deployment.
kubectl create -f nginx-deployment.yaml
If the following information is displayed, the Deployment is being created.
deployment "nginx" created
4. Query the Deployment status.
kubectl get deployment
If the following information is displayed, the Deployment is running.
NAME           READY     UP-TO-DATE   AVAILABLE   AGE
nginx          1/1       1            1           4m5s
Parameter description
o NAME: pod name
o READY: number of pod replicas that have been deployed
o STATUS: status of the Deployment
o RESTARTS: restart times
o AGE: period the Deployment keeps running
5. If the Deployment will be accessed through a ClusterIP or NodePort Service, add the corresponding Service. For details, see Network Management.
Feedback
Was this page helpful?
Provide feedbackThank you very much for your feedback. We will continue working to improve the documentation.See the reply and handling status in My Cloud VOC.
For any further questions, feel free to contact us through the chatbot.
Chatbot


