Hardware Compatibility Test Tool
Overview
oec-hardware is a hardware compatibility test tool provided by HCE. It verifies the compatibility between servers, boards, and HCE. The verification covers only basic functions.
Compatibility Conclusion Inheritance
- Servers
If the servers to be verified use the same motherboard and are in the same CPU generation, the compatibility conclusion can be inherited.
- Boards
Generally, the board model is determined based on the following quadruple information:
- vendorID: Chip vendor ID
- deviceID: Chip model ID
- svID: Board vendor ID
- ssID: Board model ID
Whether the board compatibility conclusion can be inherited is determined by the following:
- The value of vendorID is different from that of deviceID.
The compatibility conclusion cannot be inherited.
- The value of vendorID is the same as that of deviceID, but different from that of svID.
The compatibility conclusion cannot be inherited because the chip models are the same but the board vendors are different.
- The values of vendorID, deviceID, and svID are the same.
Different boards that use the same chip from the same vendor can inherit the compatibility conclusion.
- The values of vendorID, deviceID, svID, and ssID are the same.
Boards of the same series that use the same chip from the same vendor can inherit the compatibility conclusion. Vendors can assess the boards of the same series and use the typical board name.
Environment Requirements
- Requirements for the server test environment
Table 1 Requirements for the server test environment Item
Requirements
Server quantity
Two servers are required, and their service network ports can communicate with each other.
Hardware
At least one RAID controller card and one NIC (including the hardware integrated on the mainboard) are required.
Memory
Maximum memory is recommended.
- Requirements for the board test environment
Table 2 Requirements for the board test environment Item
Requirements
Server model
TaiShan 200 (Model 2280), 2288H V5, or equivalent servers should be used. For x86_64 servers, you can select Ice Lake, Cooper Lake, or Cascade Lake. Ice Lake is preferred.
RAID controller card
At least RAID 0 is required.
NIC/IB card
A board of the same type should be inserted into the server and the test machine, respectively. IP addresses on the same network segment are required to ensure direct communication.
FC card
The disk array needs to be connected, and at least two LUNs need to be created.

To test an external driver, install the driver and configure the test environment in advance.
For items that need to be tested, such as GPU and keycards, install external drivers in advance. Then, use the test tool to perform the tests.
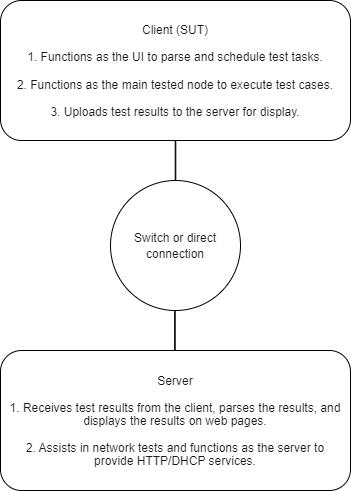
- Operating environment networking
Figure 1 Networking

Installing the Tool
oec-hardware can run in HCE 2.0 or later. For details about the supported OS versions, see the /usr/share/oech/kernelrelease.json file.
- Obtain the installation package.
- Online installation
Use an official HCE repository of the matched version, and use DNF to obtain the software package.
- Offline installation
- Mount the HCE image locally and configure repositories to obtain dependencies.
- Obtain the latest software package from the updates directory of the official repository of HCE.
- Install the tool.
- Client
- Install oec-hardware using DNF.
dnf install oec-hardware
- Run oech. If the tool runs normally, the installation is successful.
- Install oec-hardware using DNF.
- Server
- Install oec-hardware-server using DNF.
dnf install oec-hardware-server
- Start services. oec-hardware works with Nginx to provide a web service. By default, port 80 is used. You can change the port in the Nginx configuration file. Before starting the services, ensure that their ports are not occupied.
systemctl start oech-server.service
systemctl start nginx.service
Enable the services to automatically start upon server startup.systemctl enable oech-server.service systemctl enable nginx.service
- Disable the firewall and SELinux.
systemctl stop firewalld
iptables -F
setenforce 0
- Client
Test Items
- Test Introduction
- oec-hardware automatically restarts when kdump and watchdog tests are being performed. You are advised to perform the kdump and watchdog tests separately from other tests.
- The keycard test depends on the specified open-source OpenSSL version. Perform the test when the environment can access the public network, or download the following content to the /opt directory in advance:
- The GPU test depends on some open-source tools. Perform the test when the environment can access the public network, or download the following content to the /opt directory in advance:
https://github.com/NVIDIA/cuda-samples/archive/refs/heads/master.zip
- If the tests involve interaction between two nodes, disable the firewalls on the two nodes to prevent the test data from being filtered out, such as the Ethernet and DPDK tests.
systemctl stop firewalld
- Currently, the USB test is used to check whether the USB device can be identified. During the test, you need to manually insert or remove the USB device in different phases as prompted.
- /usr/share/oech/lib/config/test_config.yaml is the configuration file template for hardware tests. Before performing FC, RAID, disk, Ethernet, and InfiniBand tests, edit the configuration file based on the actual environment and specify the hardware to be tested. For other hardware tests, you do not need to edit the configuration file.
- Test Strategies
Table 3 Test strategies Test
Mandatory for Servers
Mandatory for Boards
system
√
√
ACPI
√
-
clock
√
-
cpufreq
√
-
cdrom
-
-
disk
√
-
dpdk
-
-
Ethernet
√
√
FC
-
√
GPU
-
√
IPMI
√
-
InfiniBand
-
√
kABI
√
√
kdump
√
-
keycard
-
√
memory
√
-
NVMe
-
√
perf
√
-
RAID
√
√
USB
-
-
watchdog
√
-
Using the Tool
Prerequisites
- The /usr/share/oech/kernelrelease.json file lists all supported system versions. Run uname -a to check whether the current system kernel version is supported by the framework.
- By default, the framework scans all NICs. Before testing NICs, list the NICs to be tested. The test port must be connected and in the up state. You are advised not to use the service network port to perform the NIC test.
- /usr/share/oech/lib/config/test_config.yaml is the configuration file template for hardware tests. Before performing FC, RAID, disk, Ethernet, and InfiniBand tests, edit the configuration file based on the actual environment. For other hardware tests, you do not need to edit the configuration file. For the NIC test, if the IP address is automatically added by the tool, you need to manually delete the IP address of the server for security after the test is complete.
Procedure
- Start the test framework on the client.
# oech
- Set Compatibility Test ID, Product URL, and Compatibility Test Server.
Set a custom compatibility test ID (which cannot contain special characters), set Product URL to the product URL, and set Compatibility Test Server to the domain name or IP address of the server that can be directly accessed by the client and is used to display test reports and perform network tests. The default Nginx port number on the server is 80. If the port number is not changed after the server is installed, set Compatibility Test Server to the service IP address of the server. Otherwise, set it to the IP address and port number, for example, 172.167.145.2:90.
The HCE Hardware Compatibility Test Suite
Please provide your Compatibility Test ID:
Please provide your Product URL:
Please provide the Compatibility Test Server (Hostname or Ipaddr):
- Go to the test suite selection page. On the test case selection page, the framework automatically scans hardware and selects the test suite that can be tested in the current environment. You can enter edit to go to the test suite selection page.
These tests are recommended to complete the compatibility test:
No. Run-Now?  status    Class         Device         driverName     driverVersion     chipModel      boardModel
1     yes     NotRun    acpi
2     yes     NotRun    clock
3     yes     NotRun    cpufreq
4     yes     NotRun    disk
5     yes     NotRun    ethernet      enp3s0         hinic          2.3.2.17          Hi1822              SP580
6     yes     NotRun    ethernet      enp4s0         hinic          2.3.2.17          Hi1822              SP580
7     yes     NotRun    ethernet      enp125s0f0     hns3                             HNS GE/10GE/25GE    TM210/TM280
8     yes     NotRun    ethernet      enp125s0f1     hns3                             HNS GE/10GE/25GE    TM210/TM280
9     yes     NotRun    raid          0000:04:00.0   megaraid_sas   07.714.04.00-rc1  SAS3408             SR150-M
10    yes     NotRun    gpu           0000:03:00.0   amdgpu                           Navi                Radeon PRO W6800
11    yes     NotRun    ipmi
12    yes     NotRun    kabi
13    yes     NotRun    kdump
14    yes     NotRun    memory
15    yes     NotRun    perf
16    yes     NotRun    system
17    yes     NotRun    usb
18    yes     NotRun    watchdog
Ready to begin testing? (run|edit|quit)
- Select a test suite. The options (all and none) are used to select all and cancel all (system is a mandatory test and cannot be canceled). Enter a number to select a test suite. Only one number can be entered at a time. After you press Enter, no changes to yes, indicating that the test suite is selected.
Select tests to run:
No. Run-Now?  status    Class         Device         driverName     driverVersion     chipModel           boardModel
1     no      NotRun    acpi
2     no      NotRun    clock
3     no      NotRun    cpufreq
4     no      NotRun    disk
5     yes     NotRun    ethernet      enp3s0         hinic          2.3.2.17          Hi1822              SP580
6     no      NotRun    ethernet      enp4s0         hinic          2.3.2.17          Hi1822              SP580
7     no      NotRun    ethernet      enp125s0f0     hns3                             HNS GE/10GE/25GE    TM210/TM280
8     no      NotRun    ethernet      enp125s0f1     hns3                             HNS GE/10GE/25GE    TM210/TM280
9     yes     NotRun    raid          0000:04:00.0   megaraid_sas   07.714.04.00-rc1  SAS3408             SR150-M
10    yes     NotRun    gpu           0000:03:00.0   amdgpu                           Navi                Radeon PRO W6800
11    yes     NotRun    ipmi
12    yes     NotRun    kabi
13    yes     NotRun    kdump
14    yes     NotRun    memory
15    yes     NotRun    perf
16    yes     NotRun    system
17    yes     NotRun    usb
18    yes     NotRun    watchdog
Selection (<number>|all|none|quit|run):
- Start the test. After selecting a test suite, enter run to start the test.
- Upload the test results. After a test is complete, you can upload the test results to the server for display and log analysis. If the upload fails, check the network configuration and upload the test results again.
...
-------------  Summary  -------------
ethernet-enp3s0                  PASS
system                           PASS
Log saved to /usr/share/oech/logs/oech-20240928210118-TnvUJxFb50.tar succ.
Do you want to submit last result? (y|n) y
Uploading...
Successfully uploaded result to server X.X.X.X.
Obtaining the Results
- Viewing Test Logs
After the test is complete, the test logs are saved in the /usr/share/oech/logs/ directory. You can export and decompress the test logs to view them.
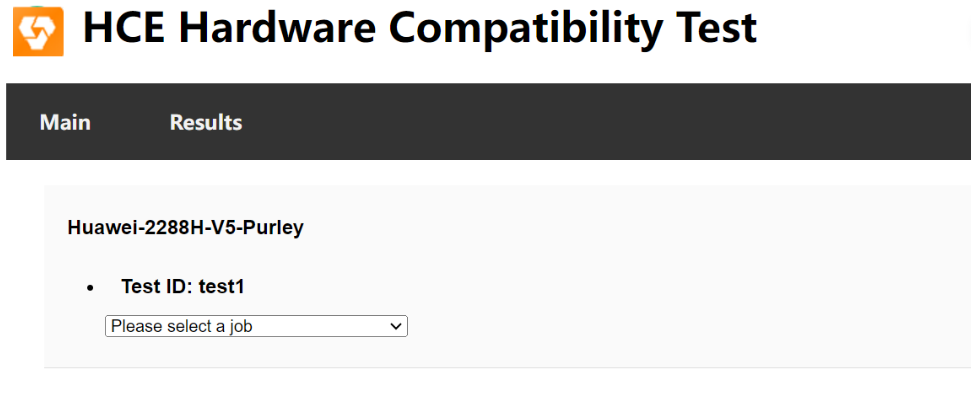
- Viewing the Test Report Using a Browser
View the test report using a browser. You need to configure the server in advance receive the test results.
- Open the browser, enter the server IP address, click Results, and find the corresponding test IDs.
Figure 2 Viewing the test report using a browser

- View the detailed test results on each page, including the environment information and execution results.
- Summary: View all test results.
- Devices: View information about all hardware devices.
- Runtime: View the test runtime and general task execution logs.
- Attachment: Download the test log attachment.
- Open the browser, enter the server IP address, click Results, and find the corresponding test IDs.
Feedback
Was this page helpful?
Provide feedbackThank you very much for your feedback. We will continue working to improve the documentation.See the reply and handling status in My Cloud VOC.
For any further questions, feel free to contact us through the chatbot.
Chatbot


