
Analyzing a Graph Using Tools in the Drawing Area
The canvas intuitively displays the graph data. You can also edit and analyze data in this area. For details about the shortcut keys and interface elements on the canvas, see Table 3.
Function
The procedure is as follows:
- Access the GES graph editor. For details, see Accessing the Graph Editor.
- On the canvas, click any vertex in the graph. The selected vertex is displayed as
 .
.
 : hides a vertex. After clicking the button, the vertex will be hidden on the canvas.
 : a one-hop query starting from the current vertex, and the vertices associated with the current vertex are extended.
- On the canvas, right-click a vertex or an edge, and perform the following operations:
Figure 1 Shortcut menu
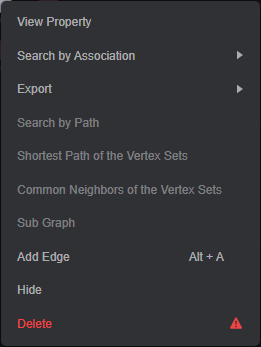
- View Property
Select View Property to view the property information about the selected vertex or edge on the Property tab page.
Figure 2 View Property
- Search by Association
You can select OUT, IN, and ALL to expand vertices related to the current vertex.
- OUT: Query the vertices using this vertex as the source vertex.
- IN: Query the vertices using this vertex as the target vertex.
- ALL: Query all vertices of OUT and IN.
- Export
Export the graph or data displayed on the canvas.
- Search by Path
Query paths between two vertices. All possible paths are listed.
Procedure: Hold down Ctrl and click two vertices. The first is the source vertex and the second is the target vertex. Then, Right-click and choose Search by Path from the shortcut menu.

This option is valid only when two vertices are selected. Otherwise, it is dimmed.
After the running is complete, a path is drawn based on the selected two vertices.Figure 3 Search by path
- Shortest Path of Vertex Sets
- Hold down Shift and box-select a group of vertices (a single vertex or multiple vertices).
- Hold down Shift and box-select another group of vertices (a single vertex or multiple vertices).
- Right-click in the selection box and choose Shortest Path of the Vertex Sets from the shortcut menu.
- In the dialog box that appears, you can edit the selected two sets of vertices. After entering vertices, you can press Enter to quickly add them.
- Click Run. The shortest paths between two vertex sets are returned.
- Common Neighbors of Vertex Sets
- Function
By box-selecting the common neighbors of two vertex sets, you can intuitively discover the objects associated with the two sets.
- Procedure
- Hold down Shift and box-select two vertex sets.
Figure 4 Box-selecting vertex sets

- Right-click a vertex set and choose Common Neighbors of Vertex Sets from the shortcut menu.
Figure 5 Common Neighbors of Vertex Sets

- In the displayed dialog box, confirm the vertices in the vertex set. You can add or delete vertices and determine whether to carry additional parameters. Then, click Run.
Figure 6 Confirming the vertices in the vertex sets

The Carrying additional constraints option allows you to limit the result set:
- If this option is not selected, the found common neighbors are the intersection of the neighbors corresponding to the source vertex set and target vertex set.
- If this option is selected, the found common neighbors are not only the intersection of the neighbors corresponding to the source vertex set and target vertex set, but each vertex in the common neighbor set has at least two neighboring vertices in the source vertex set and target vertex set.
- Display the result.
Figure 7 Graph
 Figure 8 Query result
- Hold down Shift and box-select two vertex sets.
- Function
- Sub Graph: Press and hold Ctrl and select some vertices. The edges between those vertices and the selected vertices form a new graph.
Graphs of the database edition do not support path query, shortest path of the selected vertex set, common neighbor of the selected vertex set, and subgraph query.
- Add Edge: Add an edge.
To add an edge between any two vertices on the canvas, hold down Ctrl, select two vertices on the canvas, right-click the selected vertices, and choose Add Edge. By default, the vertex selected first is the source vertex, and that selected later is the target vertex. After the edge is added, you can select the label of the edge and set the edge properties.
- Hide: Hide one selected vertex or edge each time.
- Delete: Delete a vertex, an edge, multiple vertices, and multiple edges, or delete edges and vertices in batches.
- To delete a vertex /edge, select the vertex/edge and delete it.
- To delete multiple vertices/edges, press Ctrl to select the vertices/edges and delete them.
- To delete vertices and edges in batches, hold down Shift and drag the left key of the mouse to select multiple vertices and edges and delete them.
After you click Delete, a confirmation dialog box is displayed. Confirm the information about the vertices and edges you want to delete and click Yes.Figure 9 Deleting vertices and edges
The vertices and edges will be permanently deleted and cannot be restored. Exercise caution when performing this operation.
- View Property
- View the details about a vertex.
Move the cursor to a non-virtualized vertex. The ID, label, and properties of this vertex are displayed.
Figure 10 Details
A maximum of six properties of a vertex can be displayed in the pop-up window. When the number of properties is greater than six, you can view all of them in the filter and property tab as shown in Editor page.
Feedback
Was this page helpful?
Provide feedbackThank you very much for your feedback. We will continue working to improve the documentation.See the reply and handling status in My Cloud VOC.
For any further questions, feel free to contact us through the chatbot.
Chatbot


