
Help Center>
Graph Engine Service>
User Guide>
Accessing and Analyzing Graph Data>
HyG Graph Management (Database Edition)
Updated on 2024-06-17 GMT+08:00
HyG Graph Management (Database Edition)
Create a HyG graph in the GES editor and import data into the graph.

- Only graphs of version 2.4.2 or later support this function.
- When creating a graph, set the product type to database edition and enable the HyG computing engine. For details, see Creating a Custom Graph.
Creating a HyG Graph
- After the database graph cluster is created, the graph engine editor page is displayed. For details, see Accessing the GES Graph Editor.
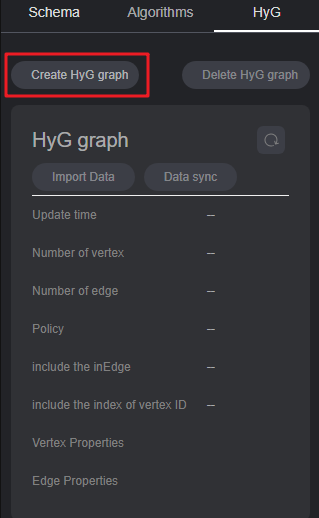
- On the HyG tab, click Create HyG graph.
Figure 1 Creating a HyG graph
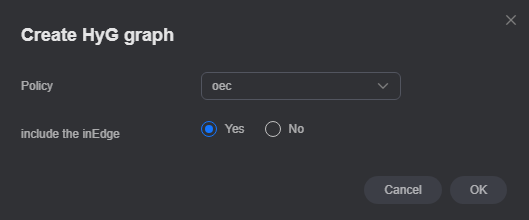
- In the displayed dialog box, set Policy (only oec currently available) and Include Incoming Edge, and click OK.
- Policy: graph splitting policy. oec (out edge cut) indicates outgoing edge splitting. Retain the default value.
- Include Incoming Edge: whether the graph contains incoming edges. If set to Yes, the data synchronization performance will be affected.
Figure 2 Setting parameters
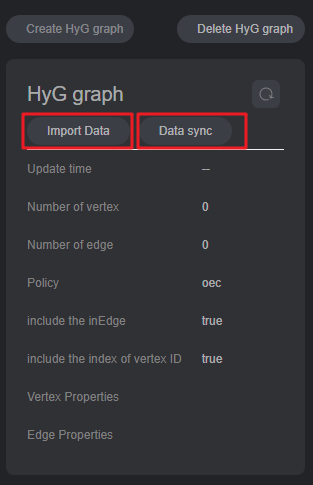
- Once the creation is successful, you can import or synchronize data.
- Data import: You can import new vertex and edge data. For details, see Importing Data.
- Data synchronization: Synchronize your existing vertex and edge data in the graph database to the compute engine. For details, see Synchronizing Data.
Figure 3 Importing data
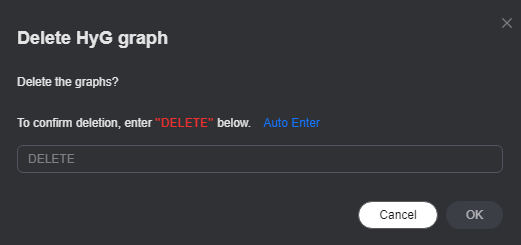
- To delete a HyG graph, click Delete HyG Graph. In the displayed dialog box, enter DELETE and click OK.
Figure 4 Deleting a HyG graph
Importing Data
- Click Import Data. In the displayed dialog box, set the following parameters:
- AccessKey: user's access key ID
- SecretKey: secret key used together with the access key ID
- Vertex Dataset: vertex file directory or vertex file name. CSV and TXT files can be imported.
- Edge Dataset: edge file directory or edge file name. CSV and TXT files can be imported.
- Metadata: OBS path of the metadata file of the new data
- Log Storage Path: directory for storing graph import logs, used to store failed data imports and detailed error causes
- Field Delimiter: field delimiter in a CSV file. The default value is comma (,).
- Field Enclosure Symbol: field enclosure symbol in a CSV file, which is used to enclose a field, such as when the field contains a delimiter or line break. The default value is double quotes (").
- Vertex Properties: List of vertex properties. The specified properties must belong to the schema file. If the list is empty, vertex properties will not be imported.
- Edge Properties: List of edge properties. The specified properties must belong to the schema file. If the list is empty, edge properties will not be imported.
Figure 5 Importing data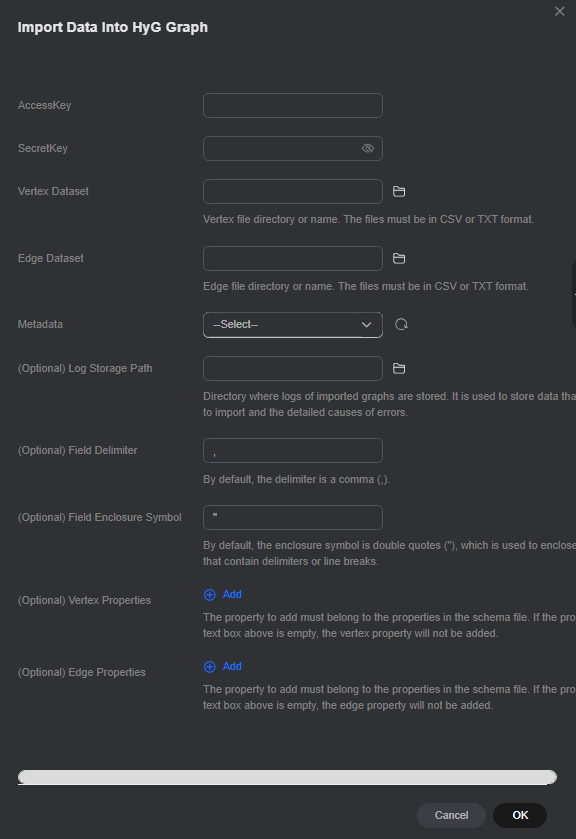
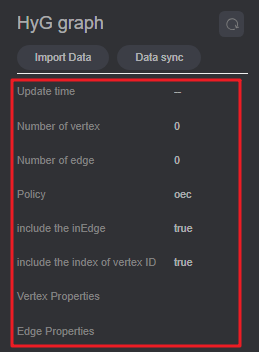
- Click OK. The imported data is displayed in the HyG graph details.
Figure 6 HyG graph details
Data Synchronization
- Click Synchronize Data. In the displayed dialog box, specify the vertex and edge properties.
During the initial data synchronization, the vertex and edge parameters will be applied. For subsequent synchronizations, these parameters will default to the values specified during the first synchronization.
Figure 7 Data synchronization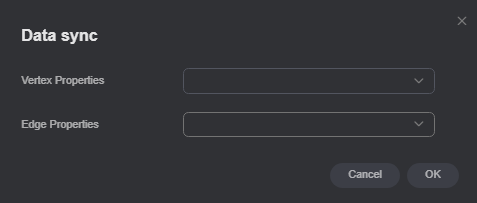
- Click OK to synchronize data. Once the synchronization is complete, the data is displayed in the HyG graph details.
Figure 8 HyG graph details

Parent topic: Accessing and Analyzing Graph Data
Feedback
Was this page helpful?
Provide feedbackThank you very much for your feedback. We will continue working to improve the documentation.See the reply and handling status in My Cloud VOC.
The system is busy. Please try again later.
For any further questions, feel free to contact us through the chatbot.
Chatbot


