Purchasing a FlexusX Instance
Scenarios
When purchasing a FlexusX instance, you need to configure the instance specifications, image, storage, network, and security group. After the purchase is successful, you can use the FlexusX instance just like using a local PC or physical server.
This section describes how to purchase FlexusX instances on the management console.
Procedure
|
Step |
Description |
|---|---|
|
Register a HUAWEI ID and enable Huawei Cloud services. |
|
|
Access the Buy FlexusX Instance page. |
|
|
Configure parameters based on your service requirements. |
|
|
Confirm the configuration details and complete the purchase. |
Preparations
Before creating a FlexusX instance, sign up for a HUAWEI ID and enable Huawei Cloud services. For details, see Signing Up for a HUAWEI ID and Enabling Huawei Cloud Services.
Real-name authentication is required only when you buy or use cloud services provisioned in the Chinese mainland.
Before purchasing a FlexusX instance, you need to understand the notes and constraints. For details, see Notes and Constraints.
Step 1: Access the Page for Purchasing FlexusX Instances
- Log in to the FlexusX console. In the upper left corner, click
 and select a region.
 - Click Buy FlexusX.
Figure 1 FlexusX instance page

Step 2: Configure Parameters
Configure required parameters for purchasing a FlexusX instance based on your service requirements.
Basic Configuration

|
Parameter |
Description |
|---|---|
|
Billing Mode |
FlexusX instances can be billed on a yearly/monthly or pay-per-use basis. For details, see Billing.
|
|
Region |
A region refers to a physical data center area where FlexusX instances reside. Select a region close to your services to reduce network latency and improve access speed. For services that need to communicate with existing cloud services through a private network, select the region where the existing cloud services are deployed. Exercise caution when selecting a region. Once a FlexusX instance is created, the region cannot be changed. |
|
AZ |
An AZ is a physical region where resources use independent power supply and networks. AZs are physically isolated but interconnected through an internal network.
|
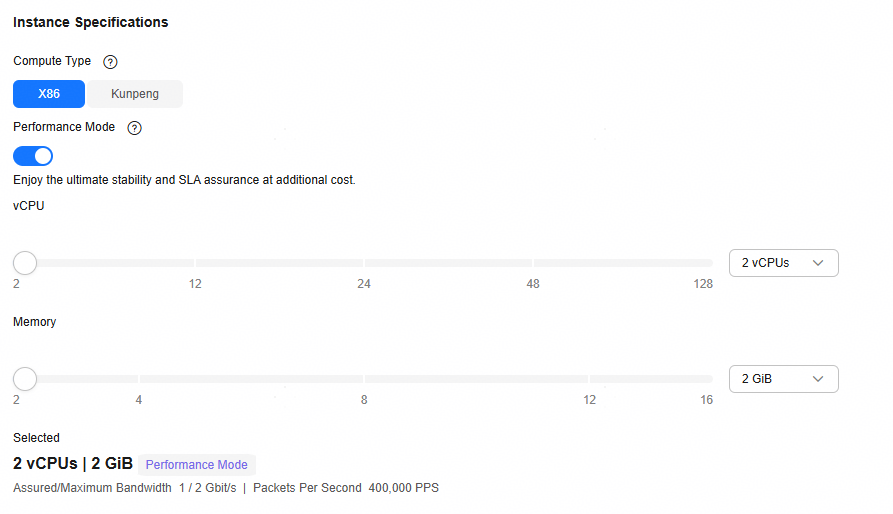
Instance Specifications
|
Parameter |
Description |
|---|---|
|
Compute Type |
|
|
Performance Mode |
FlexusX supports performance mode. Performance mode can provide the ultimate, stable performance assurance at additional costs. For details about the differences between x86-powered instance specifications with performance mode enabled and disabled, see Instance Specifications (x86 Compute). For details about Kunpeng-powered instance specifications, see Instance Specifications (Kunpeng Compute). |
|
Instance Specifications |
You can select either preset or custom FlexusX instance specifications as needed. For more information about specifications, see Instance Specifications. |
Image

|
Parameter |
Description |
|---|---|
|
Public Images |
Public images are standard, widely used images. A public image contains an OS and pre-installed public applications. After your instance is created using a public image, you can deploy applications or software on the instance as required.
NOTE:
|
|
Private images |
Private images are created on Image Management Service (IMS). You can create a private image from a cloud server on Huawei Cloud or another cloud platform, or you can download a third-party image. Before selecting a private image, you are advised to learn about the usage and constraints of private images described in Creating a FlexusX Instance from a Private Image or Using a Private Image to Change the OS.
NOTE:
The FlexusX instance you are creating and the private image you want to select must belong to the same region. Otherwise, the image cannot be selected for the FlexusX instance. For example, if you want to create a FlexusX instance in the CN-Hong Kong region, you can only select images from the CN-Hong Kong region. If you want to use an image from another region, replicate that image to the current region. For details, see Replicating Images Across Regions. |
|
Shared images |
A shared image is a private image shared by another user. |
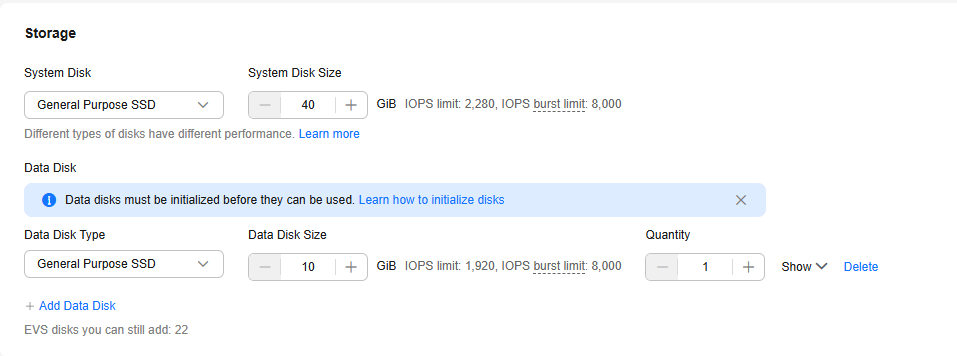
Storage
|
Parameter |
Description |
|---|---|
|
System Disk |
Set the system disk type and size. Different disks have different performance. For details, see EVS Concepts. If the private image you selected is not encrypted, the system disk will not be encrypted, either. If the image you selected is encrypted, the system disk will be encrypted automatically. |
|
Data Disk |
Set the data disk type, size, and quantity. Click Show
|
Network

|
Parameter |
Description |
|---|---|
|
VPC |
Select an available VPC and subnet from the drop-down list and specify how a private IP address will be assigned.
|
|
NIC |
Click Add NIC to add multiple extension NICs and specify IP addresses for them (including primary NICs). If you specify an IP address and create multiple FlexusX instances in a batch, this IP address is the start IP address. Ensure that the IP address is consecutive, available within the specified subnet. The subnet that contains the specified IP address cannot overlap with other subnets. |
|
IPv6 |
This parameter is available only if FlexusX instances are of specific flavors and in a VPC with IPv6 enabled.
For details about how to enable IPv6 on a subnet, see IPv4 and IPv6 Dual-Stack Network. For details about how to check whether a FlexusX instance supports IPv4 and IPv6 dual stack, see "Constraints" in Dynamically Assigning IPv6 Addresses. By default, the system assigns IPv4 addresses. If you select Automatically-assigned IPv6 address, the system assigns IPv6 addresses. In a VPC, a FlexusX instance uses an IPv6 address to access the dual-stack intranet. To access the Internet, you must enable IPv6 Bandwidth and select a shared bandwidth. The FlexusX instance then can access the IPv6 Internet through the IPv6 address.
After you create a FlexusX instance, you need to enable IPv6 so that the instance dynamically obtains an IPv6 address. For details, see Dynamically Assigning IPv6 Addresses.
NOTE:
|
|
Security Group |
You can select an existing security group from the drop-down list or create a new one. This configuration controls access to FlexusX instances within a security group or among security groups, enhancing instance security. You can define access rules for a security group to protect the FlexusX instances in the group. When creating a FlexusX instance, you can select multiple security groups (no more than five is recommended). The access rules of all the selected security groups apply to the instance. The security group rules affect the access and use of FlexusX instances. For details about how to configure security group rules, see Configuring Security Group Rules for a FlexusX Instance. Enable the following common protocols and ports as needed:
|
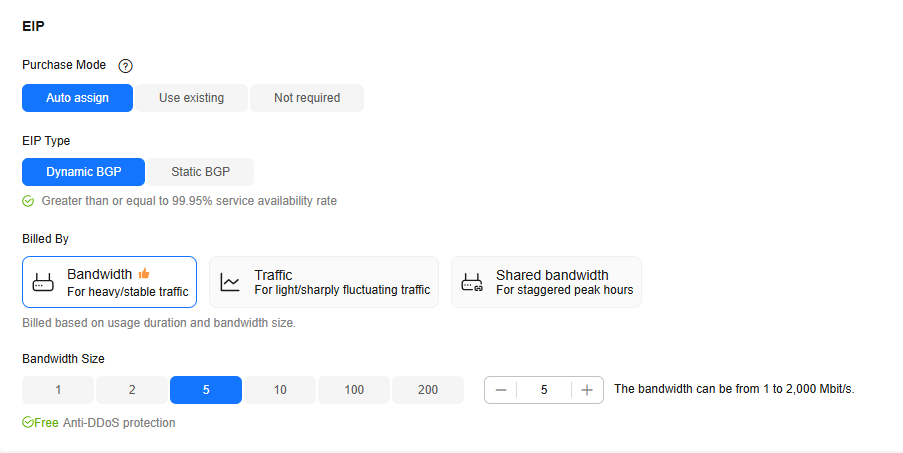
EIP
An EIP is a static public IP address bound to a FlexusX instance in a VPC. The EIP enables the instance to communicate with the Internet.
|
Parameter |
Description |
|---|---|
|
Purchase Mode |
|
|
EIP Type |
This parameter is mandatory when Purchase Mode is set to Auto assign.
|
|
Billed By |
This parameter is mandatory when Purchase Mode is set to Auto assign. If you select Bandwidth or Traffic, the system will allocate a dedicated bandwidth for you, and the bandwidth is dedicated for one EIP.
|
|
Bandwidth Size |
Select the bandwidth size (in Mbit/s) based on service requirements. |
(Optional) Associated Services
Configure Cloud Eye and Host Security Service (HSS) based on your needs.

|
Parameter |
Description |
|---|---|
|
Cloud Eye |
If you enable Cloud Eye, an agent will be automatically installed on your FlexusX instance to provide 1-minute fine-grained monitoring of its metrics, such as vCPUs, memory, network, disks, and processes. |
|
HSS |
If you enable HSS, your FlexusX instance will be provided with host security services that scan for weak passwords, system vulnerabilities, brute-force attacks, and unauthorized logins. You can select the HSS edition as required. The basic protection trial edition is free for one month. After one month, HSS stops providing services. |
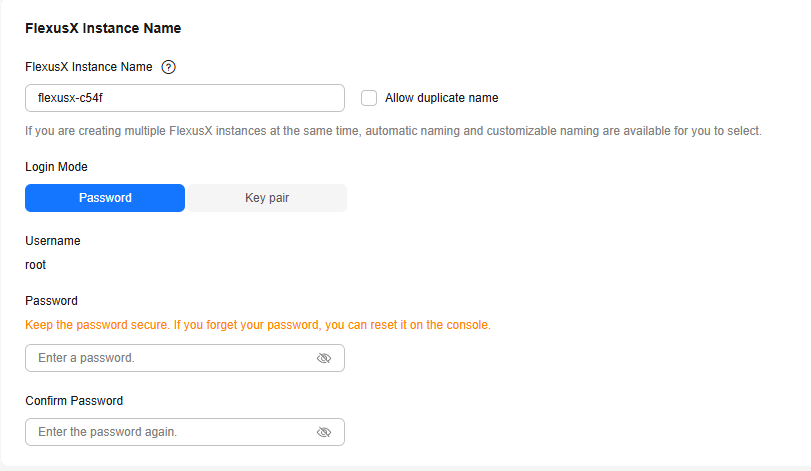
FlexusX Instance
|
Parameter |
Description |
|---|---|
|
FlexusX Instance Name |
You can create a custom FlexusX instance name. If you purchase multiple FlexusX instances at a time, the system automatically sequences these instances. |
|
Login Mode |
|
Cloud Backup and Recovery
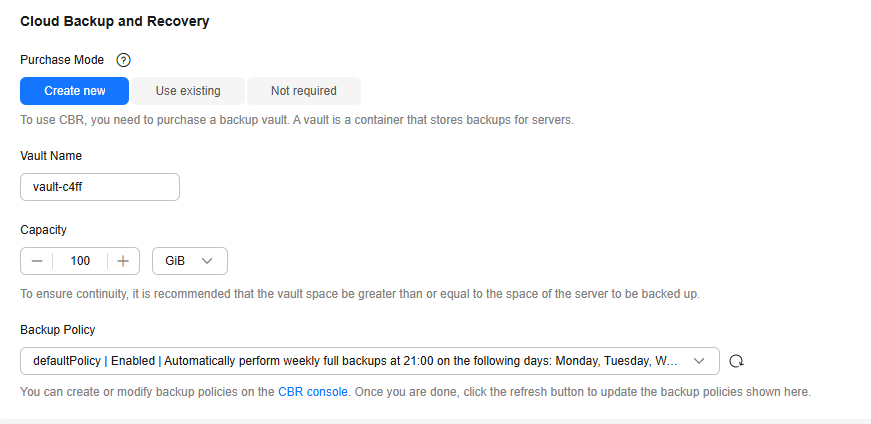
Cloud Backup and Recovery (CBR) lets you back up disks and FlexusX instances and use the backups to restore data. After you set Cloud Backup and Recovery, the system associates the FlexusX instance with the cloud backup vault and applies the selected backup policy to periodically back up the instance. For CBR billing details, see How Is CBR Billed?
|
Parameter |
Description |
|---|---|
|
Create new |
|
|
Use existing |
|
|
Not required |
Backup is not configured. If you require this function after purchasing the FlexusX instance, log in to the CBR console and bind the desired cloud backup vault to your FlexusX instance. |
(Optional) Advanced Options
|
Parameter |
Description |
|---|---|
|
Description |
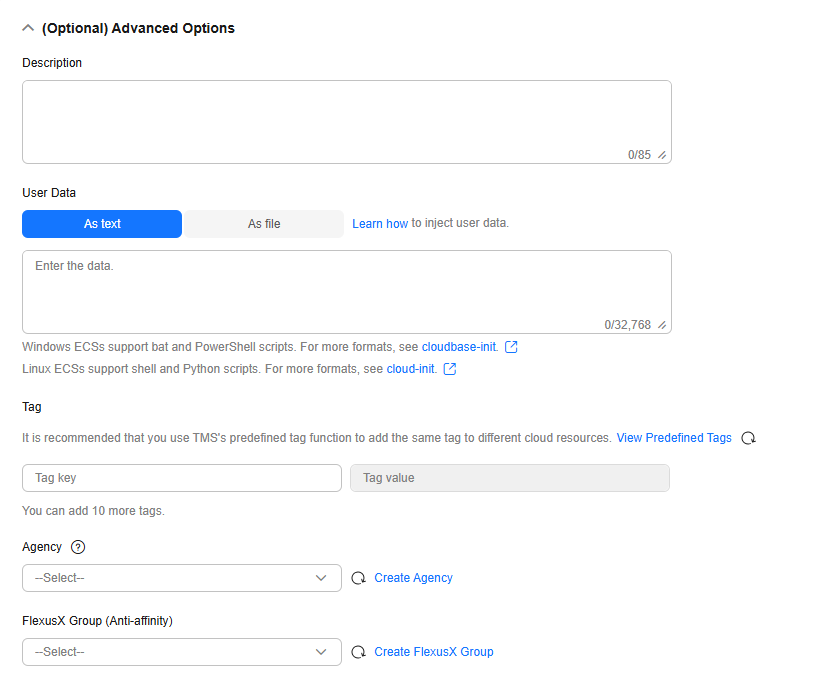
Add a FlexusX instance description. |
|
User Data |
This parameter is available only if you select Key pair for Login Mode. You can inject user data to customize your FlexusX instance. With this configuration, the FlexusX instance automatically injects data the first time it starts up.
For example, if you activate user root with a script, you can log in to the FlexusX instance as root. For details about how to pass user data, see Passing User Data to ECSs. |
|
Tag |
Tags the FlexusX instance. Adding tags to FlexusX instances helps you better identify and manage your FlexusX instances. You can add up to 10 tags to each instance.
NOTE:
Tags added during the instance creation will also be added to the EIP and EVS disks (including the system disk and data disks) of the FlexusX instance. If the instance uses an existing EIP, the tags will not be added to that EIP. After creating the instance, you can view the tags on the pages providing details about the FlexusX instance, EIP, and EVS disks. |
|
Agency |
When your FlexusX resources need to be shared with other accounts, or your FlexusX is delegated to professional personnel or team for management, the tenant administrator creates an agency in IAM and grants the FlexusX management permissions to the personnel or team. The delegated account can log in to the cloud system and switch to your account to manage resources. This way, you do not need to share security credentials (such as passwords) with other accounts, ensuring the security of your account. If you have created an agency in IAM, select the agency from the drop-down list. For more information about agencies, see Account Delegation. |
|
ECS Group (Anti-affinity) |
Select the ECS group that you want to add your FlexusX instance to. An ECS group applies the anti-affinity policy to the instances in it so that they can be deployed on different hosts. For details about how to create an ECS group, see Managing an ECS Group for FlexusX Instances. |
Step 3: Confirm the Configuration and Submit the Order
- Click Next: Confirm.
On the displayed page, confirm the configuration details of your FlexusX instance.
Table 11 Verifying parameter configuration Parameter
Description
Enterprise Project
This function is provided for enterprise users.
An enterprise project makes it easy to manage projects and groups of cloud resources and users. Use the default enterprise project or create one.
Select an enterprise project from the drop-down list. For more details, see Accessing the Enterprise Center.
Required Duration
Specifies the subscription duration of the FlexusX instance. This parameter is displayed only when Billing Mode is set to Yearly/Monthly.
Auto-renew
This parameter is displayed only when Billing Mode is set to Yearly/Monthly. You can select Auto-renew to automatically renew a yearly/monthly subscription upon expiry.- Monthly subscription: auto-renews for 1 month every time.
- Yearly subscription: auto-renews for 1 year every time.
For more information about auto-renewal rules, see Auto-Renewal Rules.
Required Duration
This parameter is displayed only when Billing Mode is set to Pay-per-use. You can select Set scheduled deletion time and set the time for deleting the FlexusX instance. This way, the FlexusX instance will be deleted automatically as scheduled.
However, before the scheduled time arrives, you can change it on the instance details page.NOTE:Back up data before you set the scheduled deletion time.
Quantity
You can set how many FlexusX instances to be created in a batch. FlexusX instances created in a batch have the same configurations.
- Read and agree to the agreement/disclaimer.
- Hover your mouse over the price to learn about price details.
- Click Submit and complete the payment.
- Go back to the FlexusX console and view the purchased FlexusX instances.
Figure 12 Successful creation

Helpful Links
- If you did not create a password for your FlexusX instance or if you have forgotten the login password, reset the password and then log in to the instance.
- After creating a FlexusX instance, you can remotely connect to the instance to deploy it. For details, see Logging In to a FlexusX Instance.
Before logging in to a FlexusX instance in non-VNC mode, ensure that the login port has been allowed by security group rules. Otherwise, the login fails. To log in to a Linux instance, ensure that SSH port 22 has been allowed. To log in to a Windows instance, ensure that RDP port 3389 has been allowed. For details about how to configure security group rules, see Configuring Security Group Rules for a FlexusX Instance.
- Data disks can be used only after initialization.
- If you want to deploy your FlexusX instance by yourself, refer to the instructions in Setting Up Websites.

When you set up the environment by referring to Setting Up Websites, ensure that the image version used by the FlexusX instance is the same as that in the tutorial to prevent command execution failures caused by version incompatibility.
- If your FlexusX instance is used as an email server, it is a good practice to configure reverse DNS records for the EIP. This helps reduce the chance that emails sent from the email server will be flagged as spam. For more information, see Configuring a PTR Record for an Email Server.
Feedback
Was this page helpful?
Provide feedbackThank you very much for your feedback. We will continue working to improve the documentation.See the reply and handling status in My Cloud VOC.
For any further questions, feel free to contact us through the chatbot.
Chatbot


