
Injecting or Extracting Image Watermarks
The DSC console offers a feature for injecting watermarks into JPG or JPEG files. You can refer to this section to apply customized watermarking to your cloud-stored files in OBS buckets or to images on your local device.
The content of an invisible watermark remains unseen until it is retrieved through a specialized watermark extraction tool. The DSC console facilitates this process by offering a watermark extraction feature for images. Detailed instructions on how to extract watermarks from files stored in OBS buckets or from local files are provided in this section.
Prerequisites
- OBS asset access permissions are granted. For details, see Allowing or Disallowing Access to Cloud Assets.
- You have enabled and created assets on OBS. For details about how to enable OBS, see Enabling and Using OBS Buckets.
- The supported image formats are jpg, jpeg, png, bmp, tiff, tif, tga and gif.
- The resolution of the original image must be greater than 128 x 128 pixels.
Constraints
- The maximum size of an image is 20 MB.
- The resolution of the image to be watermarked must be at least 128 x 128 pixels.
- The maximum length of the invisible text watermark is 32 characters.
- Images in *.tiff, *.tif, and *.tga formats do not support watermark preview.
- When Watermark Content is set to Image, only logo images in the digital or letter style are supported.
- This section describes how to extract invisible watermarks from an image.
- The invisible watermark content contains a maximum of 32 bytes.
Injecting or Extracting Image Watermarks
To inject data watermarks to or extract them from an image, perform the following operations:
- Log in to the DSC console.
- Click
 in the upper left corner and select a region or project.
 - In the navigation pane on the left, choose .
- In the OBS Bucket Files tab, set the path in the File Settings area. Figure 1 File settings

- Click Add next to Original image path to select the cloud path of the original images. The size of the selected image cannot exceed 20 MB.
- Click Add next to Storage destination path to select the destination storage path.
- Click the Save Target File Name text box and enter the name of the watermarked image file. The file name contains a maximum of 32 characters and the file name extension is jpg, jpeg, png, bmp, tiff, tif, tga, or gif. Images in *.tiff, *.tif, and *.tga formats do not support watermark preview.
- Watermark type can be visible watermark and invisible watermark.
- Visible watermark: The watermark can be displayed on the image. For details about the related parameters, see Table 1.
Table 1 Configuring a visible watermark Parameter
Description
Watermark Content
Select the Watermark Content from the drop-down list box.
- Image watermark
- Text watermark.
Image Path
If Watermark Content is set to Image watermark, click Add to select an image on the cloud as the watermark.
The watermark image must be in the same area as the original image. Otherwise, the preview fails.
Text Content
If Watermark Content is set to Text watermark, enter the text watermark content in the text box. The value can contain 1 to 32 characters. Only numbers and letters are supported.
Watermark Position
Select the position where the watermark is injected.
Image Size
Absolute size of the image to be injected. This parameter is displayed when Watermark Content is set to Image watermark. The value ranges from 0 to 100.
Watermark Size
Size of the text watermark to be injected. This parameter is displayed when Watermark Content is set to Text watermark. The value ranges from 1 to 100.
Watermark Transparency
Transparency of the watermark to be injected. The value ranges from 1 to 100.
Horizontal Margin
Horizontal margin of the watermark to be injected relative to the image. The value ranges from 0 to 100.
Vertical Margin
Vertical margin of the watermark to be injected relative to the image. The value ranges from 0 to 100.
Font Color
This parameter is displayed when Watermark Content is set to Text watermark. You can click the color bar to select the font color of the text watermark to be injected.
Figure 2 Configuring a visible watermark
- Invisible watermark: The watermark text is invisible and needs to be extracted using tools. For details about how to extract an invisible watermark, see Extracting Image Watermarks from an Image in an OBS Bucket and Extracting Watermarks from a Local Image.

For effective watermark embedding, the resolution of the watermark image should be at least 64 x 64 pixels. Upon extraction, the watermark will be displayed as a downscaled version, resized to precisely 64 x 64 pixels.
Table 2 Configuring an invisible watermark Parameter
Description
Watermark Content
Select the Watermark Content from the drop-down list box.
- Image watermark
- Text watermark.
Text Content
If Watermark Content is set to Text watermark, enter the text watermark content in the text box. The value can contain 1 to 32 characters. Only numbers and letters are supported.
Image path
If Watermark Content is set to Image watermark, click Add to select an image on the cloud as the watermark.
Figure 3 Configuring an invisible watermark
- Visible watermark: The watermark can be displayed on the image. For details about the related parameters, see Table 1.
- After parameters are configured, click OK. The file with watermark injected is automatically downloaded to the specified path on the local PC.

- If you injected a visible watermark, open the target file to view the watermark.
- If you injected an invisible watermark, extract the watermark from the target file using tools. For details, see Extracting Image Watermarks from an Image in an OBS Bucket and Extracting Watermarks from a Local Image.
- Click Preview in the lower left corner of the page and preview the watermark effect in the visible watermark preview area on the right. The invisible watermark cannot be previewed.
- Click OK to complete watermark injection.
- Log in to the DSC console.
- Click in the upper left corner and select a region or project.
- In the navigation pane on the left, choose .
- Click the Local File tab. The Watermark Injection page is displayed.
- Click Add File and select the local image file to which you want to add watermarks.
- Watermark type can be visible watermark and invisible watermark.
- Visible watermark: Watermarks are visible on images.
- Invisible watermark: The watermark text is invisible and needs to be extracted using tools. For details about how to extract an invisible watermark, see Extracting Image Watermarks from an Image in an OBS Bucket and Extracting Watermarks from a Local Image.
- Set the watermark parameters according to Table 3.
Table 3 Watermark settings Watermark Type
Parameter
Description
Visible watermark
Watermark Content
Select the watermark content from the drop-down list box.
- Image watermark
- Text watermark.
Watermark Image
When Watermark Content is set to Image watermark, click Add File to add an image as the watermark.
The watermark image must be in the same area as the original image. Otherwise, the preview fails.
Text Content
This parameter is displayed when Watermark Content is set to Text watermark. Enter the text watermark content in the text box. The value can contain 1 to 32 characters. Only numbers and letters are supported.
Watermark Position
Select the position where the watermark is injected.
Image Size
Absolute size of the image to be injected. This parameter is displayed when Watermark Content is set to Image watermark. The value ranges from 0 to 100.
Watermark Size
Size of the text watermark to be injected. This parameter is displayed when Watermark Content is set to Text watermark. The value ranges from 1 to 100.
Watermark Transparency
Transparency of the watermark to be injected. The value ranges from 1 to 100.
Horizontal Margin
Horizontal margin of the watermark to be injected relative to the image. The value ranges from 0 to 100.
Vertical Margin
Vertical margin of the watermark to be injected relative to the image. The value ranges from 0 to 100.
Font Color
This parameter is displayed when Watermark Content is set to Text watermark. You can click the color bar to select the font color of the text watermark to be injected.
Invisible watermark
Watermark Content
Select the watermark content from the drop-down list box.
- Image watermark
- Text watermark.
Watermark Image
This parameter is displayed when Watermark Content is set to Image watermark. Click Add File to select a local image as the watermark.
Text Content
This parameter is displayed when Watermark Content is set to Text watermark. Enter the text watermark content in the text box. The value can contain 1 to 32 characters. Only digits and letters are supported.
Figure 4 Watermark settings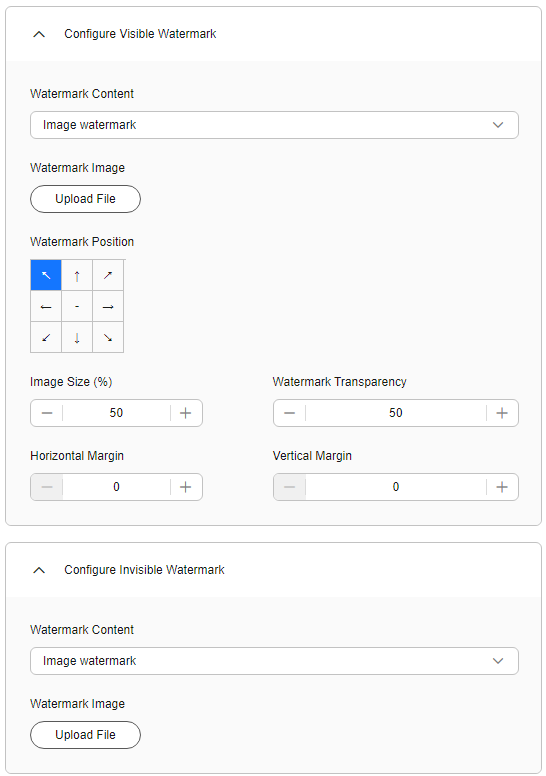
- After parameters are configured, click OK. The file with watermark injected is automatically downloaded to the specified path on the local PC.
- If you injected a visible watermark, open the target file to view the watermark.
- If you injected an invisible watermark, extract the watermark from the target file using tools. For details, see Extracting Image Watermarks from an Image in an OBS Bucket and Extracting Watermarks from a Local Image.
- Log in to the DSC console.
- Click
 in the upper left corner and select a region or project.
 - In the navigation pane on the left, choose .
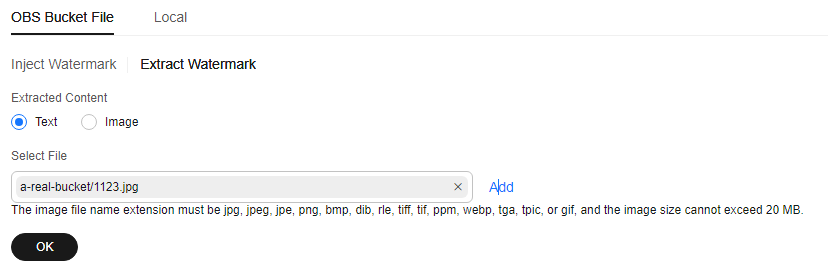
- Click the Watermark Extraction tab. The Watermark Extraction page is displayed.
- Select the content to be extracted.
- If Extracted Content is set to Text, click Add to select the image from which the watermark is to be extracted. Figure 5 Extracting text content
- If Extracted Content is set to Image:
- Click Add next to Select File and select the image from which you want to extract watermarks.
- Click Add next to Storage Destination Path and select the path for storing the extracted watermark image.
- In the Target Storage File field, enter the name of the watermark image file you want to extract. The file name extension must be jpg, jpeg, png, bmp, tiff, tif, tga or gif.
Figure 6 Extracting image content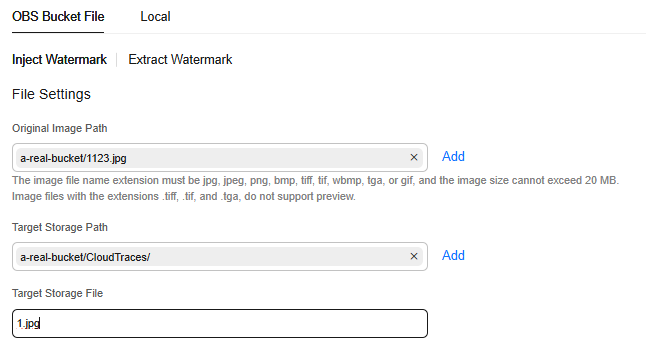
- If Extracted Content is set to Text, click Add to select the image from which the watermark is to be extracted.
- Click OK. If the Extracted Content is Text, the invisible watermark content is displayed in the dialog box. If the Extracted Content is Image, view the image in the target storage path.
- Log in to the DSC console.
- Click
 in the upper left corner and select a region or project.
 - In the navigation pane on the left, choose .
- On the displayed page, choose . The Extract Watermark page is displayed.
- Select the Extracted Content.
- If the Extracted Content is Text, click Upload File to upload the local image whose invisible watermark needs to be extracted to the DSC platform.
- If the Extracted Content is Image, click Upload File to upload the target local image from to the DSC platform.
- After the file is uploaded, click OK and view the invisible watermark content.
Feedback
Was this page helpful?
Provide feedbackThank you very much for your feedback. We will continue working to improve the documentation.See the reply and handling status in My Cloud VOC.
For any further questions, feel free to contact us through the chatbot.
Chatbot


