
Creating a Flink SQL Job
This section describes how to create a Flink SQL job. You can use Flink SQLs to develop jobs to meet your service requirements. Using SQL statements simplifies logic implementation. You can edit Flink SQL statements for your job in the DLI SQL editor. This section describes how to use the SQL editor to write Flink SQL statements.
DLI Flink OpenSource SQL jobs are fully compatible with the syntax of Flink 1.10 and 1.12 provided by the community. In addition, Redis, GaussDB(DWS), and DIS data source types are added based on the community connector.
Prerequisites
- You have prepared the data input and data output channels. For details, see Preparing Flink Job Data.
- When you use a Flink SQL job to access other external data sources, such as OpenTSDB, HBase, Kafka, GaussDB(DWS), RDS, CSS, CloudTable, DCS Redis, and DDS, you need to create a datasource connection to connect the job running queue to the external data source.
- For details about the external data sources that can be accessed by Flink jobs, see Cross-Source Analysis Development Methods.
- For details about how to create a datasource connection, see Enhanced Datasource Connections. After a datasource connection is created, you can choose More > Test Address Connectivity in the Operation column on the Queue Management page to check whether the network connection between the queue and the external data source is normal. For details, see Testing Address Connectivity.
Precautions
Before creating jobs and submitting tasks, you are advised to enable CTS to record operations associated with DLI for later query, audit, and backtrack operations. DLI operations that can be recorded by CTS. For details, see DLI Operations That Can Be Recorded by CTS.
For details about how to enable CTS and view trace details, see Cloud Trace Service Getting Started.
Creating a Flink SQL Job
- In the left navigation pane of the DLI management console, choose > . The Flink Jobs page is displayed.
- In the upper right corner of the Flink Jobs page, click Create Job.
Figure 1 Creating a Flink SQL job
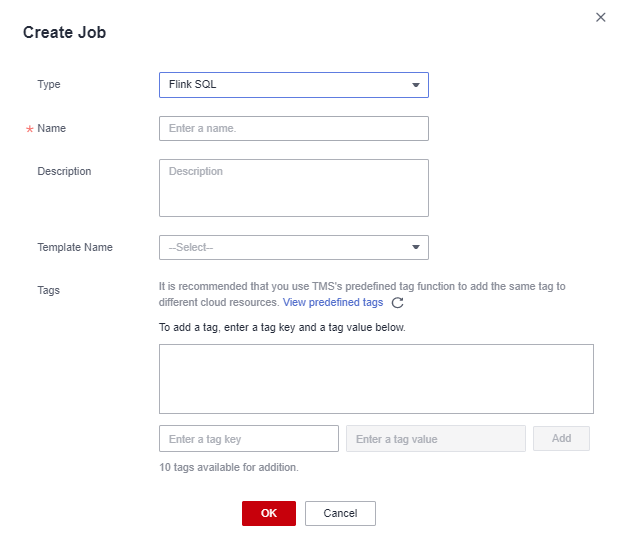
- Specify job parameters.
Table 1 Job configuration information Parameter
Description
Type
Set Type to Flink SQL. You will need to rewrite SQL statements to start the job.
Name
Name of a job. Enter 1 to 57 characters. Only letters, digits, hyphens (-), and underscores (_) are allowed.
NOTE:The job name must be globally unique.
Description
Description of a job. It can contain a maximum of 512 characters.
Template Name
You can select a sample template or a custom job template. For details about templates, see Managing Flink Templates.
Tag
Tags used to identify cloud resources. A tag includes the tag key and tag value. If you want to use the same tag to identify multiple cloud resources, that is, to select the same tag from the drop-down list box for all services, you are advised to create predefined tags on the Tag Management Service (TMS).
If your organization has configured tag policies for DLI, add tags to resources based on the policies. If a tag does not comply with the tag policies, resource creation may fail. Contact your organization administrator to learn more about tag policies.
For details, see Tag Management Service User Guide.
NOTE:- A maximum of 20 tags can be added.
- Only one tag value can be added to a tag key.
- The key name in each resource must be unique.
- Tag key: Enter a tag key name in the text box.
NOTE:
A tag key can contain a maximum of 128 characters. Only letters, digits, spaces, and special characters (_.:=+-@) are allowed, but the value cannot start or end with a space or start with _sys_.
- Tag value: Enter a tag value in the text box.
NOTE:
A tag value can contain a maximum of 255 characters. Only letters, digits, spaces, and special characters (_.:=+-@) are allowed. The value cannot start or end with a space.
- Click OK to enter the editing page.
- Edit a Flink SQL job.
Enter details SQL statements in the statement editing area. For details about SQL syntax, see the Data Lake Insight SQL Syntax Reference.
- Click Check Semantics.
- You can Debug or Start a job only after the semantic verification is successful.
- If verification is successful, the message "The SQL semantic verification is complete. No error." will be displayed.
- If verification fails, a red "X" mark will be displayed in front of each SQL statement that produced an error. You can move the cursor to the "X" mark to view error details and change the SQL statement as prompted.
- Set job running parameters.
Table 2 Running parameters Parameter
Description
Queue
A shared queue is selected by default. You can select a custom queue as needed.
NOTE:- During job creation, a sub-user can only select a queue that has been allocated to the user.
- If the remaining capacity of the selected queue cannot meet the job requirements, the system automatically scales up the capacity and you will be billed based on the increased capacity. When a queue is idle, the system automatically scales in the queue.
UDF Jar
If you selected custom queues, you need to configure this parameter.
You can customize a UDF Jar file. Before you select a JAR file, upload the corresponding JAR package to the OBS bucket and choose to create a package. For details, see Creating a Package.
In SQL, you can call a user-defined function that is inserted into a JAR file.
CUs
Sum of the number of compute units and job manager CUs of DLI. CU is also the billing unit of DLI. One CU equals 1 vCPU and 4 GB.
The configured number of CUs is the number of CUs required for job running and cannot exceed the number of CUs in the bound queue.
Job Manager CUs
Number of CUs of the management unit.
Parallelism
Number of Flink SQL jobs that run at the same time Properly increasing the number of parallel threads improves the overall computing capability of the job. However, the switchover overhead caused by the increase of threads must be considered.
NOTE:- This value cannot be greater than four times the compute units (number of CUs minus the number of job manager CUs).
- The priority of the number of parallel tasks on this page is lower than that set in the code.
Task Manager Configuration
Whether to set Task Manager resource parameters
If this option is selected, you need to set the following parameters:
- CU(s) per TM: Number of resources occupied by each Task Manager.
- Slot(s) per TM: Number of slots contained in each Task Manager.
OBS Bucket
OBS bucket to store job logs and checkpoint information. If the selected OBS bucket is not authorized, click Authorize.
NOTE:If Enable Checkpointing and Save Job Log are both selected, you only need to authorize OBS once.
Save Job Log
Whether to save the job running logs to OBS The logs are saved in the following path: Bucket name/jobs/logs/Directory starting with the job ID. To go to this path, go to the job list and click the job name. On the Run Log tab page, click the provided OBS link.
CAUTION:You are advised to select this parameter. Otherwise, no run log is generated after the job is executed. If the job is abnormal, the run log cannot be obtained for fault locating.
If this option is selected, you need to set the following parameters:
OBS Bucket: Select an OBS bucket to store user job logs. If the selected OBS bucket is not authorized, click Authorize.NOTE:If Enable Checkpointing and Save Job Log are both selected, you only need to authorize OBS once.
Alarm Generation upon Job Exception
Whether to report job exceptions, for example, abnormal job running or exceptions due to an insufficient balance, to users via SMS or email
If this option is selected, you need to set the following parameters:
SMN Topic
Select a user-defined SMN topic. For details about how to create a custom SMN topic, see "Creating a Topic" in Simple Message Notification User Guide.
Enable Checkpointing
Whether to enable job snapshots. If this function is enabled, jobs can be restored based on the checkpoints.
If this option is selected, you need to set the following parameters:- Checkpoint Interval indicates the interval for creating checkpoints. The value ranges from 1 to 999999, and the default value is 30.
- Checkpoint Mode can be set to either of the following values:
- At least once: Events are processed at least once.
- Exactly once: Events are processed only once.
- OBS Bucket: Select an OBS bucket to store your checkpoints. If the selected OBS bucket is not authorized, click Authorize.
The checkpoint path is Bucket name/jobs/checkpoint/Directory starting with the job ID.NOTE:
If Enable Checkpointing and Save Job Log are both selected, you only need to authorize OBS once.
Auto Restart upon Exception
Whether to enable automatic restart. If this function is enabled, any job that has become abnormal will be automatically restarted.
If this option is selected, you need to set the following parameters:
- Max. Retry Attempts: maximum number of retry times upon an exception. The unit is times/hour.
- Unlimited: The number of retries is unlimited.
- Limited: The number of retries is user-defined.
- Restore Job from Checkpoint: This parameter is available only when Enable Checkpointing is selected.
Idle State Retention Time
Defines for how long the state of a key is retained without being updated before it is removed in GroupBy or Window. The default value is 1 hour.
Dirty Data Policy
Select a policy for processing dirty data. The following policies are supported: Ignore, Trigger a job exception, and Save.
NOTE:Save indicates that the dirty data is stored to the OBS bucket selected above.
Dirty Data Dump Address
Set this parameter when Dirty Data Policy is set to Save. Click the address box to select the OBS path for storing dirty data.
- (Optional) Set the runtime configuration as required.
- Click Save.
- Click Start. On the displayed Start Flink Jobs page, confirm the job specifications and the price, and click Start Now to start the job.
After the job is started, the system automatically switches to the page, and the created job is displayed in the job list. You can view the job status in the column. After a job is successfully submitted, the job status will change from to . After the execution is complete, the message Completed is displayed.
If the job status is or , the job submission failed or the job did not execute successfully. In this case, you can move the cursor over the status icon in the column of the job list to view the error details. You can click
 to copy error information. After handling the fault based on the provided information, resubmit the job.
Other available buttons are as follows:
- Save As: Save the created job as a new job.
- Format: Format the SQL statements in the editing box.
- Set as Template: Set the created SQL statements as a job template.
- Theme Settings: Set the theme related parameters, including Font Size, Wrap, and Page Style.
- Help: Redirect to the help center to provide you with the SQL syntax for stream jobs.
Feedback
Was this page helpful?
Provide feedbackThank you very much for your feedback. We will continue working to improve the documentation.See the reply and handling status in My Cloud VOC.
For any further questions, feel free to contact us through the chatbot.
Chatbot


