
Managing Agents
If your data is stored in HDFS or a relational database, you can deploy an agent on the source network. CDM pulls data from your internal data sources through an agent but cannot write data into the databases.
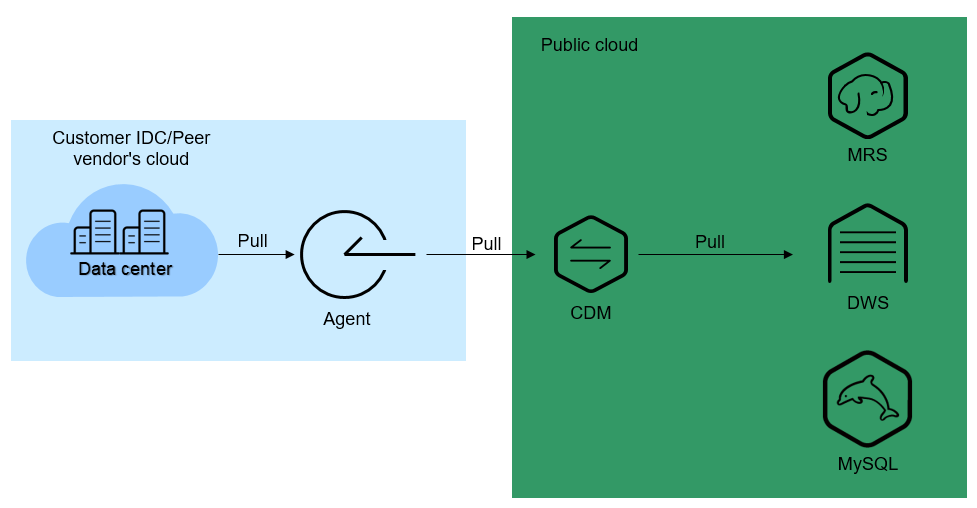
Figure 2 shows the process of using an agent.
Prerequisites
- A CDM cluster is available.
- A Linux server (for example, a Linux ECS) is available. The Linux server has no special requirements for vCPUs, memory, and disks, but must meet the following requirements:
- Java 8 (64-bit) has been installed and Java environment variables have been configured.
- User Ruby must be granted the write permission of the /tmp directory. If there is no user Ruby, create one.
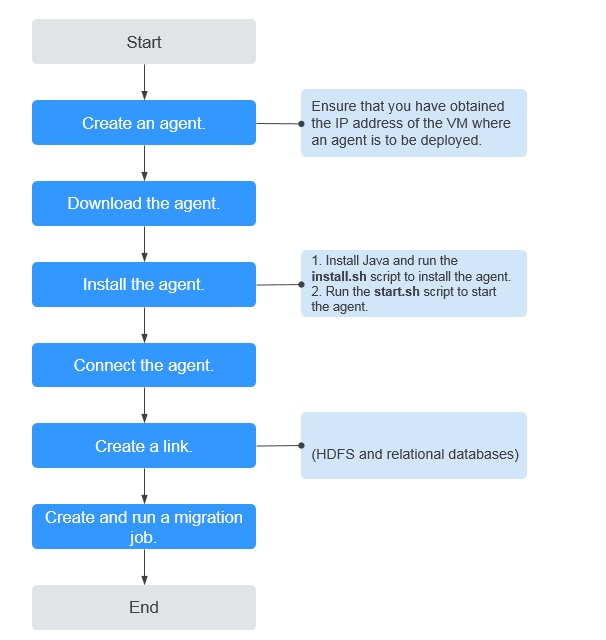
Creating an Agent
- Access the CDM console and choose Cluster Management in the left navigation pane. Locate the target cluster, choose , and configure agent parameters.
Figure 3 Creating an agent
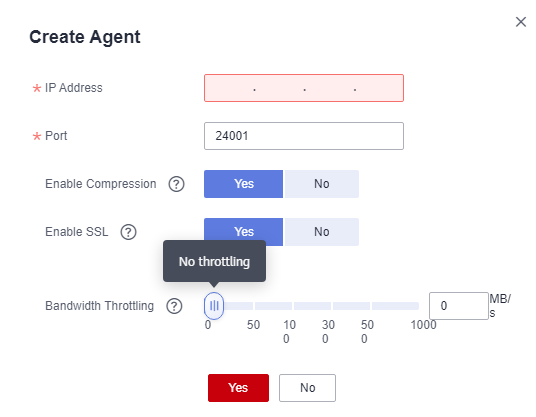
- IP Address: Set this parameter to the IP address of the server where the agent is deployed on the source network.
- Port: custom port of the agent Recommended value range: 1024–65535.
- Enable Compression: whether to compress data using the gzip algorithm.
- Enable this function for text data (data based on character encoding, such as MySQL INT data) because such data can be well compressed by the gzip algorithm. (For details about text data, see the related database documentation.)
- Disable this function for binary data (data based on value encoding, such as MySQL BINARY data) because such data has been compressed, and compressing it again will increase the workload to decompress data and undermine the performance of the client. (For details about text data, see the related database documentation.)
- Enable SSL: whether to enable two-way SSL authentication Enable this function if security is of high priority.
- Bandwidth Throttling: set the maximum downstream rate of the agent. By default, there is no throttling.
- Click OK. On the Agent Management page, view the created agent.
Installing and Starting an Agent
- On the Agent Management page, locate the created agent and click Download in the Operation column.
Figure 4 Downloading an agent

- Upload the downloaded agent package to the target Linux server.

The Linux server has no special requirements for vCPUs, memory, and disks, but must meet the following requirements:
- Java 8 (64-bit) has been installed and Java environment variables have been configured.
- User Ruby must be granted the write permission of the /tmp directory. If there is no user Ruby, create one.
- Decompress the package and run the following command to install the agent:
sh sbin/install.sh
- If you want to use the agent to connect to a relational database, you need to upload the corresponding drivers (see Managing Drivers) to the /server/jdbc directory in the agent installation directory and modify the version number of the corresponding database driver in the properties file in the same directory.
- Run the following command as user root to change the owner and group of the driver uploaded to the /server/jdbc directory to Ruby:
chown Ruby.Ruby * -R
- After the installation is complete, run the following commands to start the agent:
su Ruby
sh sbin/start.sh
- Run the following command to check whether the agent is started:
ps -ef | grep cdm
If the command output contains the running agent process, the agent process has been started.
Connecting to an Agent
- On the Agent Management page, locate the created agent and click Connect in the Operation column.
Figure 5 Connecting to an agent

- After the agent is successfully connected, you can select it when creating a connection.
Feedback
Was this page helpful?
Provide feedbackThank you very much for your feedback. We will continue working to improve the documentation.See the reply and handling status in My Cloud VOC.
For any further questions, feel free to contact us through the chatbot.
Chatbot


